Evaluation Operation Process
After completing registration and filling in personal information as required for evaluation participation, users need to wait for platform approval. Once approved, users can log in and click the [Evaluation Console] button to enter the Evaluation Console Page. Click [Create Evaluation] to enter the parameter configuration interface. The first step is to select one of the five evaluation domains, followed by further parameter configuration.
Selection of Different Evaluation Domains
NLP Domain Model Evaluation
Create Evaluation
On the Create Evaluation page, users can click the [NLP] evaluation domain, fill in the relevant parameters, and click Submit to proceed to the Model Evaluation Instance Details page.
In the parameter input interface, the basic information that needs to be filled out includes:

Form Details:
| Parameter Category | Parameter Name | Parameter Description |
|---|---|---|
| Basic Information | Evaluation Domain |
|
| Model Name |
| |
| Description |
| |
| Evaluation Dataset |
| |
| Deployment Method | Choose one of the following two options:
| |
| Evaluation Dimension |
|
Depending on the selected deployment method in the basic information section, different forms need to be filled out:
| Deployment Method | Parameter Category | Parameter Name | Parameter Description | Picture example |
|---|---|---|---|---|
| Private Deployment | Environment Configuration | Select the image |
| 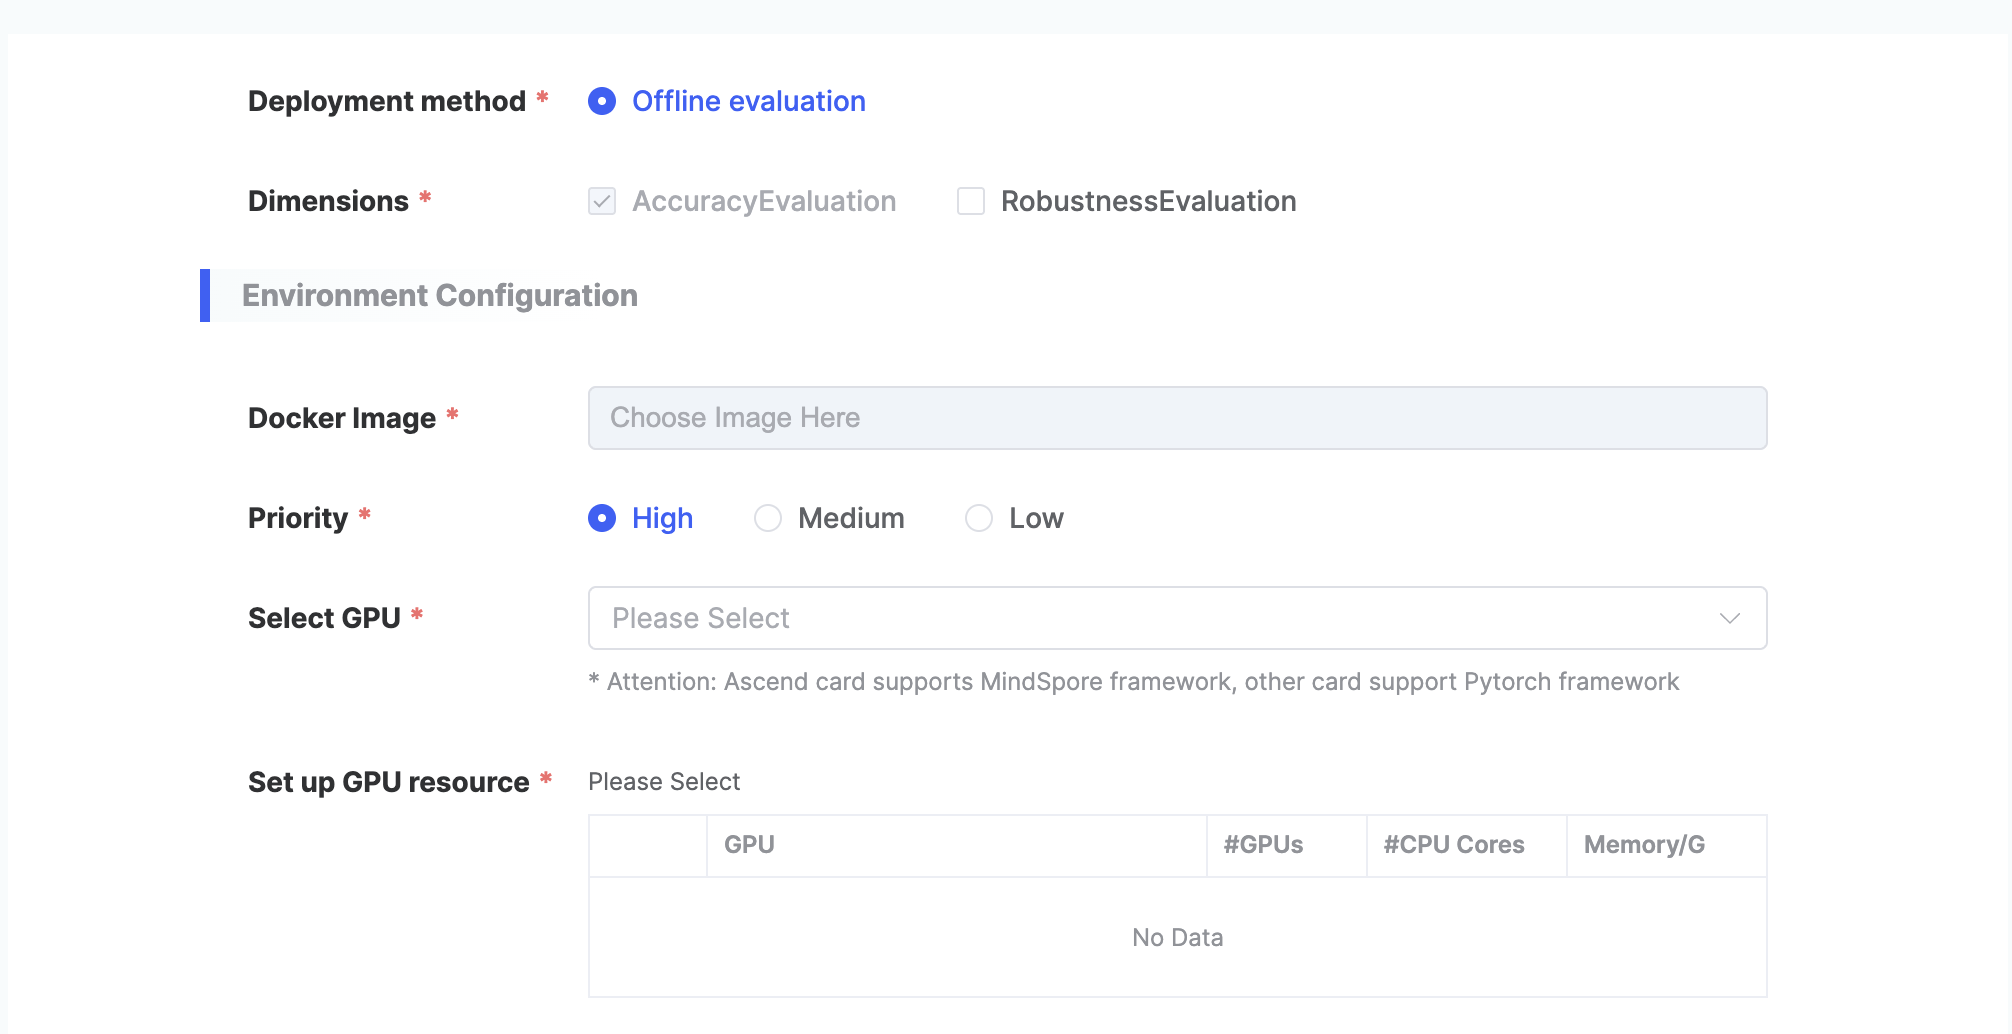 |
| Task Priority |
| |||
| Select GPU Type |
| |||
| Set Resources |
| |||
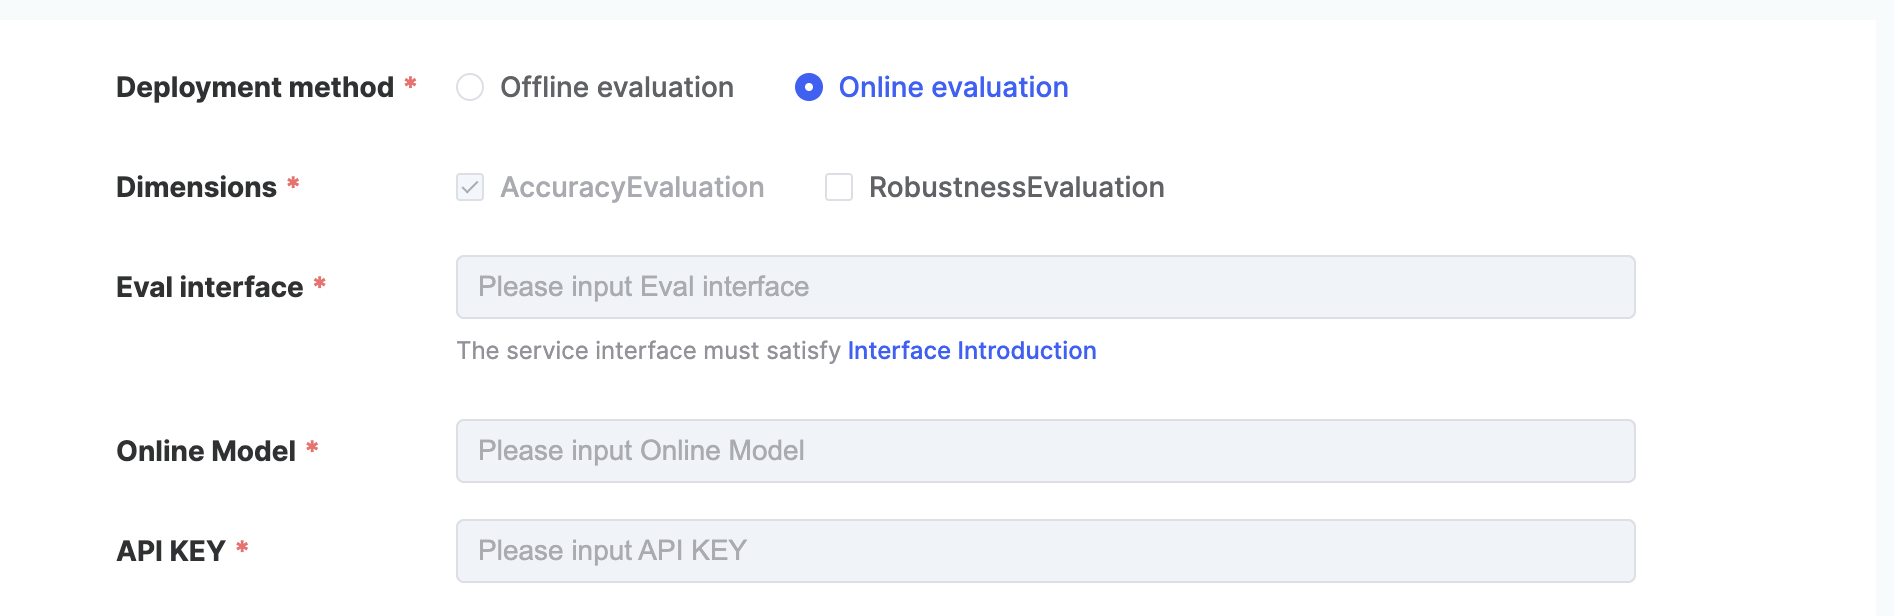
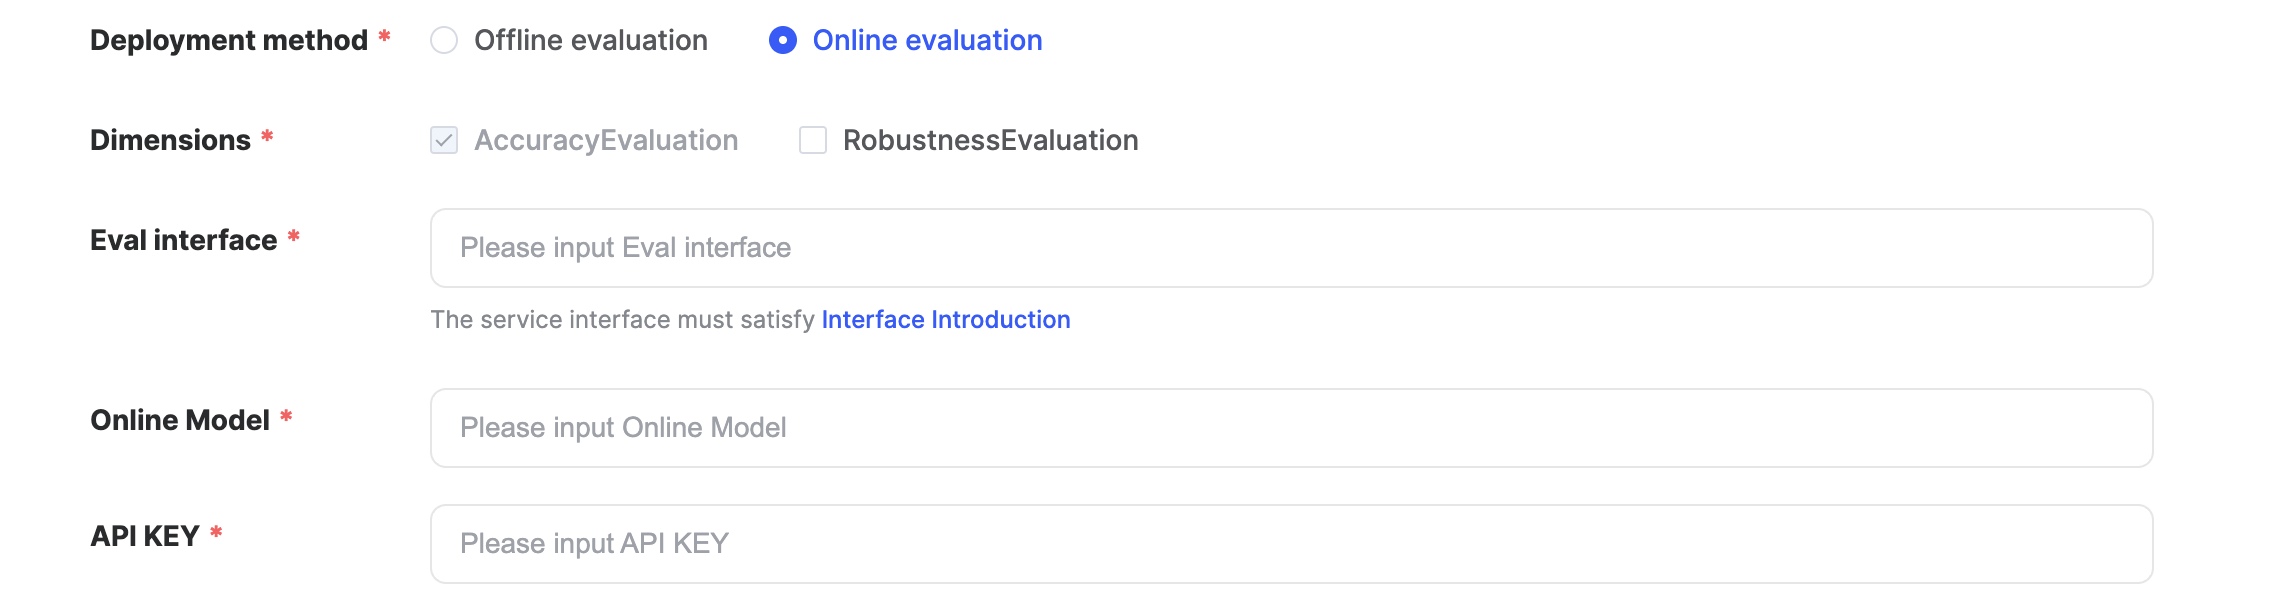
| API TEST | Basic Information | Eval interface |
|  |
| Deployment Method |
| |||
| Online Model Name |
| |||
| Online API KEY |
|
This platform supports model evaluation in two ways: 【Offline Evaluation】 and 【Online Evaluation】
- 【Online Evaluation】:
- If online evaluation is chosen, it is necessary to prepare the standard format API interface and API key in advance in accordance with the FlagEval platform interface specification. FlagEval-API Interface Requirements
- Select 【Online Evaluation】in【Deployment method】
- Three parameters of「Eval interface」、「Online Model」、「API KEY」will automatically appear below when 【Online Evaluation】 is selected
- Complete the three parameters of 「Eval interface」、「Online Model」、「API KEY」
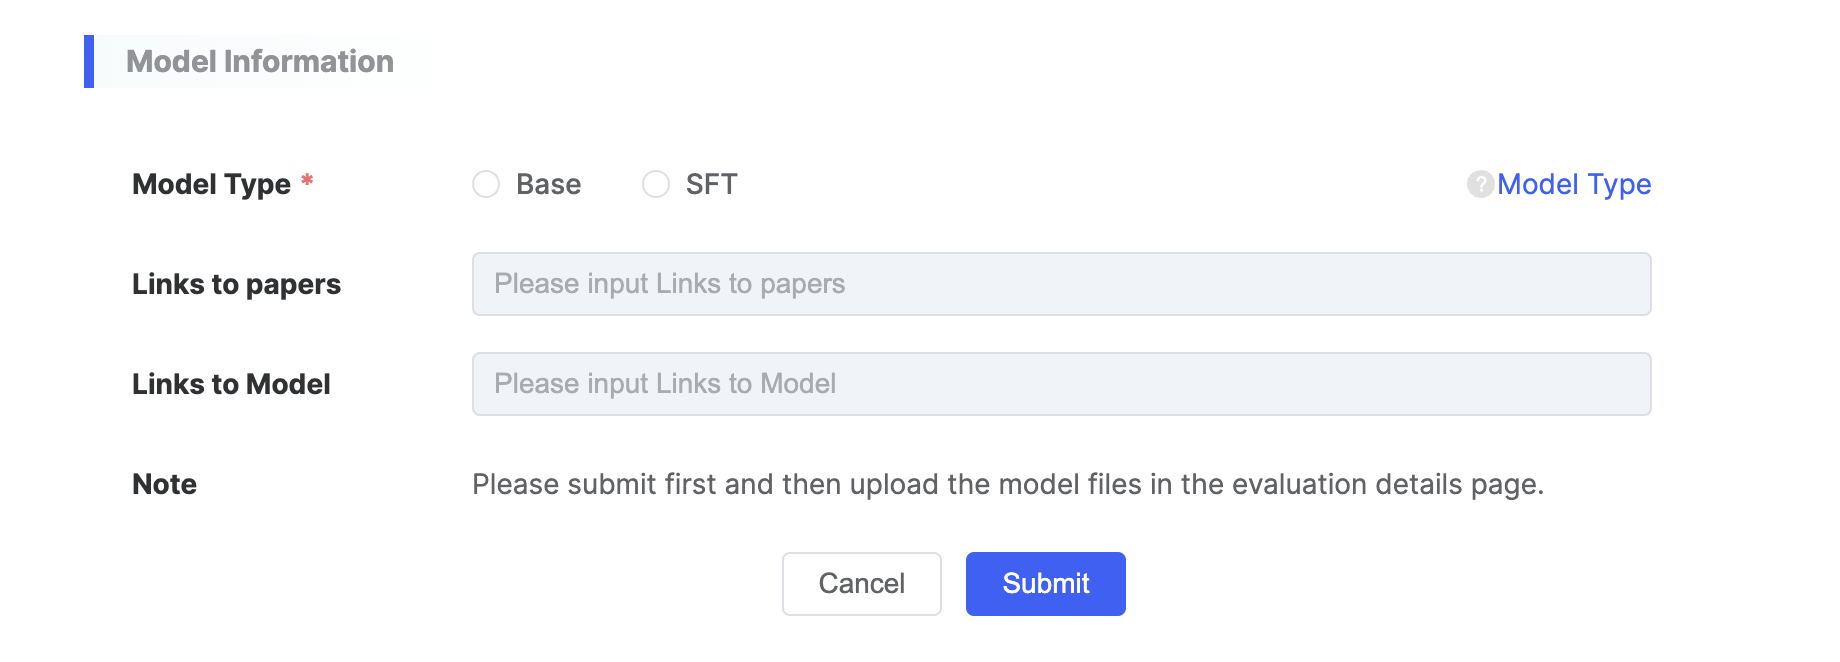
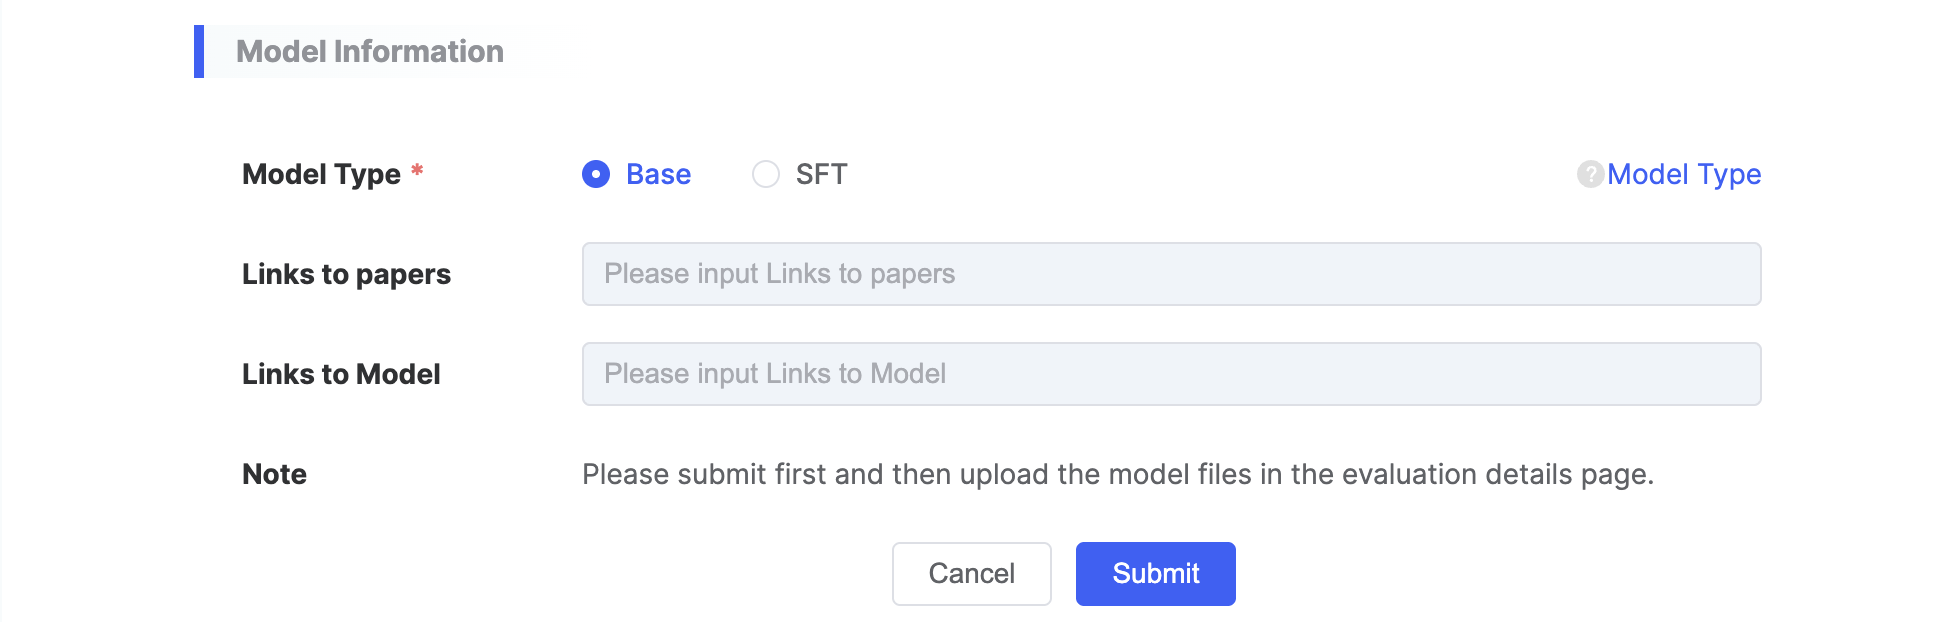
In addition to the information above, model-related details also need to be provided:
| Parameter Category | Parameter Name | Parameter Description |
|---|---|---|
| Model Information | Model Type |
|
| Paper Link | ||
| Model Link |
After the user checks the box “I acknowledge that manually labeled test set annotations must not be used during model training or in the submitted results,” the evaluation instance can be submitted. Upon submission, the system redirects to the Evaluation Instance Details Page, which is divided into three sections: upper, lower left, and lower right.
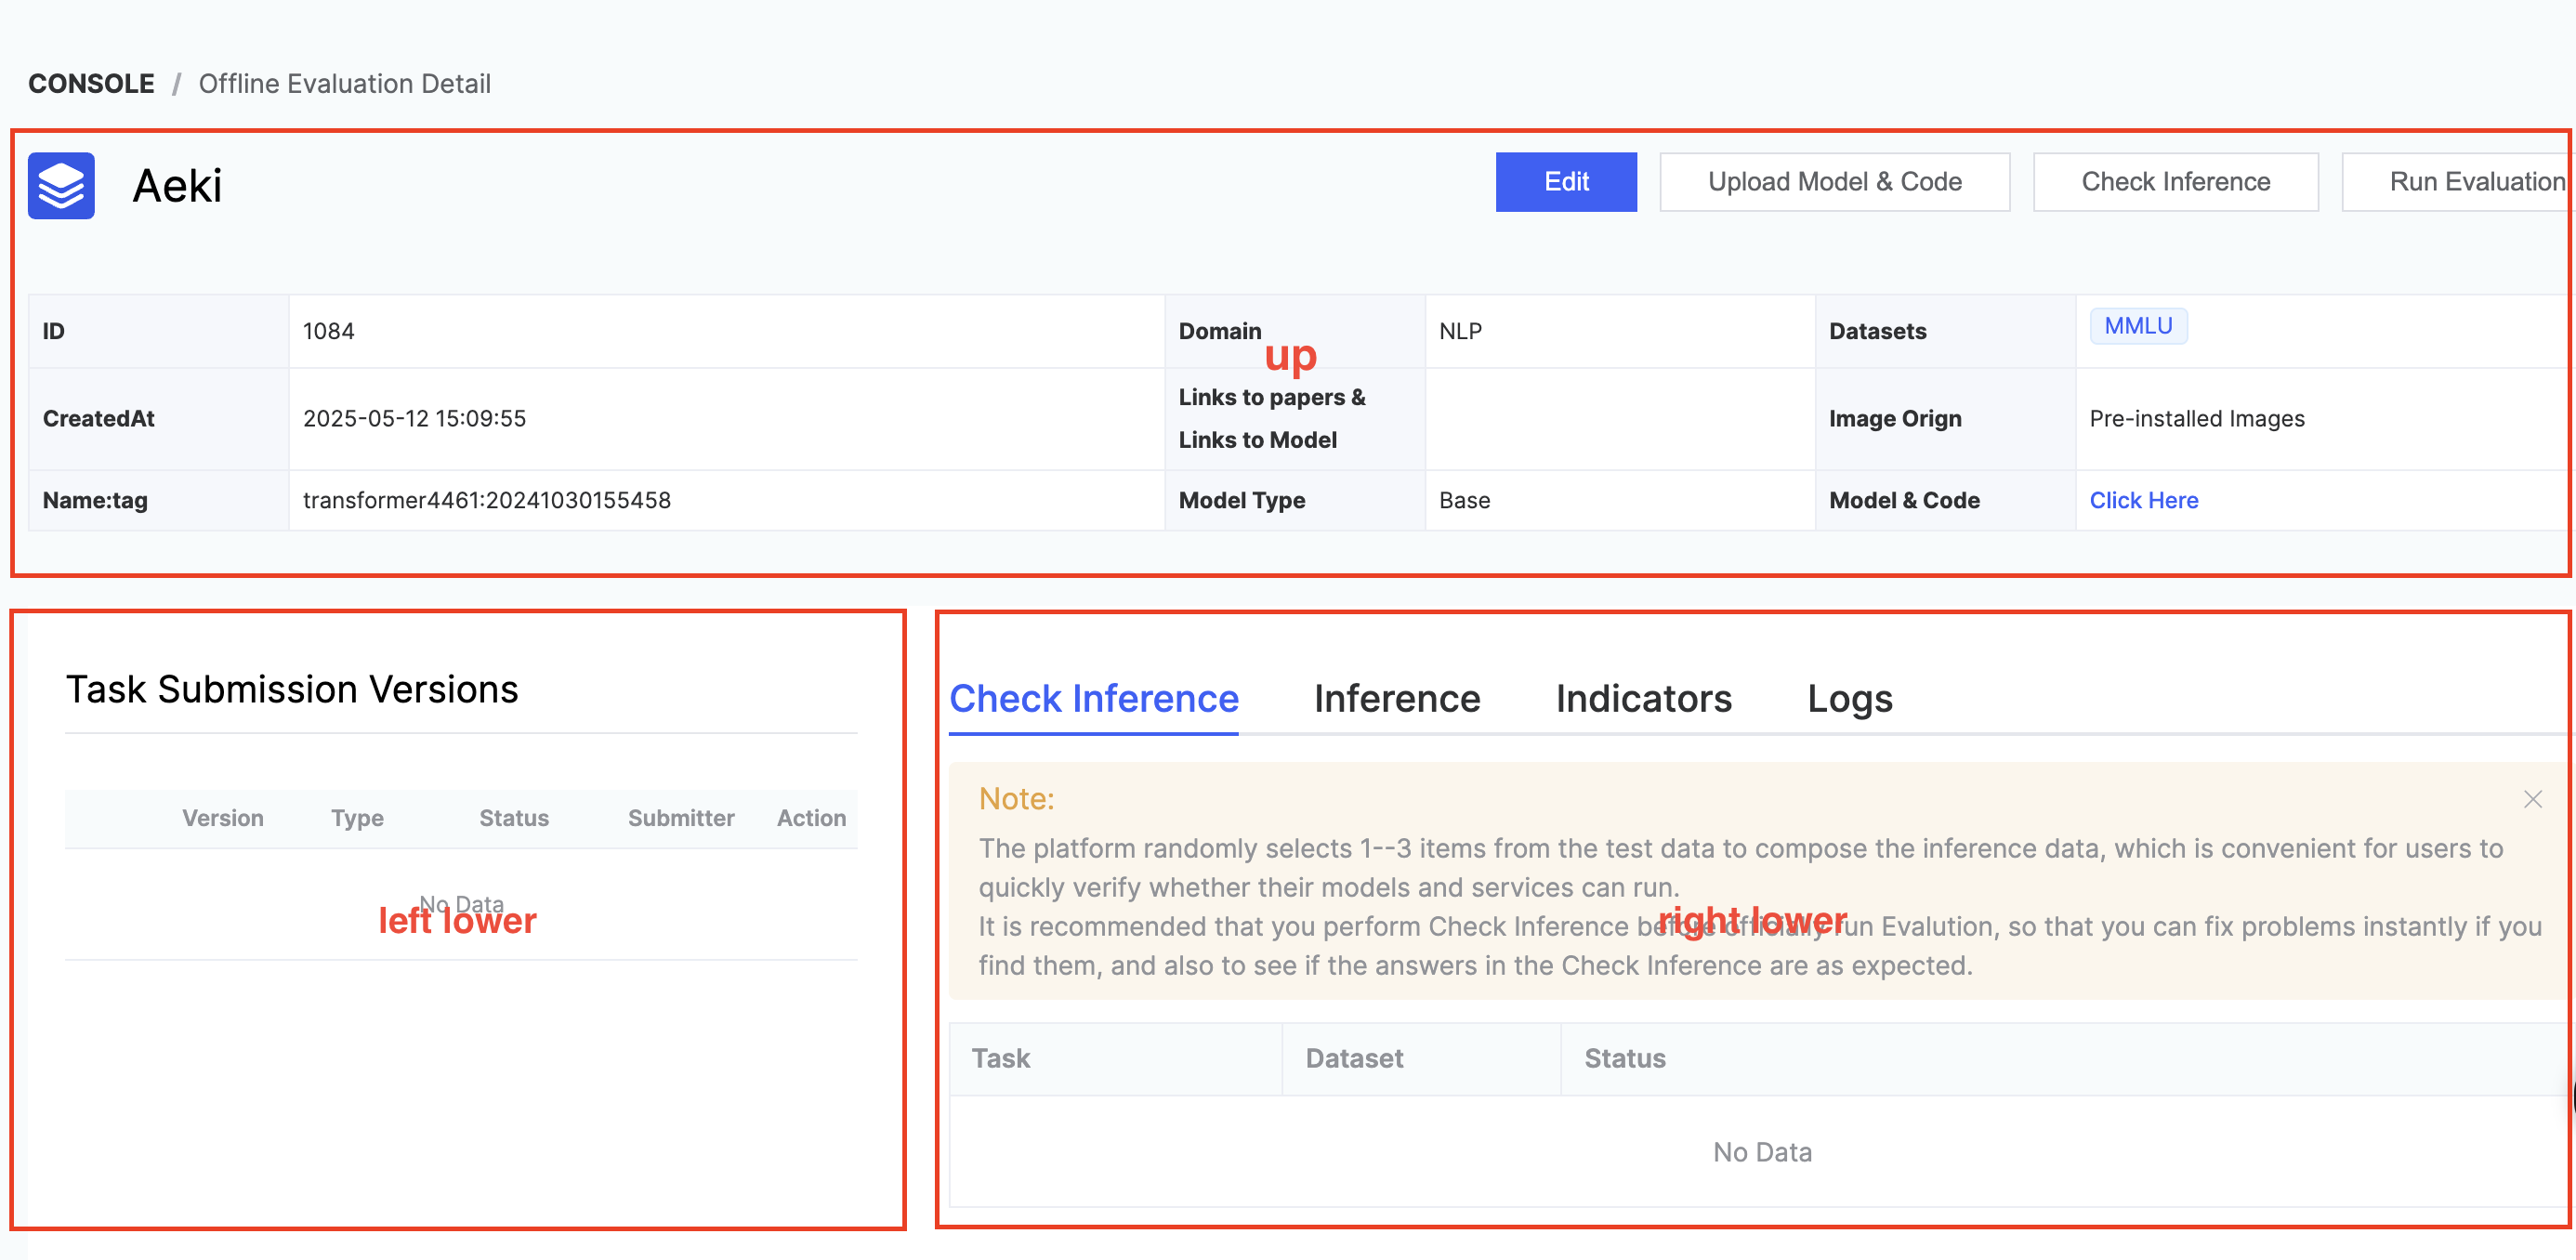
- Upper half:
- Display the specific paramters when the user [Create Evaluation].
- User operations include: [Edit], [Upload Model & Code], [Inference Verification], [Launch Inference Evaluation].
- [Edit] operation: editing is allowed except for the model name and evaluation domain.
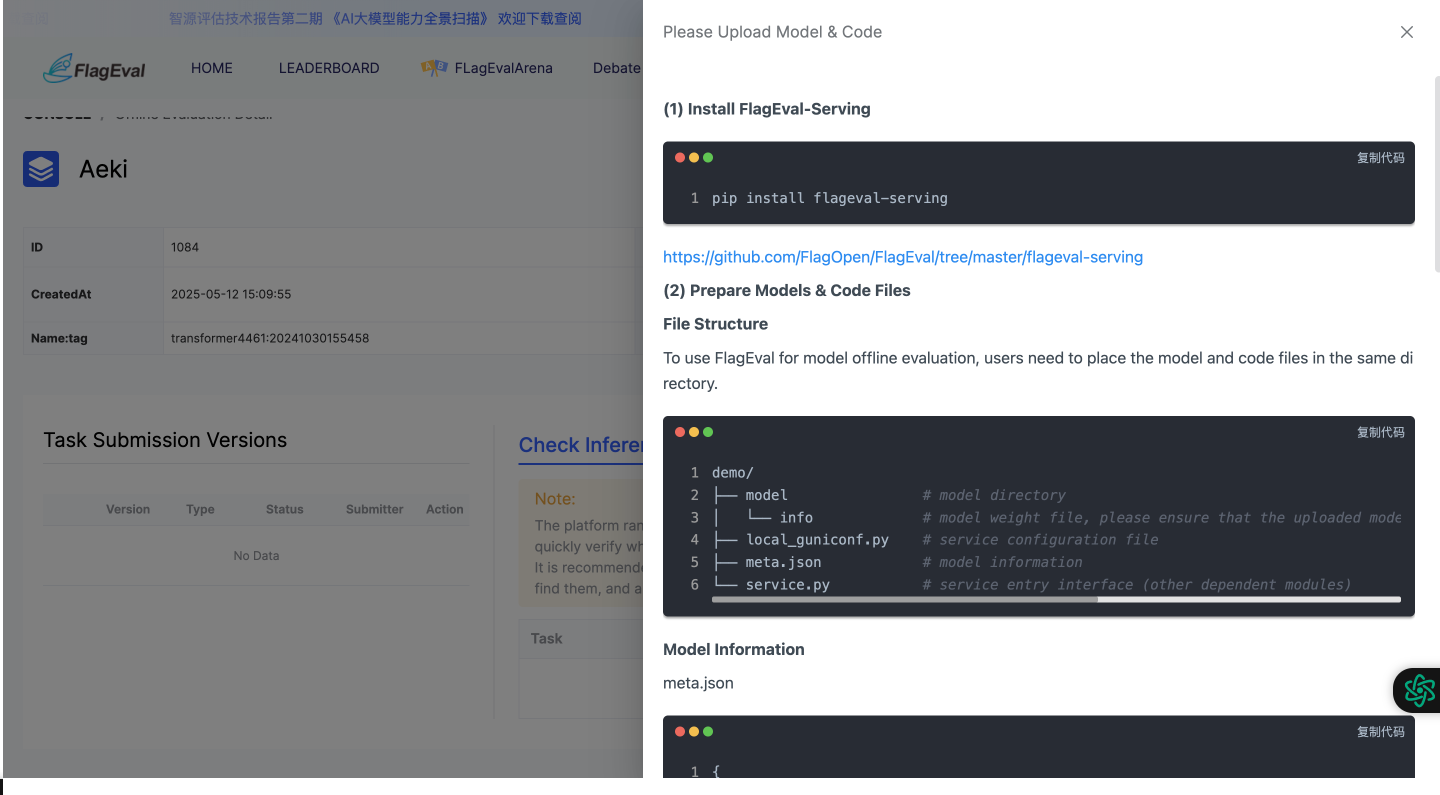
- [Upload Model & Code] operation: pop up the guide page for uploading model and code.
- [Inference Verification] operation:
- The platform randomly selects 1-3 pieces of data from the test data to form inference verification, making it convenient for users to quickly verify whether their models and services can run.
- It is recommended to conduct inference verification before officially launching the inference evaluation. If problems are found, they can be fixed immediately. You can also check whether the answers in the inference verification meet expectations.
- 【Launch Inference Evaluation] operation: after the user verifies that the model and service are free of problems, they can click to launch the inference evaluation. After launching, the entire inference evaluation process will last for several hours.
An email notification will be sent to the user when the evaluation task is completed.- Currently, it only supports single-machine inference evaluation.
- Lower left:
- Display the previous versions of inference launch and inference verification initiated by the user.
- Displayed parameters include: version, task type, status, submitter, operation.
- Task types include: inference verification & formal inference.
- [Stop] operation: click this operation to end the inference process.
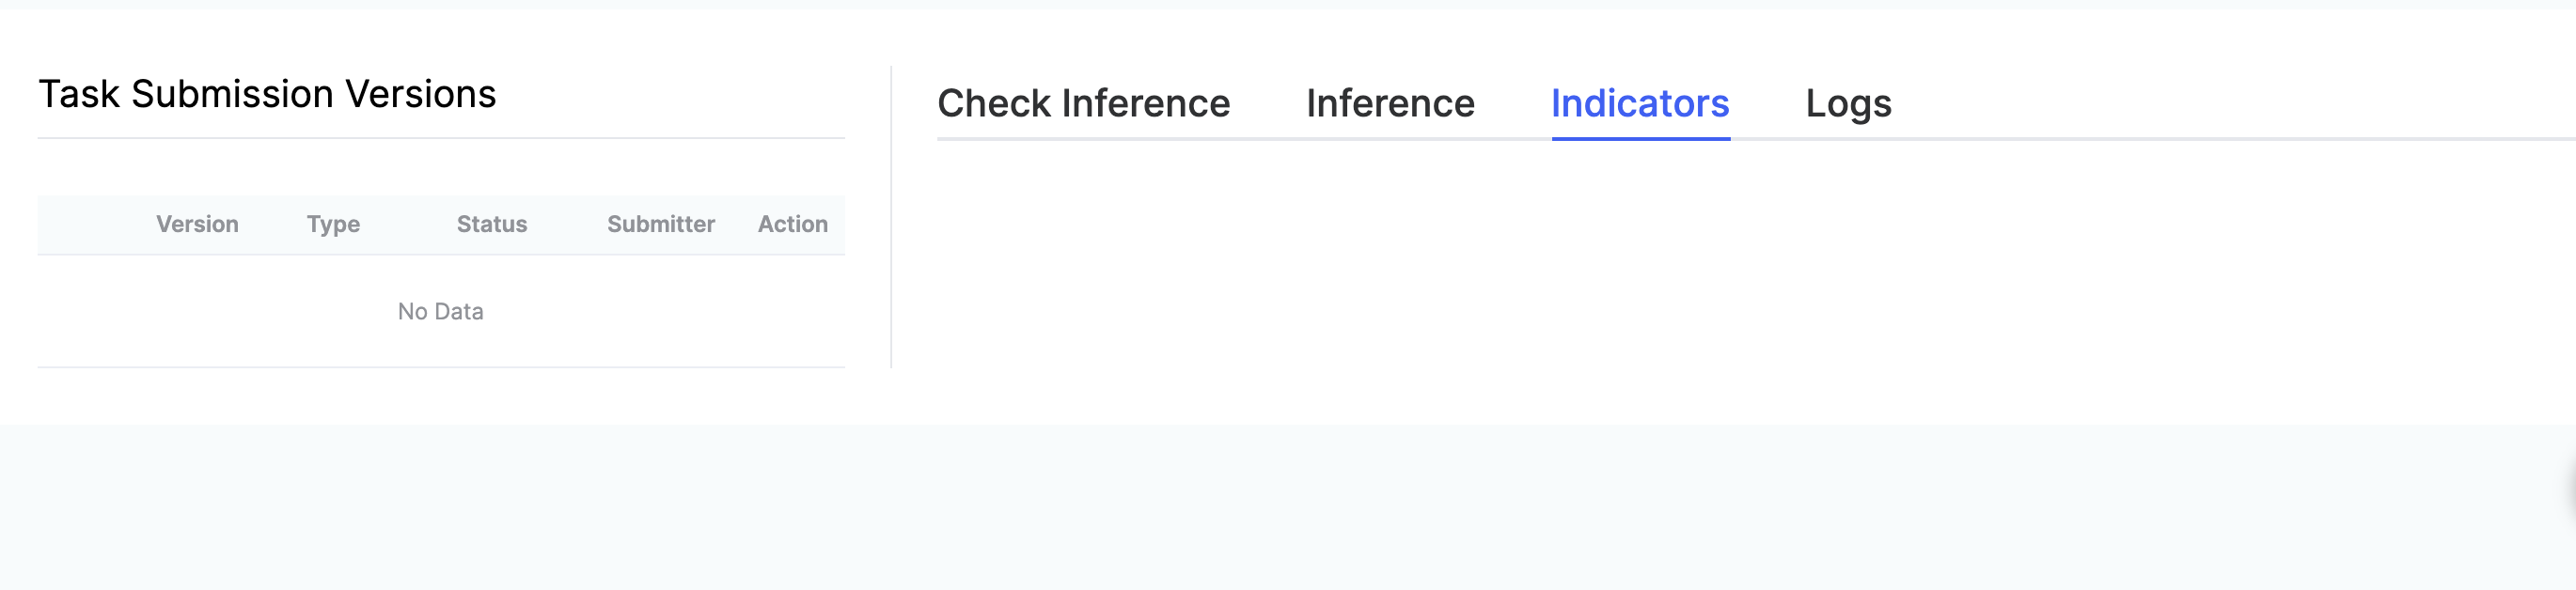
- Lower right: includes inference verification details page, model inference progress page, metrics details page, and log page
- Inference verification tab page: dataset progress display (task name, dataset name, status).
- Verification results - the platform provides partial inference results that users can confirm on their own. Data fields: ID, Dataset, Sample, Label, Predict.
- Inference verification tab page: dataset progress display (task name, dataset name, status).

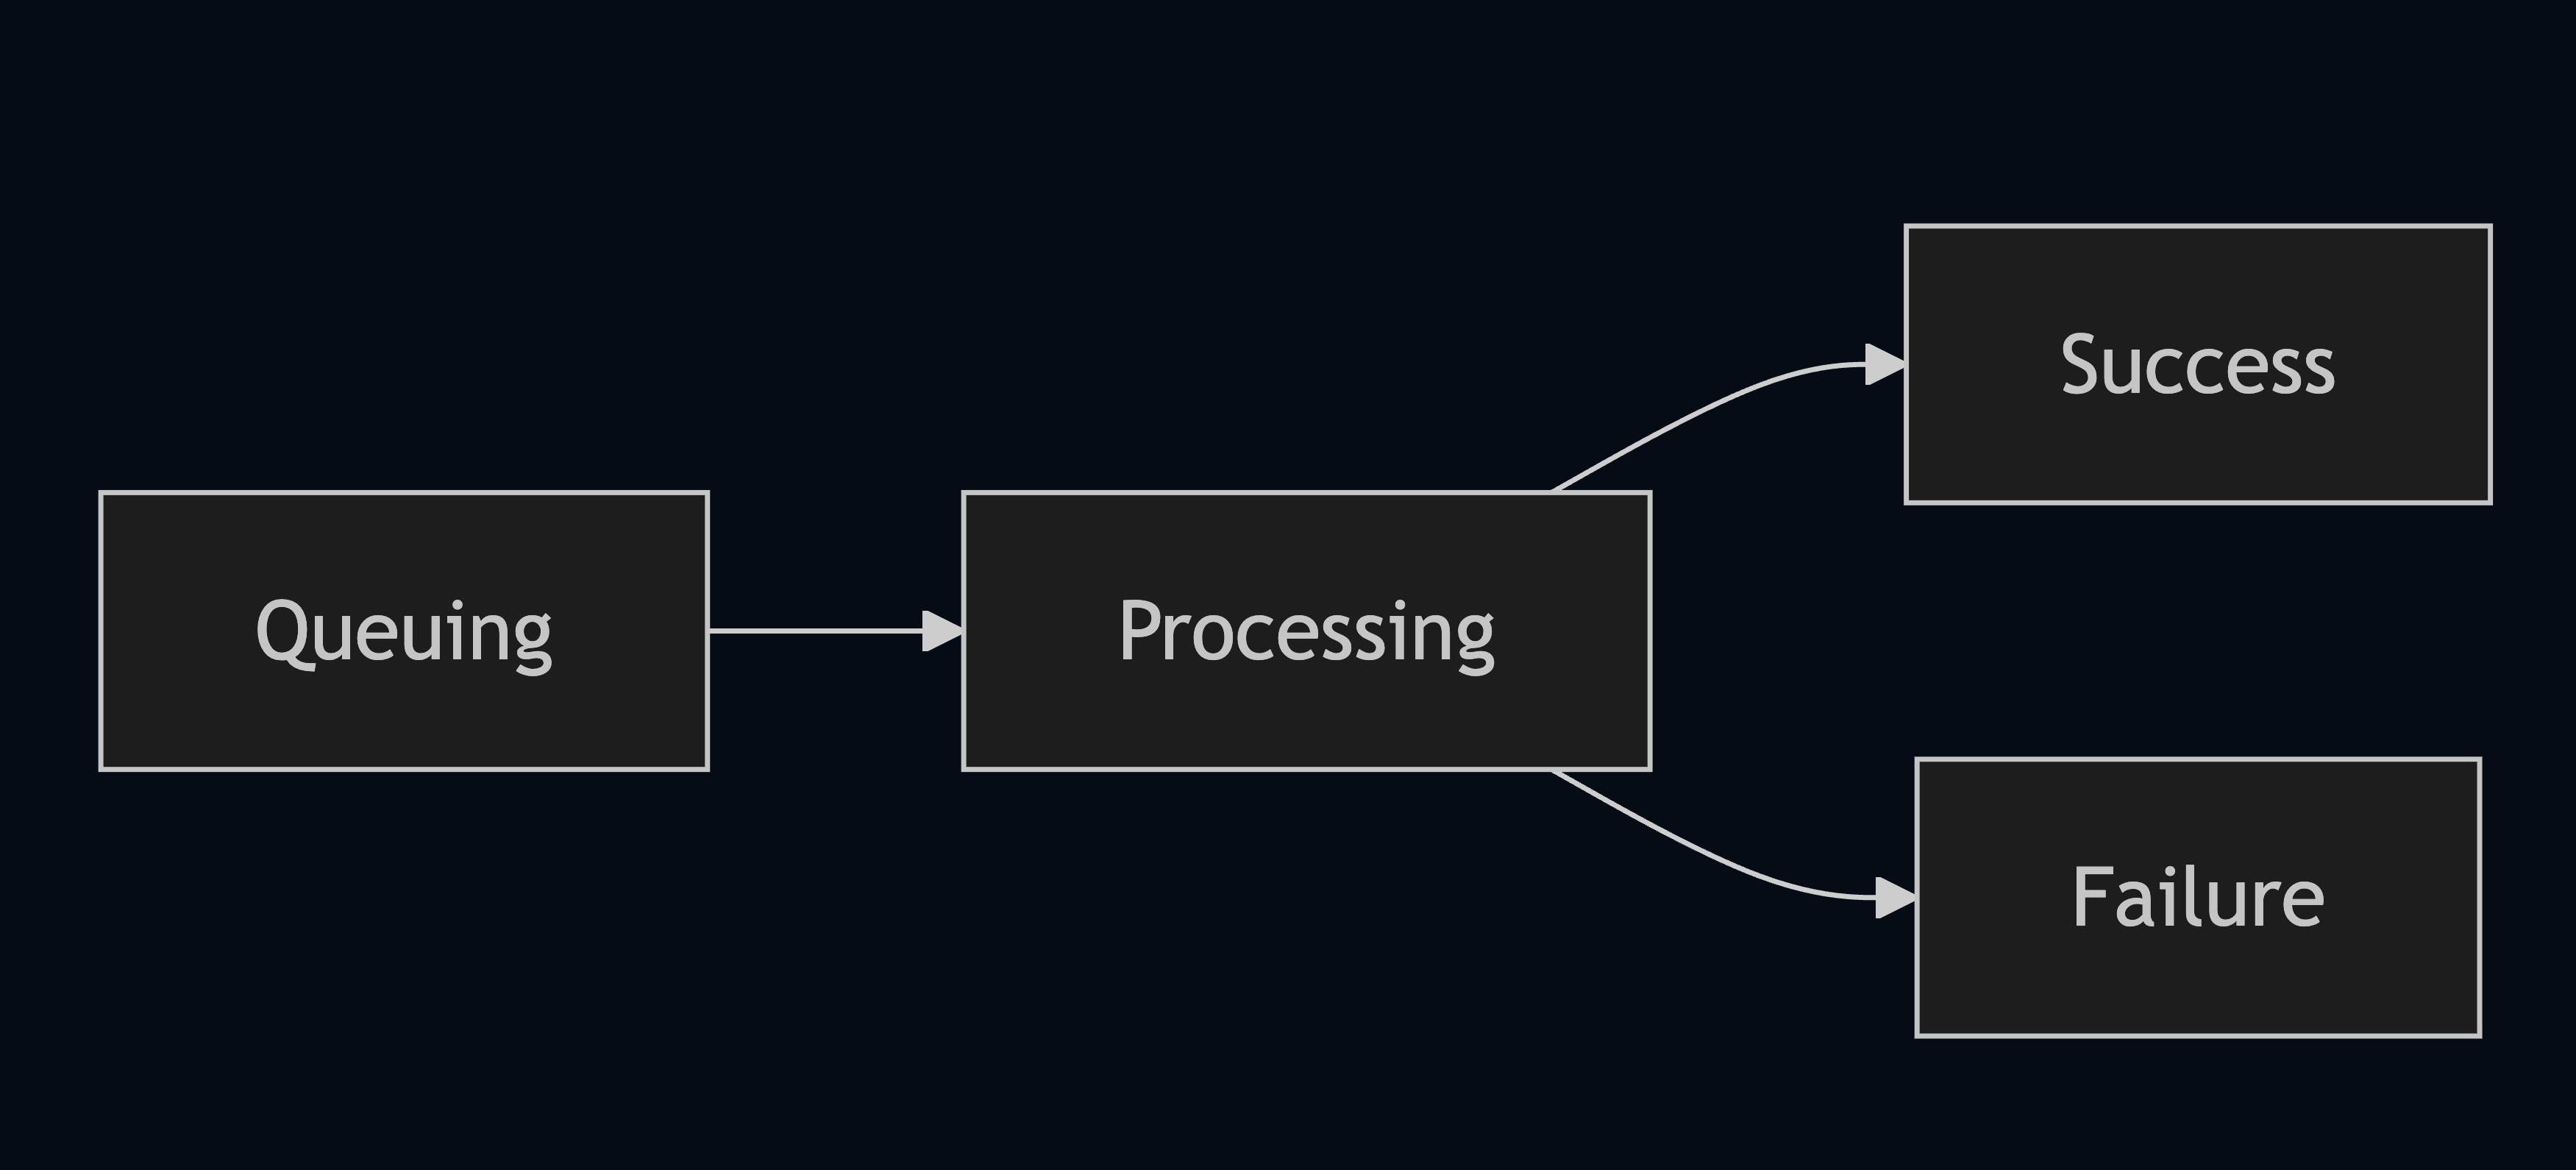
- Model inference progress tab page
- Mainly record inference submission time; task name, dataset name, status, start time, end time.
- Inference process: serial (task dataset) inference. The state flow of each dataset is shown in the following image.

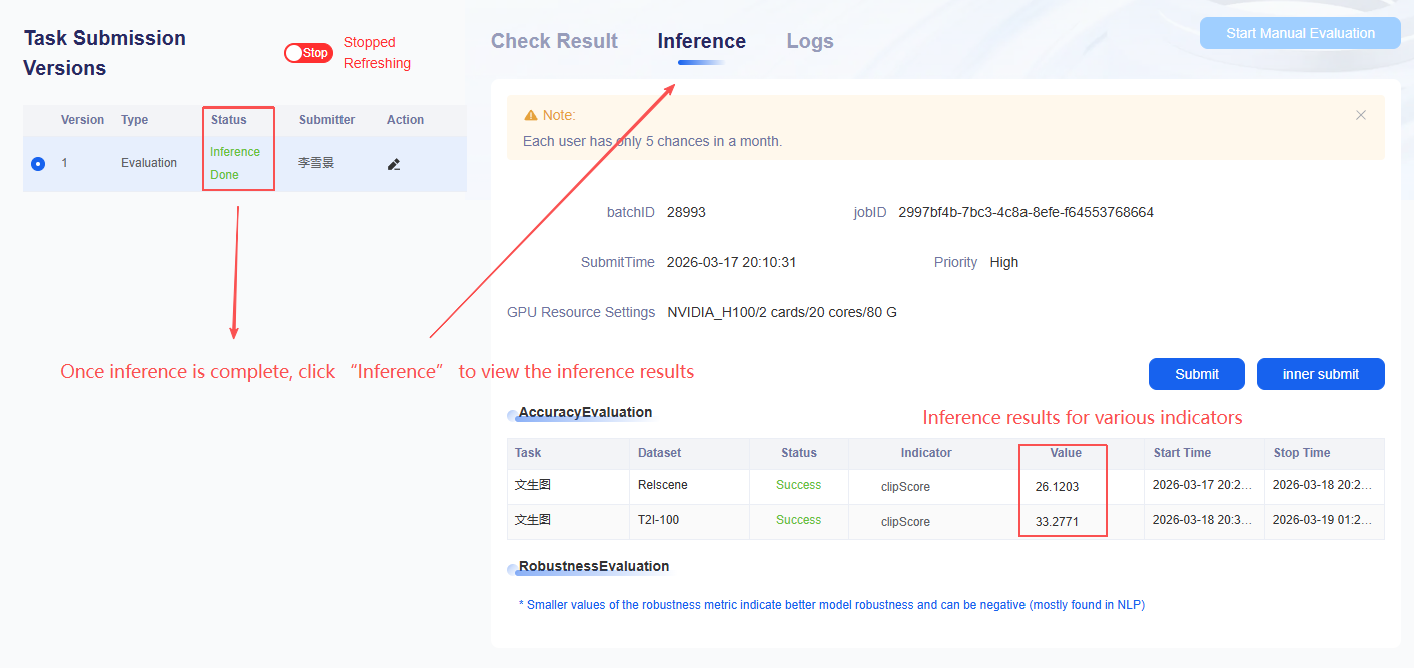
- Metrics Details Page: During the inference evaluation, users can view the performance results of datasets that have already been evaluated at any time. Each evaluation task will have its own calculated average score.
- After the entire inference task is completed, users can choose whether to submit to the leaderboard based on their scores, and can choose [anonymous submission] or [named submission].
- Users click the [named submission & anonymous submission] button to synchronize their scores to the NLP leaderboard, which is consistent with the format of the NLP leaderboard. Only the scores submitted by clicking will appear on the leaderboard.
- Named submission: display the real name and organization of the submitter; anonymous submission: display the real name and organization of the submitter as [anonymous]. Note:
- Users only have five opportunities per month to launch formal inference evaluations.
Subjective Inference Evaluation
If the user selects the [Chinese Open QA] task and uses the SFT model, it will involve subjective inference and evaluation. Due to the subjective inference evaluation requiring manual annotation evaluation, which is relatively expensive, each user is limited to a maximum of 2 manual evaluations per month. After completing the inference in [Chinese Open QA], click [Launch Manual Evaluation] button.
Preparation
(1) Install flageval-serving
pip install flageval-servingModel Weight Evaluation
The latest harness and harness-v0.4 now support evaluating model weights, and models can be loaded using transformers’ AutoModel.
Prepare Your Model
Directory Structure
demo/
├── myModel                # Model directory containing weights and config files
│   ├── config.json
│   ├── tokenizer_config.json
│   └── model.pt
└── meta.json              # Configuration information
Define Model Information meta.json
{
  // Supported evaluation methods
  "supported_evaluation_methods": [
      // FlagEval Serving method, requires service.py as described in documentation.
      // Can be used with HELM & Harness evaluation frameworks.
      // "flageval-serving",

      // HuggingFace pretrained model, specify model name or path here.
      // Can be used with lmeval, spor, and lang evaluation frameworks.
      "huggingface-pretrained"
  ],
  // Specify HuggingFace pretrained model path, supports:
  // 1. Local path starting with ./
  // 2. HuggingFace model name like "Qwen/Qwen-1_8B" from https://huggingface.co/Qwen/Qwen-1_8B
  "pretrained_model_path": "./myModel",
  "pretrained_model_name": "my/myModel",
  "pretrained_model_args": "attn_implementation=\"flash_attention_2\""
}
Upload Model
First, click “Model Upload” on the website to obtain a token, then run the following command:
flageval-serving upload --token='TOKEN' demoEvaluate Model via Serving (Legacy)
Prepare Model & Code
To integrate with FlagEval for offline evaluation, place the model and code in the same directory:
demo/
├── model                  # Model directory
│   └── info               # Model files
├── local_guniconf.py      # Gunicorn config
├── meta.json              # Model metadata
└── service.py             # Service entry (with other dependency modules)
Define Model Metadata
meta.json
"parameter_scale_billion": 7 // Model parameter scale in billionsDefine Service Need to defineservice.py in Service :
from flageval.serving.service import NLPModelService, NLPEvalRequest, NLPEvalResponse, NLPCompletion


class Service(NLPModelService):
    def global_init(self, model_path: str):
        print("Initial model with path", model_path)

    def infer(self, req: NLPEvalRequest) -> NLPEvalResponse:
        print(req)
        return NLPEvalResponse(
            completions=[
                NLPCompletion(
                    text='Hello, world!',
                    tokens='Hello, world!',
                ),
            ]
)- global_init used for model global initialization, called once when service starts;
- infer used to handle inference requests and is called during evaluation.
Debug Model Locally
You can run the debugging service using the command:
flageval-serving --service demo/service.py dev demo/modelThen test using a curl request:
curl -X POST http://127.0.0.1:5000/func -H 'Content-Type: application/json' -d '{
    "engine": "hello",
    "prompt": "hello",
    "temperature": 1.5,
    "num_return_sequences": 1,
    "max_new_tokens": 1,
    "top_p": 1,
    "echo_prompt": false,
    "top_k_per_token": 1,
    "stop_sequences": []
}'
Set Inference Worker Processes
By default, we use 1 progress to run the model inference service. If customization is required, you can adjust the workers configuration item in local_guniconf.py:
workers = 4 # Use 4 worker processesModel Upload
As before, get a token from the website and upload with:
flageval-serving upload --token='TOKEN' demoCV Domain Model Evaluation
Currently, the Flageval platform supports users in uploading pre-trained CV backbone models. Users can freeze the backbone parameters and fine-tune the model on different tasks and datasets to generate downstream task models. These models can then be evaluated through inference on the corresponding test datasets, yielding performance metrics specific to each dataset.
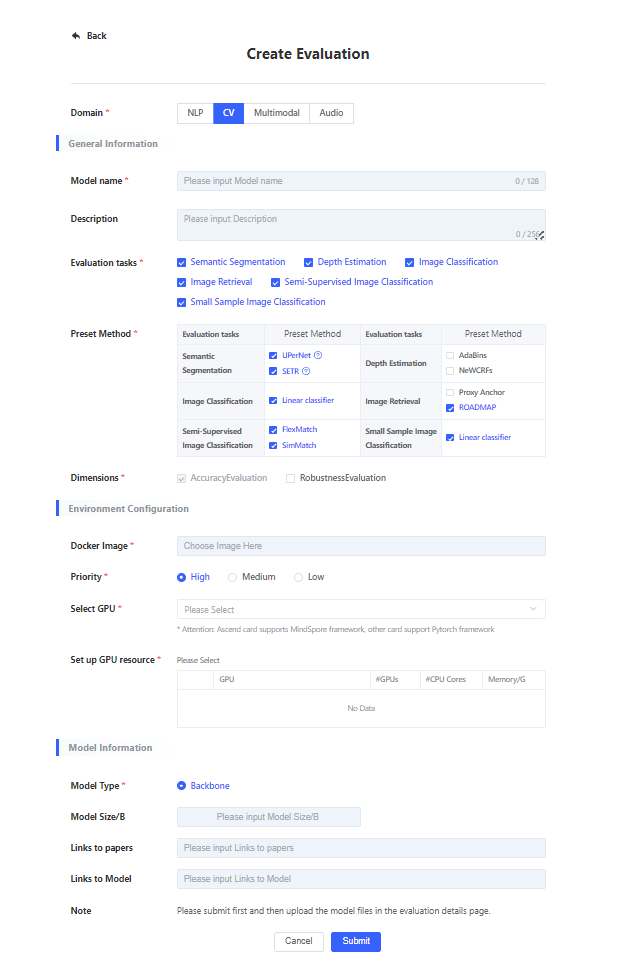
Create Evaluation
Users can click on [Create Evaluation] on the evaluation task list page, and a [Create Evaluation] dialog box will pop up. Fill in the relevant parameters and click submit to jump to the details page of the model evaluation instance.
| Parameter Category | Parameter Name | Parameter Description |
|---|---|---|
| Basic Information | Evaluation Domain | Select evaluation domain CV. Required, single choice. |
| Model Name | Enter the name of the model to be evaluated, required. Support uppercase and lowercase letters, numbers, middle hyphen -, underscore _, decimal point ., start with English letters, end with English letters and numbers, length 3–128. The name is unique on all platforms, duplicates not allowed. | |
| Description | Fill in the description information. Optional. Supports 0–256 visible characters. | |
| Evaluation task | Selection evaluation task. Required, multiple choice. Different tasks are associated with different adaptation methods. | |
| Adaptation Method | Please select the adaptation method to fine-tune. For details of adaptation methods, please refer to the task description. | |
| Evaluation Dimension | Required: Users can optionally choose to include robustness evaluation. Accuracy evaluation is a built-in option by default. | |
| Environment Configuration | Select Image | Required. Select the base image for task execution. Image encapsulates the software dependencies required for program execution and provides an operation environment for inference. Can choose [Platform Preset Image] or [User Self-Import Image] for image. If [Platform Preset Image] does not meet user needs, users can import their own image in [SUBMIT/Images Manage]. For details, please refer to image management. |
| Select Card Type | Select the card type required for evaluation. Required, single choice. Note: Ascend card type supports MindSpore framework, while other card types support Pytorch framework. | |
| Set Resources | Set the required resources based on the model size, only single-machine inference is supported. Required, single choice. After selecting a card type, if the set resource list is empty, it means that the card type has no resources temporarily. Please choose another card type. The platform will limit the maximum recourse value based on the model size. For example, in NLP model inference evaluation:
| |
| Model Information | Model Type | Currently, only Backbone pre-trained models are supported in the CV domain. |
Users submit the evaluation instance and jump to the evaluation instance details page, which is divided into three parts: upper, lower left, and lower right.
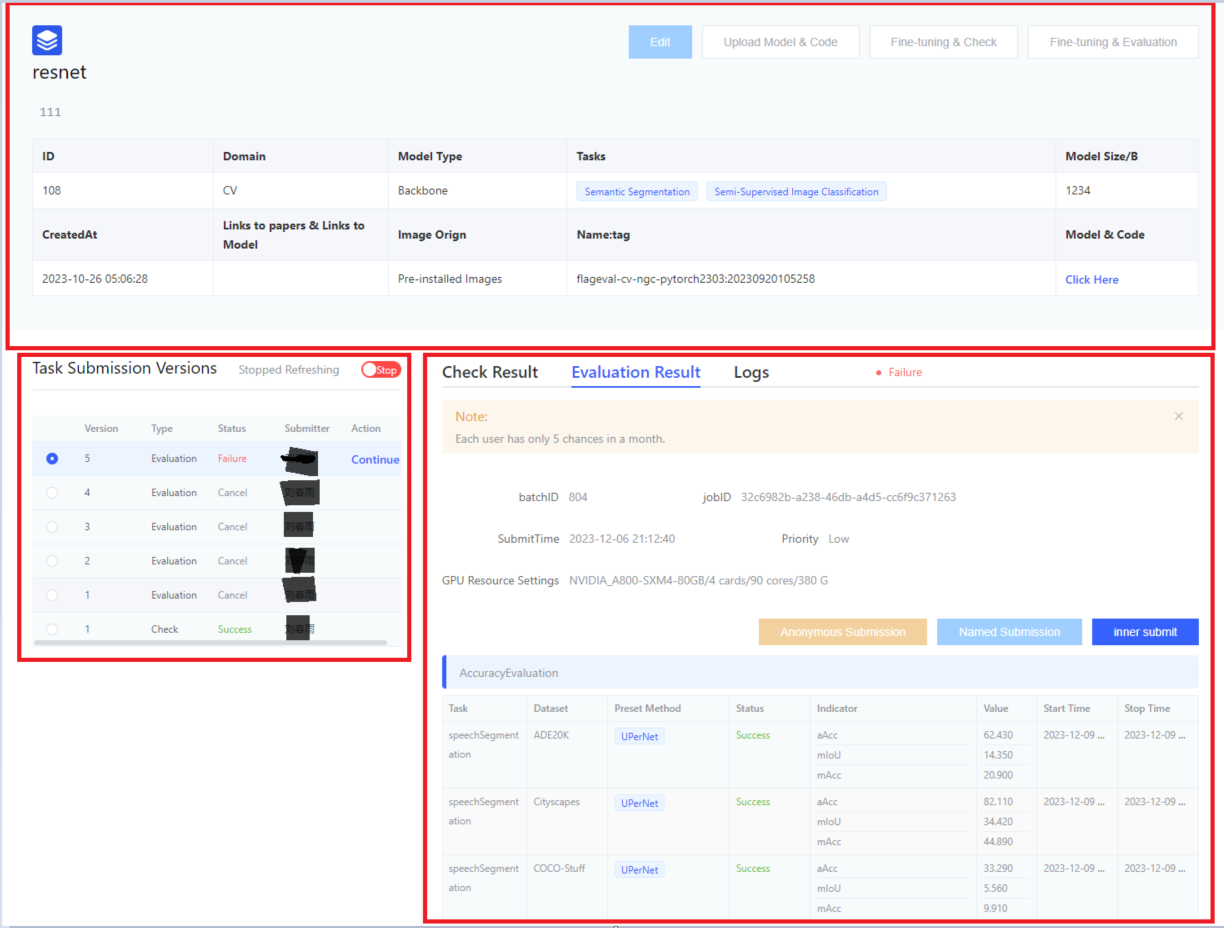
- Upper half:
- Display the specific paramters when the user [Create Evaluation].
- User operations include: [Edit], [Upload Model & Code], [Fine-Tuning & Inference Verification], [Fine-Tuning & Launch Inference Evaluation].
- [Edit] operation: editing is allowed except for the model name and evaluation domain.
- [Upload Model & Code] operation: pop up the guide page for uploading model and code.
- [Fine-Tuning & Inference Verification] operation:
- The platform randomly selects 1-3 epoch data from the verification data to form fine-tune verification data, making it convenient for users to quickly verify whether their models and services can run.
- It is recommended to conduct a verification process before officially launching fine-tuning & inference evaluation. If problems are found, they can be fixed immediately.
- [Fine-Tuning & Launch Inference Evaluation] operation: after the user verifies that the model and service are free of problems, they can click fine-tuning & launch inference evaluation. After launching, the entire fine-tuning + inference evaluation process will last for several hours.
An email notification will be sent to the user when the evaluation task is completed.- Currently, it only supports single-machine fine-tuning and inference evaluation.
- Lower left:
- Display the previous versions of inference launch and inference verification initiated by the user.
- Displayed parameters include: version, task type, status, submitter, operation.
- Task types include: inference verification & formal inference.
- [Stop] operation: click this operation to end the inference process.
- Lower right: includes verification details page, fine-tuning & inference details page, and log page
- Verification details page: dataset progress display (task name, dataset name, status).
- Fine-tuning & Inference details page
- Mainly record task name, dataset name, status, evaluation metrics, start time, end time.
- Log page
- If a task fails, users can locate the cause of failures by viewing the log.
Note::
- Users only have five opportunities per month to launch formal fine-tuning & inference evaluations.
Upload Model & Code Specifications
Open source sample code, please refer to GitHub (1) Install flageval-serving
pip install flageval-servingorpip install --upgrade flageval-servingRefer to https://github.com/FlagOpen/FlagEval/tree/master/flageval-serving
(2) Prepare Model & Code
- Directory Structure
The model and code need to be placed in the same directory. Open source sample code, please refer to GitHub
|—— demo| |—— meta.json| |—— model # Model related code, can be called by model_adapter.py| |—— checkpoint.pth| —— model_adapter.pyModel parameter file: place in model/checkpoint.pth. When the model is initialized, the model path will be passed through string checkpoint_path. Users can read it and initialize the model on their own. Note that the model name and location must be placed in the model directory whe uploading, and named after checkpoint.pth, otherwise the system will have error parsing.
- model_adapter.py
Provide an interface for obtaining the model through the model_init method of the ModelAdapter class, as shown below:
import os
import sys

# current_dir refers to the directory where model_adapter.py is located.
# If you need to access the file system, you can use current_dir. For example:
# abs_path = os.path.join(current_dir, yourfile)  # 'yourfile' is the relative path to your file

current_dir = os.path.dirname(os.path.abspath(__file__))
sys.path.append(current_dir)

from model.user_model import get_model  # noqa E402

class ModelAdapter:
    def model_init(self, checkpoint_path):
        model = get_model()
        # Initialize weights from the checkpoint path
return model- meta.json
Model configuration file that provides basic information about the model, where the train_batch_size and val_batch_size parameters are set to optional and default values are provided by the system.
{
    "model_name": "resnet_demo",
    "is_rgb": true,
    "output_channels": [256, 512, 1024, 2048], // Number of channels for features output by the backbone
    "output_dims": [4, 4, 4, 4], // Spatial dimensions of the features output by the backbone
    "mean": [123.675, 116.28, 103.53], // Mean values for input image preprocessing
    "std": [58.395, 57.12, 57.375], // Standard deviation values for input image preprocessing
    "tasks": {
        "classification": {
            "train_batch_size": 128,
            "val_batch_size": 128,
            "out_indices": [3]
        },
        "segmentation": { // Segmentation only supports features with an output_dim of 4
            "train_batch_size": 8,
            "val_batch_size": 8,
            "out_indices": [0, 1, 2, 3]
        },
        "semi_supervised_classification": {
            "train_batch_size": 32,
            "val_batch_size": 128,
            "out_indices": [3]
        }
    }
}- Model Upload
Click [Upload Model & Code] on the page to receive tokenand fill in the following command:
flageval-serving upload --token='TOKEN' demoThe upload speed is determined by the export internet bandwidth of the upload host and the service entrance bandwidth of the evaluation platform, with a maximum speed of approximately 12.5MB/s.
BackBone Model Format Specifications
- BackBone Output Format Specification
For image classification, image retrieval, few-shot classification, and semi-supervised tasks, the platform provides a preset global average pooling layer as the Neck and a linear classifier as the Head. It requires the output feature map from the last layer of the user’s Backbone. The output feature can be either a 3D or 4D tensor, and it must match the output_dims specified in the meta.json file.
For intensive prediction tasks such as semantic segmentation and depth estimation, the platform presets different Heads and needs to obtain all four layers of feature maps output by the user's BackBone. It is recommended that users process the feature map format as [B, C, H, W] in the forward function of BackBone (B is Batch_size size, C is the feature dimension size, and H and W are the height and width of the image), then output the four layers of feature maps in tuple format.
Example code for the forward function of SwinTransformer is as follows:
def forward(self, x): x, hw_shape = self.patch_embed(x) if self.use_abs_pos_embed: x = x + resize_pos_embed( self.absolute_pos_embed, self.patch_resolution, hw_shape, self.interpolate_mode, self.num_extra_tokens) x = self.drop_after_pos(x) outs = [] for i, stage in enumerate(self.stages): x, hw_shape = stage(x, hw_shape) if i in self.out_indices: norm_layer = getattr(self, f'norm{i}') out = norm_layer(x) out = out.view(-1, *hw_shape, stage.out_channels).permute(0, 3, 1, 2).contiguous() outs.append(out) return tuple(outs)- Precautions for Selecting Adaptation Methods
For semantic segmentation tasks, if the user-submitted BackBone uses a feature pyramid output form similar to Swin or ViT-Adapter, please choose UPerNet as the adaptation method. If the BackBone uses a normal ViT output form, please choose SETR as the adaptation method.
Depth estimation tasks currently do not support the evaluation of ordinary ViT architectures, only supporting models in the form of feature pyramid output. For the latter, both adaptation methods can be selected.
For image classification tasks and image retrieval tasks, all adaptation methods can be selected.
- Model Input Size: For each task, the model input size is as follows:
- Image classification, image retrieval, small sample classification and semi-supervised: 224*224
- Depth estimation:
- KITTI Eigen split dataset: 352*1120
- NYU-Depth V2 dataset: 480*640
- Semantic segmentation: 512*512
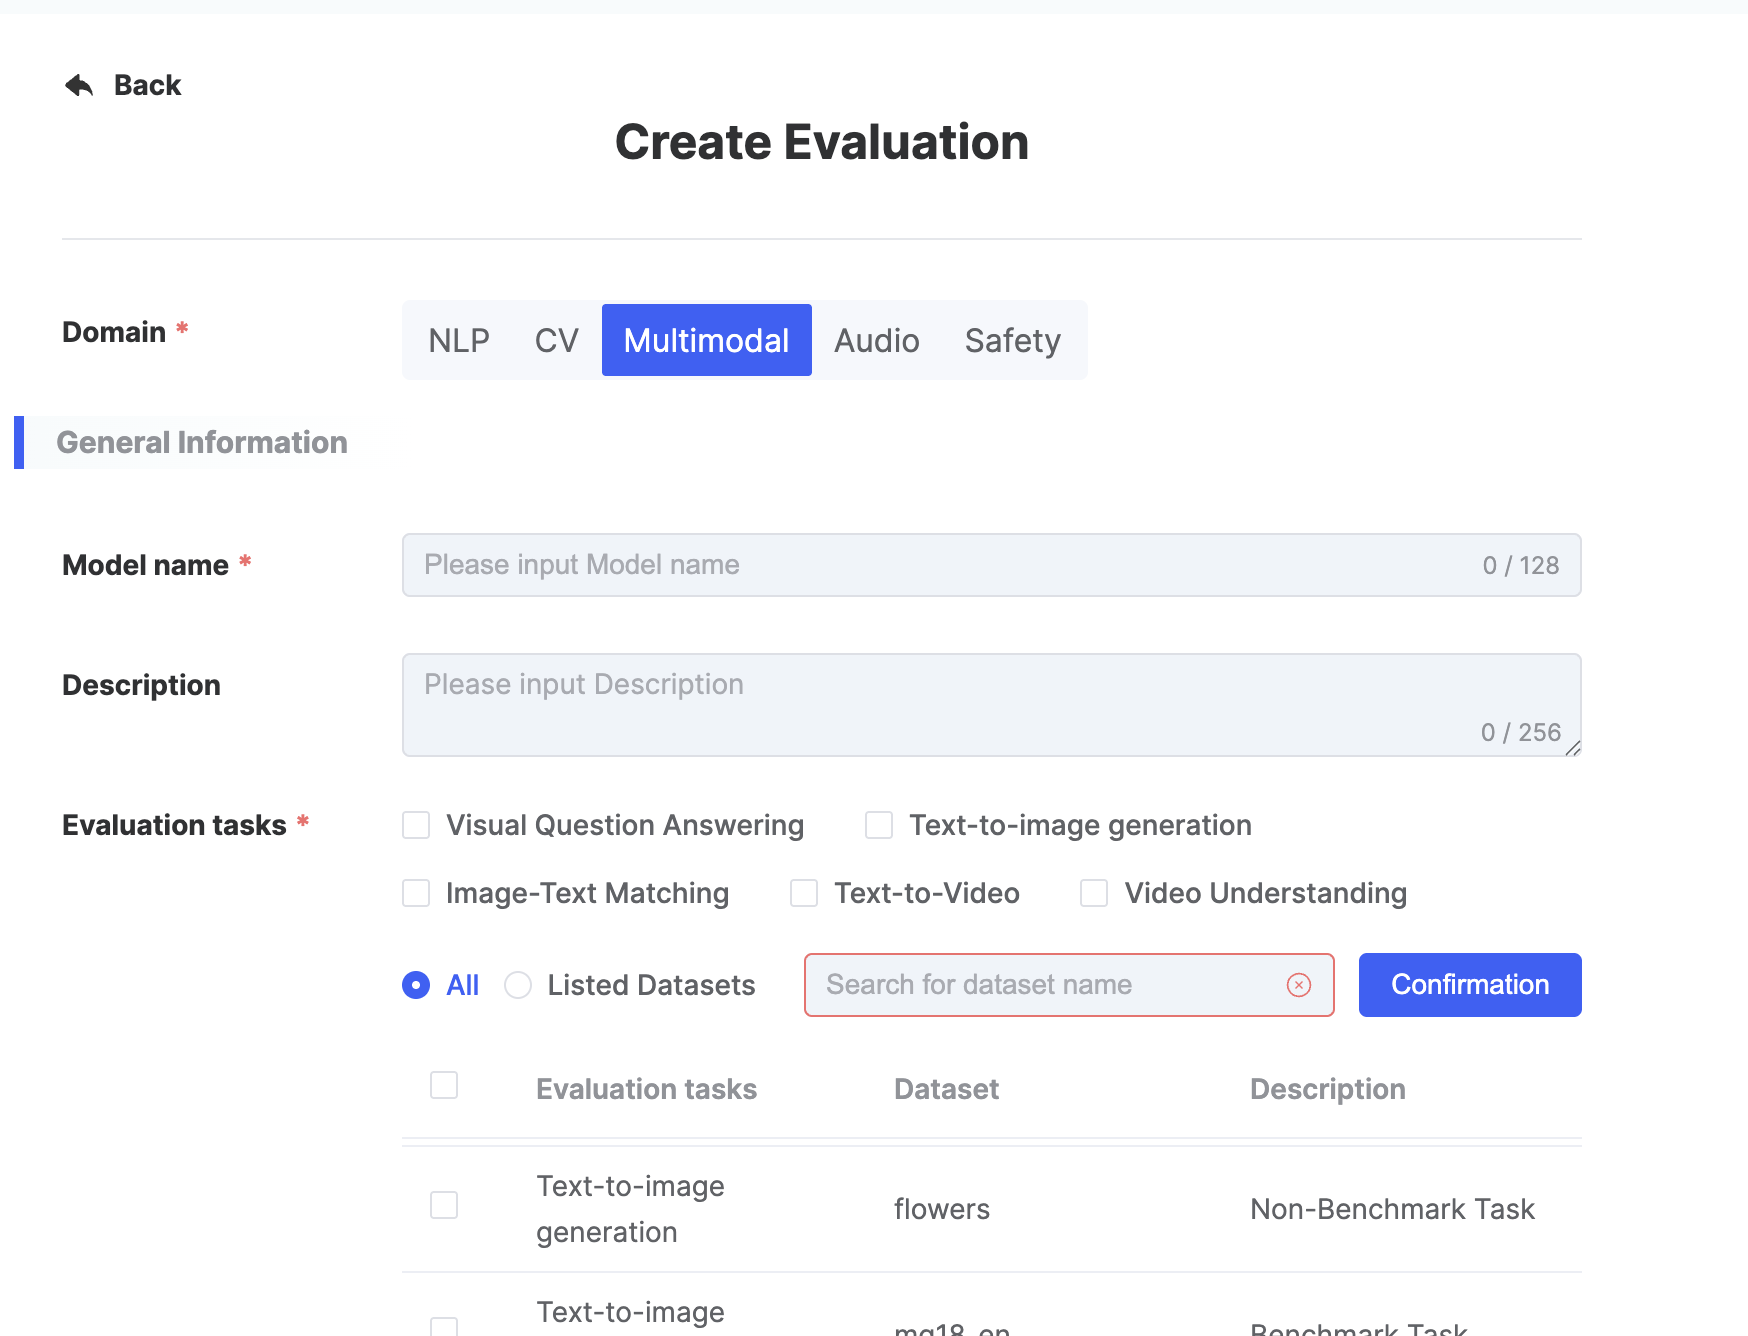
Multimodal Domain Model Evaluation
Currently, FlagEval platform supports users to upload direct inference models (without the need of finetune) in the Multimodal domain for inference evaluation.
Create Evaluation
Users can click on [Create Evaluation] on the evaluation task list page, and a [Create Evaluation] dialog box will pop up. Fill in the relevant parameters and click submit to jump to the details page of the model evaluation instance.
| Parameter Category | Parameter Name | Parameter Description |
|---|---|---|
| Basic information | Evaluation Domain |
|
| Model Name |
| |
| Description |
| |
| Evaluation Task |
| |
| Deployment Method |
| |
| Evaluation Dimension |
|
Different forms need to be filled out depending on the Deployment Method selected in the Basic Information section.

| Deployment Method | Parameter Category | Parameter Name | Parameter Description | Image example |
|---|---|---|---|---|
| Private Deployment | Environment Configuration | Select Image |
|  |
| Task Priority |
| |||
| Select GPU Type |
| |||
| Set Resources |
| |||
| API Evaluation | Basic Information | Evaluation API |
| |
| Online Model Name |
| |||
| Online API KEY |
|
In addition to the above information, model-related details must also be provided:
| Parameter Category | Parameter Name | Parameter Description |
|---|---|---|
| Model Information | Model Type |
|
| Paper Link | ||
| Model Link |
Users submit the evaluation instance and jump to the evaluation instance details page, which is divided into three parts: upper, lower left, and lower right.

- Upper half:
- Display the specific paramters when the user [Create Evaluation].
- User operations include: [Edit], [Upload Model & Code], [Inference Verification], [Launch Inference Evaluation].
- [Edit] operation: editing is allowed except for the model name and evaluation domain.
- [Upload Model & Code] operation: pop up the guide page for uploading model and code.
- [Inference Verification] operation:
- The platform randomly selects 1-3 pieces of data from the test data to form inference verification, making it convenient for users to quickly verify whether their models and services can run.
- It is recommended to conduct inference verification before officially launching the inference evaluation. If problems are found, they can be fixed immediately. You can also check whether the answers in the inference verification meet expectations.
- [Launch Inference Evaluation] operation: after the user verifies that the model and service are free of problems, they can click to launch the inference evaluation.
An email notification will be sent to the user when the evaluation task is completed.- Currently, it only supports single-machine inference evaluation.
- Lower left:
- Display the previous versions of inference launch and inference verification initiated by the user.
- Displayed parameters include: version, task type, status, submitter, operation.
- Task types include: inference verification & formal inference.
- [Stop] operation: click this operation to end the inference process.
- Lower right: includes verification details page, inference evaluation details page, and log page
- Verification details page: dataset progress display (task name, dataset name, status) and the verification results.
- Inference evaluation details page
- Mainly record task name, dataset name, status, evaluation metrics, start time, end time.
- Log page
- If a task fails, users can locate the cause of the failure by viewing the log. Note:
- Users only have five opportunities per month to launch formal inference evaluations.
Upload Model & Code Specifications
Open source sample code, please refer to github
(1) Install flageval-serving
pip install flageval-servingorpip install --upgrade flageval-servingRefer to https://github.com/FlagOpen/FlagEval/tree/master/flageval-serving (2) Prepare Model & Code
- File Structure
In the files uploaded using flageval-serving, the two files necessary are as follows. The file names must be using checkpoint.pth and run.sh, stored in the root directory of the uploaded file.
example_model
├── checkpoint.pth  # The weight file required for model initialization; users need to load and parse it in their own code.
├── run.sh
└── …. # Other user files- checkpoint.pth
The weight file required for model initialization. Needs to be loaded and parsed by the user's code.
- run.sh
Need to accept three command line parameters, each representing: task_name, server_ip, server_port. The first parameter is the task name (retrieval, vqa, t2i), and the last two parameters are the data server ip and port.
bash run.sh $task_name $server_ip $server_portThere are no restrictions inside run.sh. Ensure that the program runs and outputs the expected results will suffice.
- Output Format
- VQA Task
- For each dataset, output a list, each element of the list is in the format of {"question_id": int, "answer": str}, representing the question corresponding to the id and the answer given by the mode, as follows:
[
    {"question_id": str, "answer": str},
    ....
]- Stored in json format, path is
$output_dir"/"$dataset_name.json
Retrieval Task
- For each dataset, output a n*m matrix representing the similarity between the nth image and the mth sentence, using np.ndarray format, and the storage path is
$output_dir"/"$dataset_name.npyt2i Task
- For each dataset, output n images to
$output_dirdirectory, store in png format, and name the images as${prompt_id}.png - At the same time, generate another file
$output_dir/output_info.json, the content is a list of json. Each element needs to contain "id" (the current question_id) and "image" (the name of the generated image, that is, the path relative to$output_dir), for example:
[
    {    "id": "0",    "image": "0.png"  },
    {    "id": "1",    "image": "1.png"  },
    ....
]- Data Inference
Users need to obtain data, model paths, and dataset-related information through HTTP requests. The main interfaces are as follows:
- io_info:Directory and model file path for storing user output.
http://{server_ip}:{server_port}/io_info{ 'checkpoint_path': 'model checkpoint path', 'output_dir': 'output dir'}- meta_info:Meta information of dataset
http://{server_ip}:{server_port}/meta_info# for vqa tasks{ 'length': number of images, 'name': dataset name, 'type': 'vpa'}# for retrieval tasks{ 'name': dataset name, 'image_number': number of images, 'caption_number': number of captions, 'type': 'retrieval'}- get_data:Interface to get data
- VQA Task
# Range of index is [0, number of images)
http://{server_ip}:{server_port}/get_data?index={index}

{
    "img_path": a list, each element is the absolute path of the images,
                can be read directly using PIL, cv2, etc.,
    "question": question, is a str, image location use <image1> <image2>,
    "question_id": question_id,
    "type": type is str, is the type of the questions
}

# type can be:
# - multiple-choice
# - multiple-response
# - fill-in-the-blank
# - short-answer
# - yes-no

# Below is a real example
{
    "img_path": ["/share/projset/mmdataset/MathVista/images/20.jpg"],
    "question": "<image 1>Hint: Please answer the question and provide the correct option letter, e.g., A, B, C, D, at the end.\nQuestion: Is the sum of smallest two bar greater than the largest bar?\nChoices:\n(A) Yes\n(B) No",
    "question_id": "20",
    "type": "multiple-choice"
}- Retrieval Task
# Read image, the range of index is [0, number of images)
http://{server_ip}:{server_port}/get_data?index={index}&type=img

{
    "img_path": the absolute path of images, can be read directly using PIL, cv2, etc.
}

# Read caption, the range of index is [0, number of captions)
http://{server_ip}:{server_port}/get_data?index={index}&type=text

{
    "caption": a caption
}- t2i Task (Text-to-Image Generation)
Language: Python
# Index Range: The index parameter should be in the range: [0, number_of_prompts)
url = f"http://{server_ip}:{server_port}/get_data?index={index}"

# Example response
data = {
    "prompt": "A textual description of the image",  # type: str
    "id": 123  # prompt ID, type: int
}- Use Sample Get model checkpoint storage location and output directory
url = f"{server_ip}:{server_port}/io_info"data = requests.get(url).json()checkpoint_path = data['checkpoint_path']output_dir = data['output_dir']- Data related
import requests

# Get VQA data
url = f"http://{server_ip}:{server_port}/get_data?index=12"
data = requests.get(url).json()

# Get retrieval caption (text)
url = f"http://{server_ip}:{server_port}/get_data?index=10&type=text"
data = requests.get(url).json()

# Get retrieval image
url = f"http://{server_ip}:{server_port}/get_data?index=10&type=img"
data = requests.get(url).json()
Model Upload
Click [Upload Model & Code] on the page to receive token and fill in the following command:
flageval-serving upload --token='TOKEN' demoThe upload speed is determined by the export internet bandwidth of the upload host and the service entrance bandwidth of the evaluation platform, with a maximum speed of approximately 12.5MB/s.
For more tutorials on the use of flageval-serving, please refer to the chapter.
Audio Domain Model Evaluation
Currently, the FlagEval platform supports users to upload pre-trained backbone models in the Audio domain, supports freezing the parameters of the backbone model to fine-tune and generate downstream task models under different tasks and datasets, and perform inference evaluation on the corresponding test dataset to obtain the evaluation metrics of the model on the dataset.
Create Evaluation
Users can click on [Create Evaluation] on the evaluation task list page, and a [Create Evaluation] dialog box will pop up. Fill in the relevant parameters and click submit to jump to the details page of the model evaluation instance. 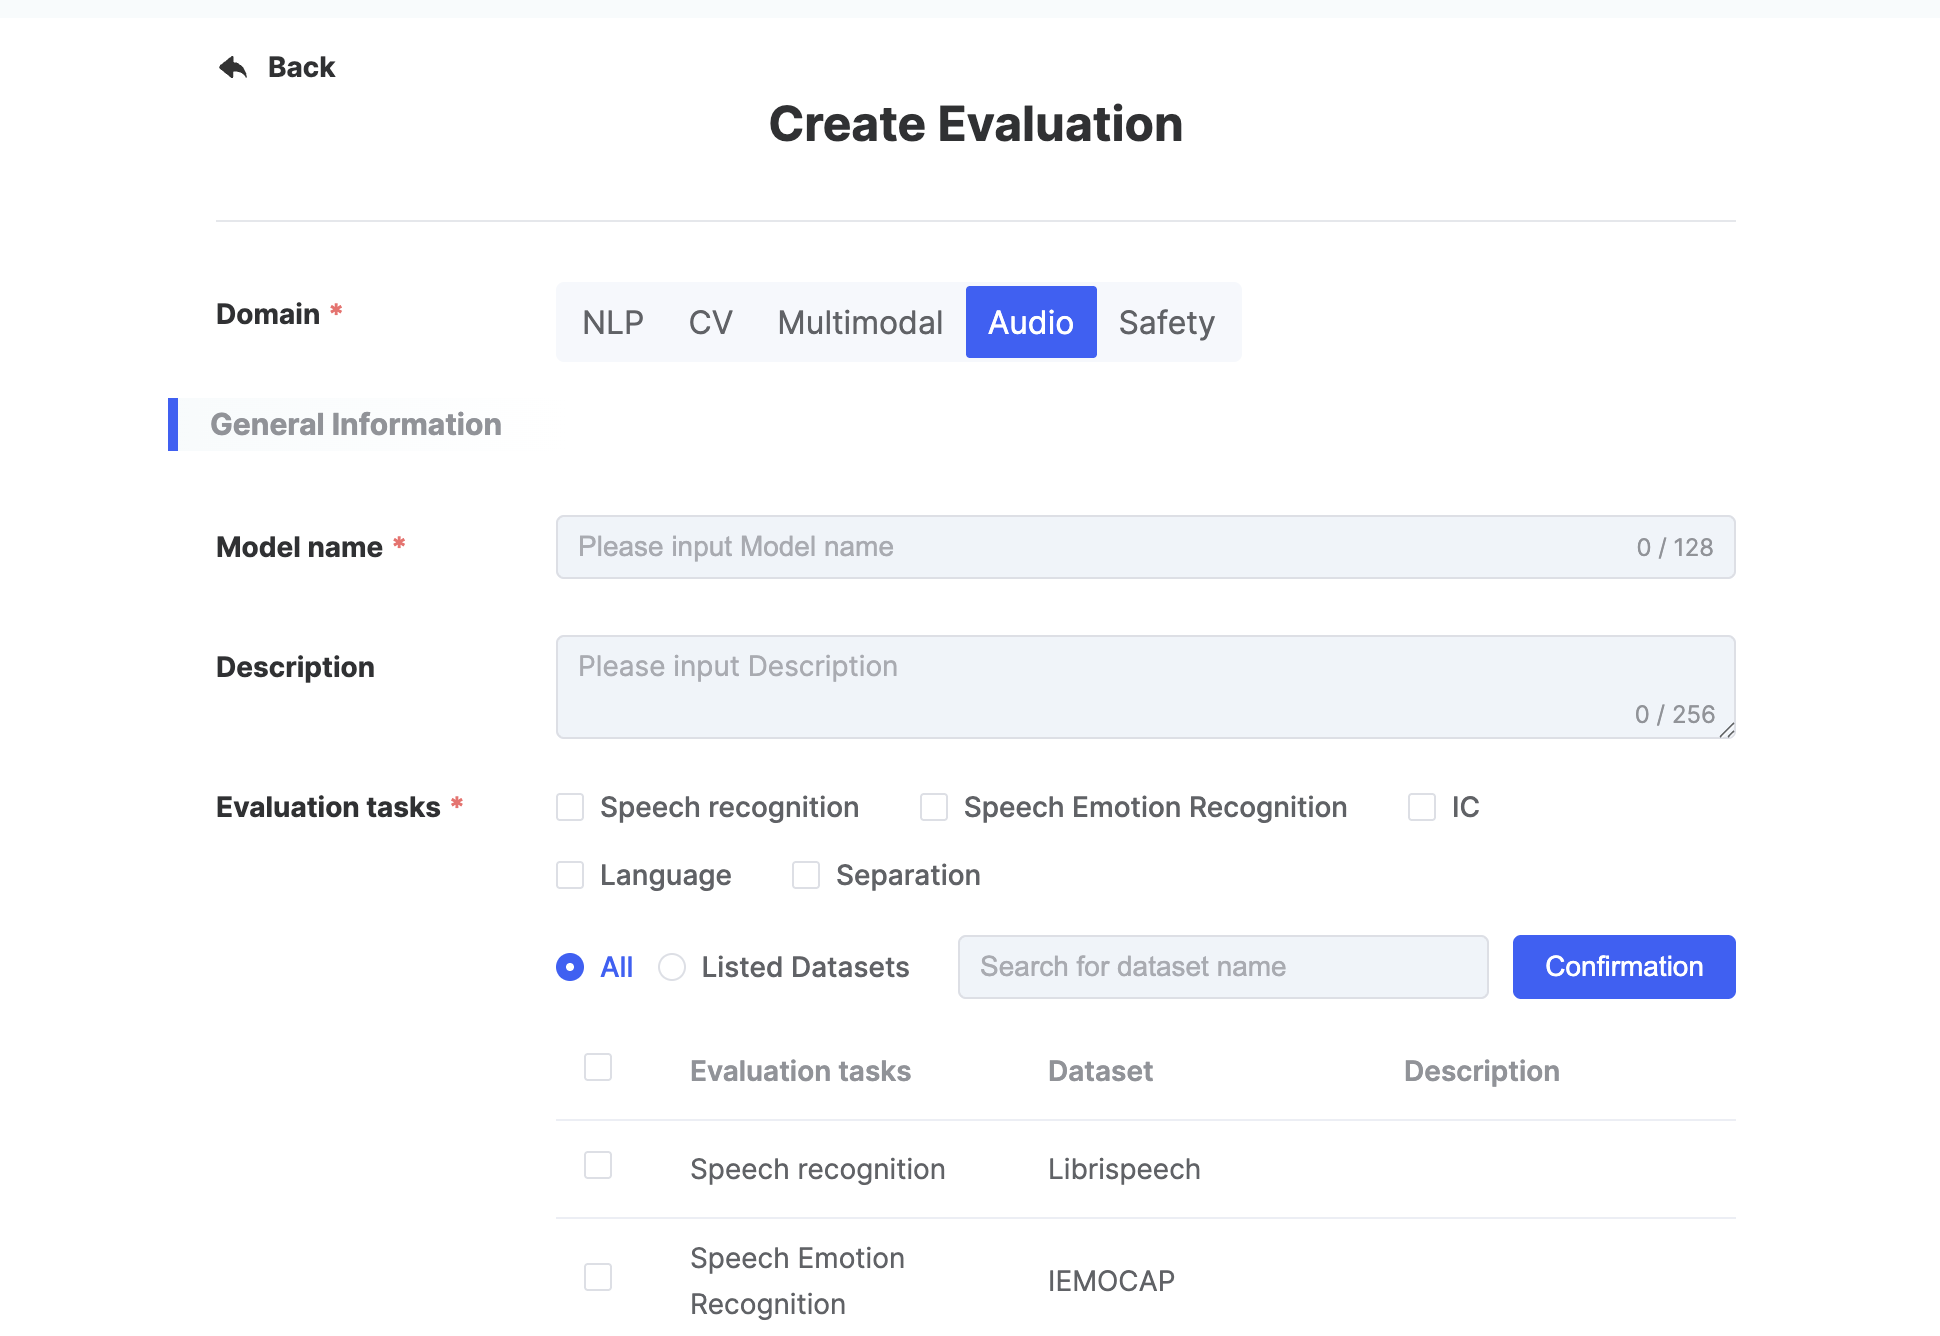
| Parameter Category | Parameter Name | Parameter Description |
|---|---|---|
| Basic Information | Evaluation Domain |
|
| Model Name |
| |
| Description |
| |
| Evaluation Task |
| |
| Evaluation Dimension |
| |
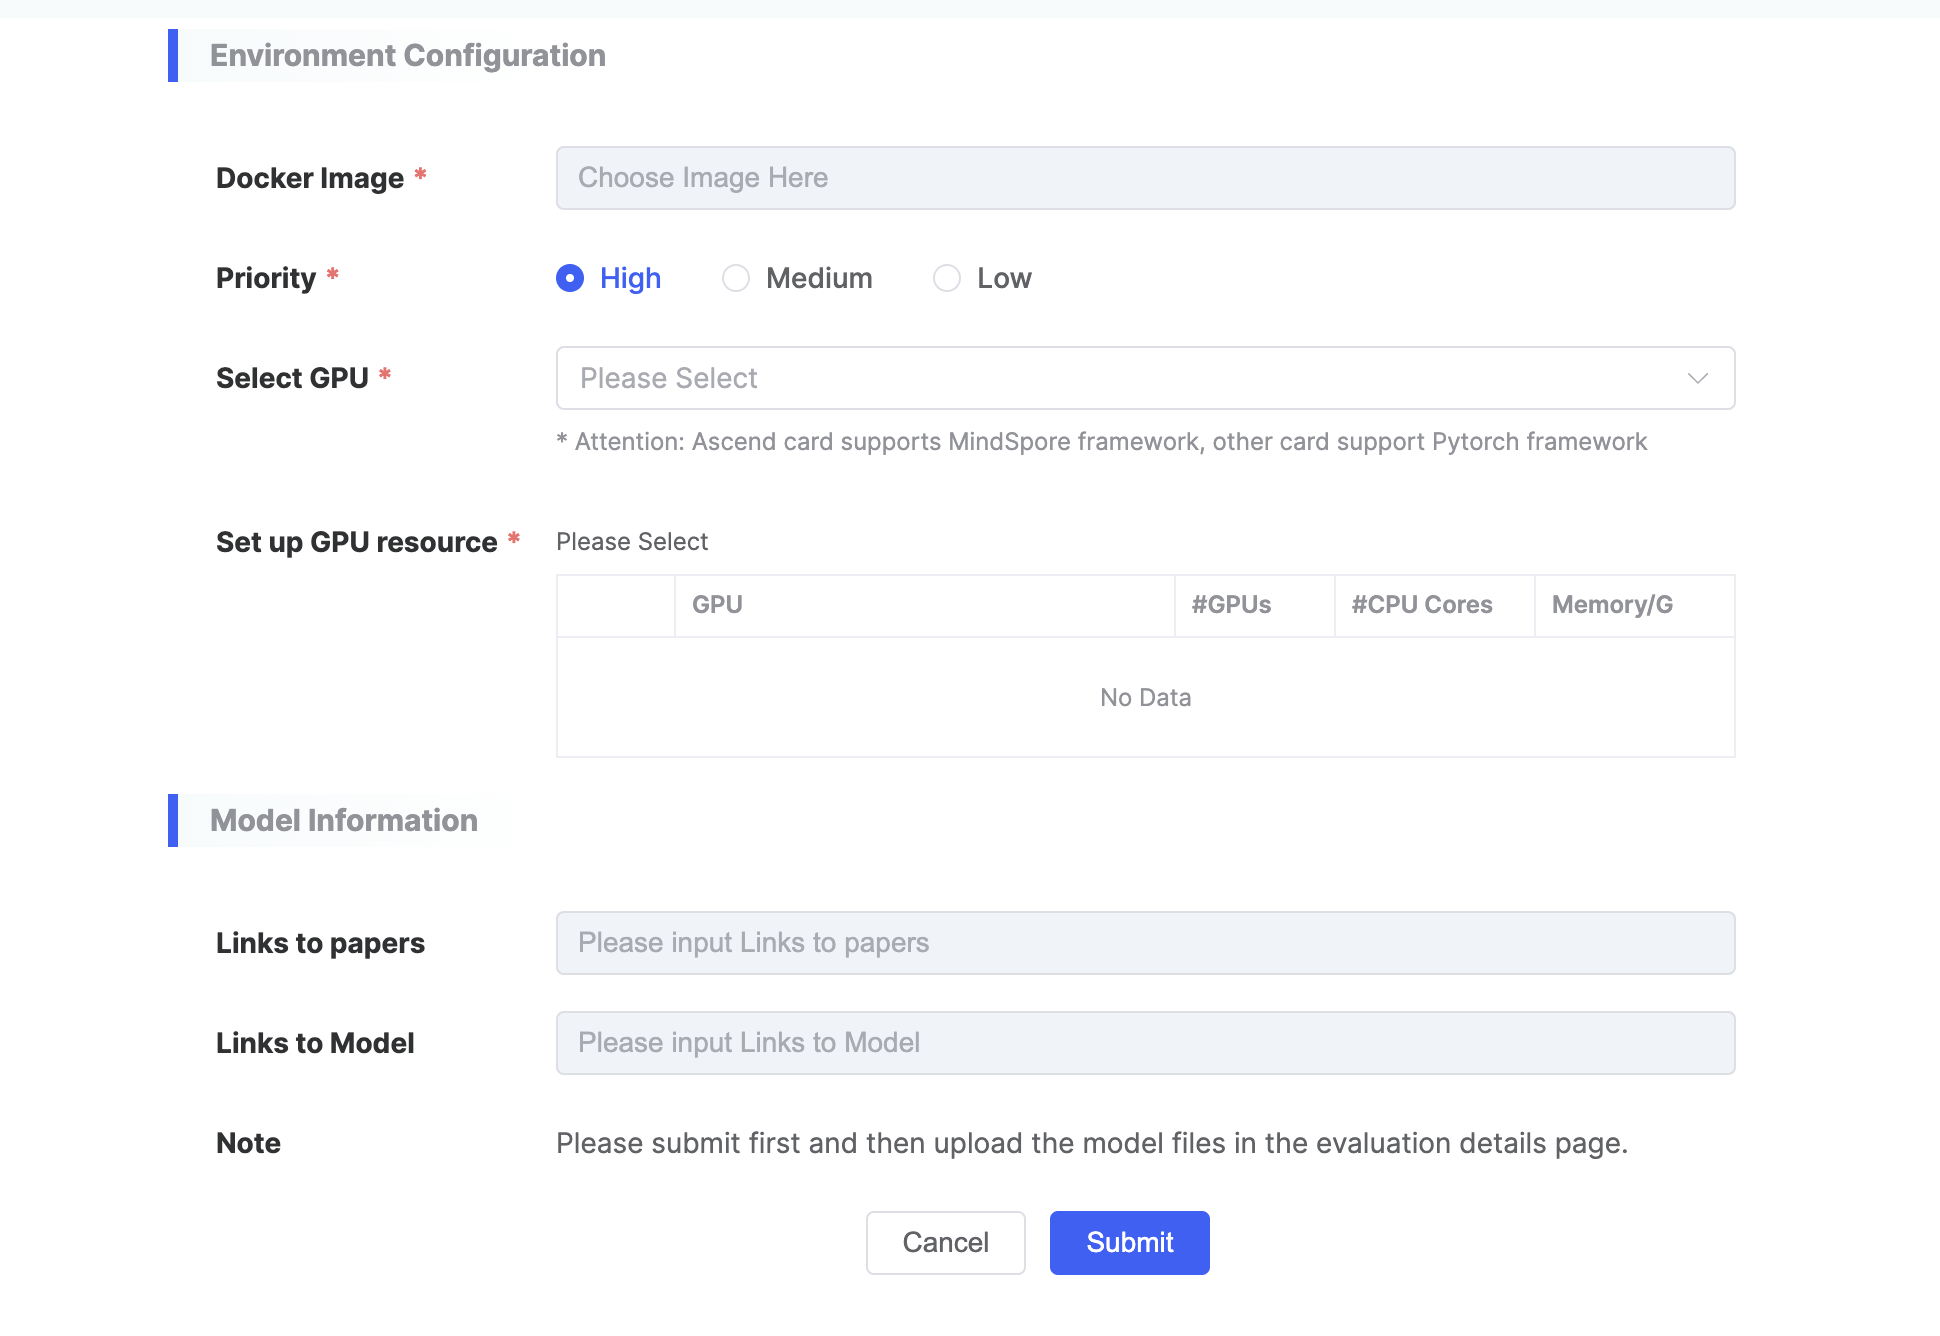
| Environment Configuration | Select Image |
|
| Task Priority |
| |
| Select GPU Type |
| |
| Set Resources |
| |
| Model Information | Paper Link | |
| Model Link |
Users submit the evaluation instance and jump to the evaluation instance details page, which is divided into three parts: upper, lower left, and lower right. 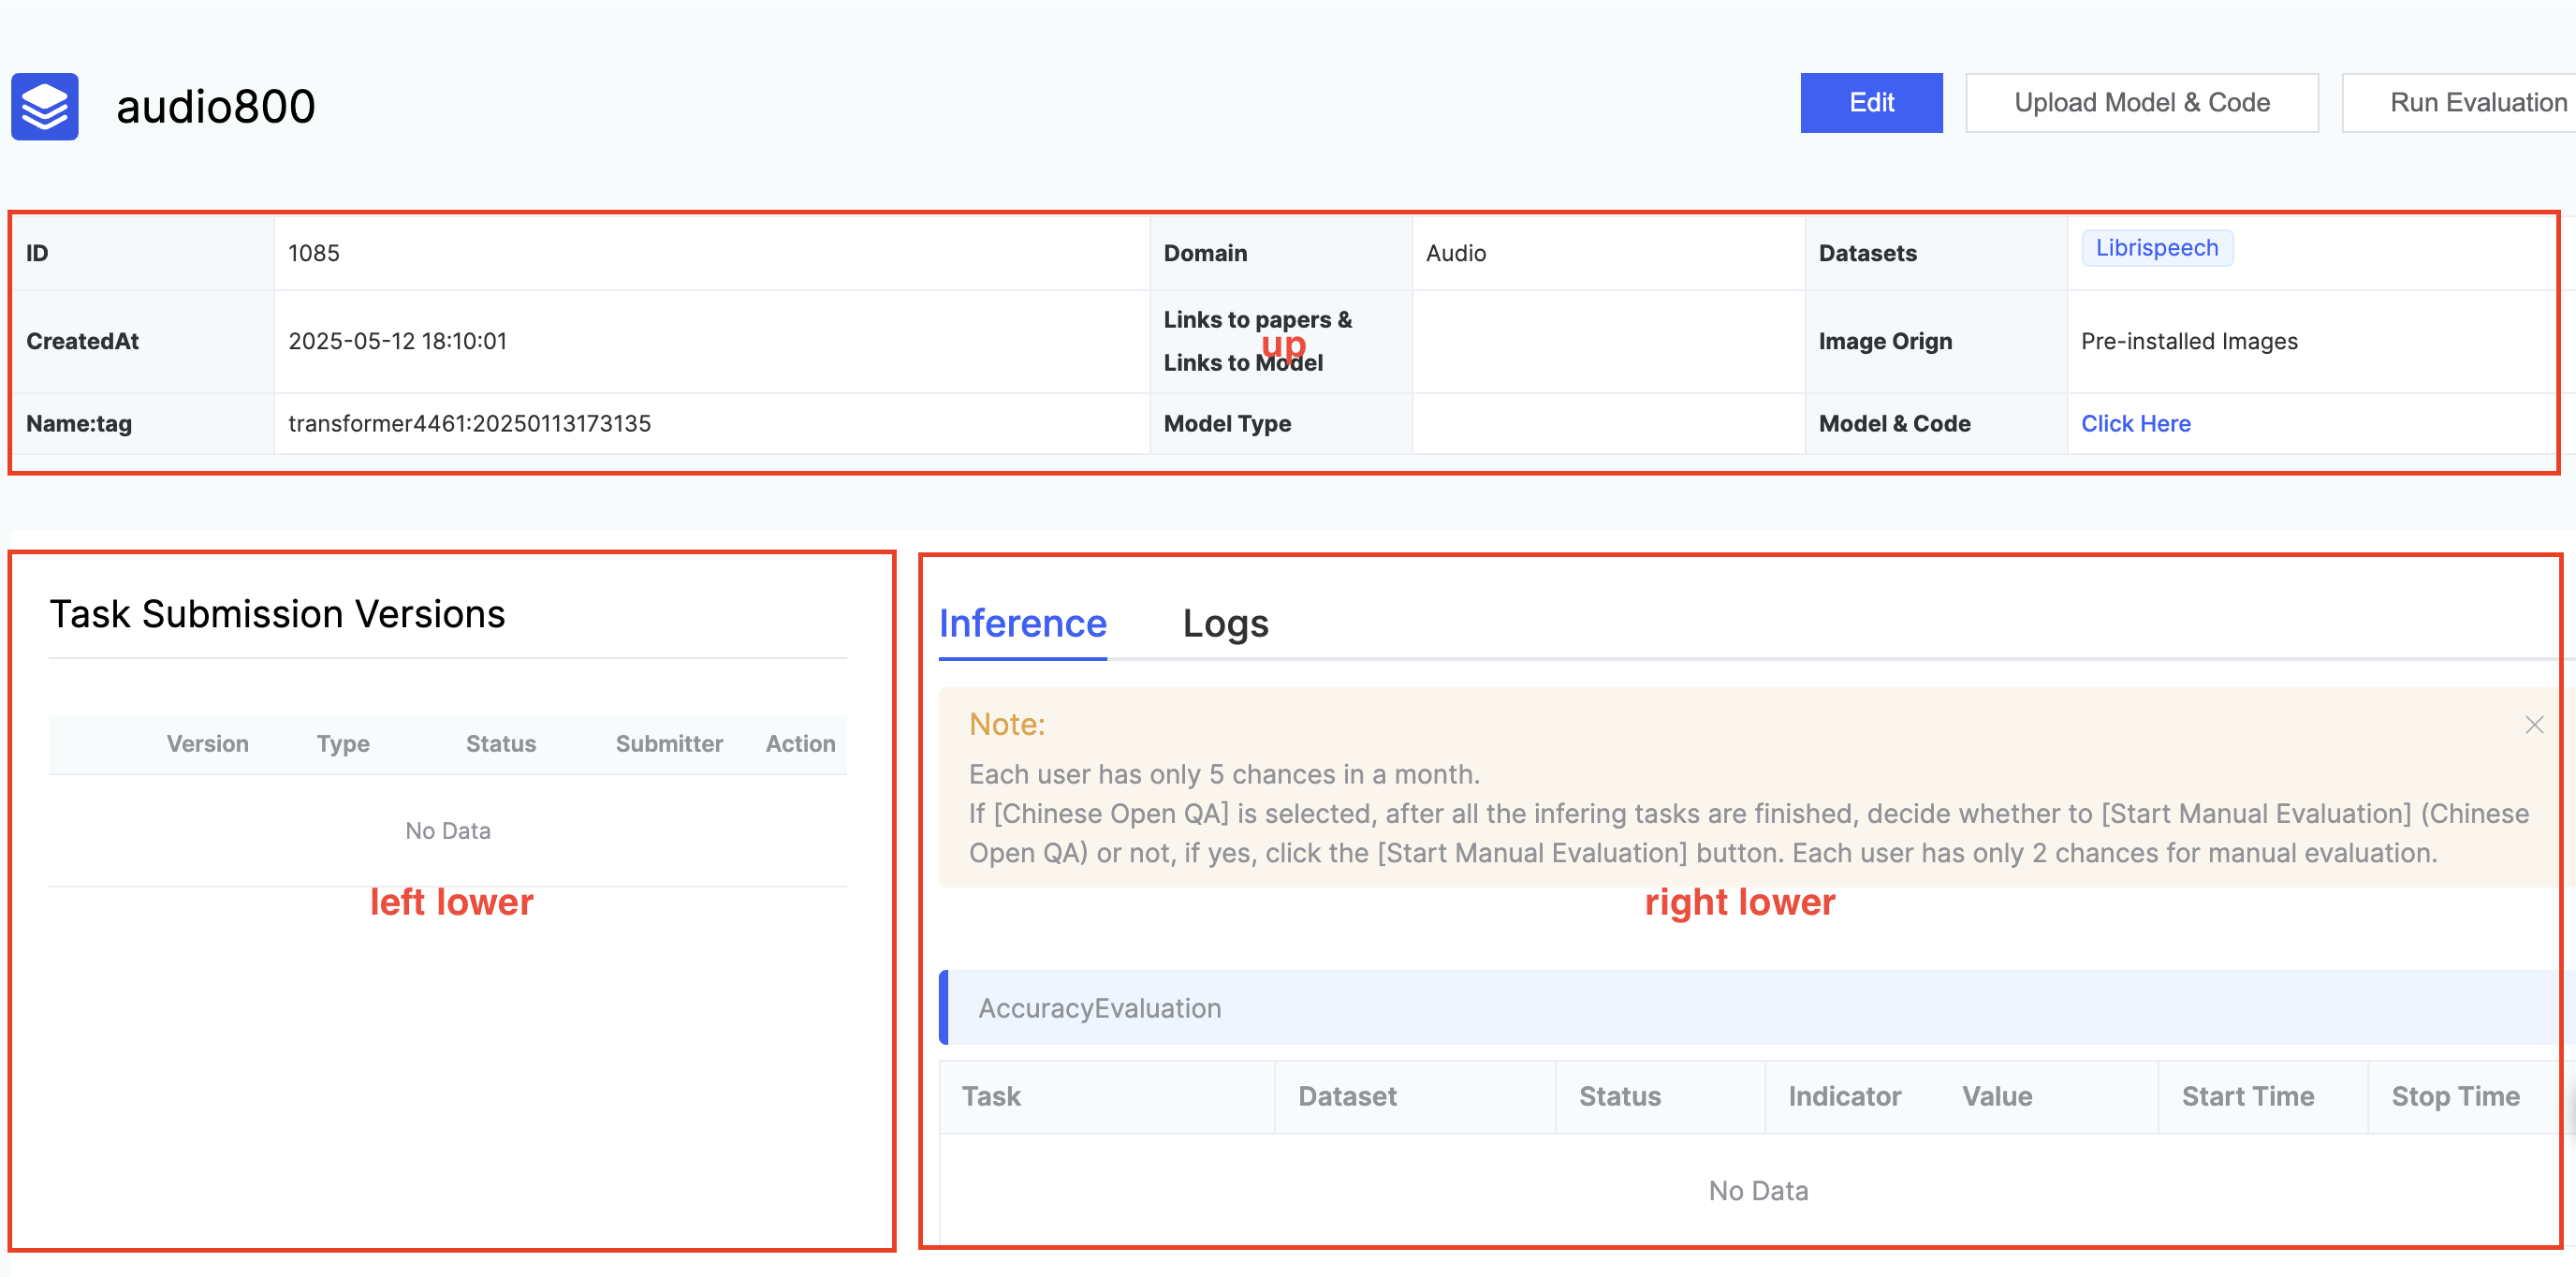
- Upper half:
- Display the specific paramters when the user [Create Evaluation].
- User operations include: [Edit], [Upload Model & Code], [Launch Inference Evaluation].
- [Edit] operation: editing is allowed except for the model name and evaluation domain.
- [Upload Model & Code] operation: pop up the guide page for uploading model and code.
- [Launch Inference Evaluation] operation: after the user verifies that the model and service are free of problems, they can click to launch the inference evaluation. An email notification will be sent to the user when the evaluation task is completed.
- Currently, it only supports single-machine inference evaluation.
- Lower left:
- Display the previous versions of the inference launch initiated by the user.
- Displayed parameters include: version, task type, status, submitter, and operation.
- Task types include: inference verification & formal inference.
- [Stop] operation: Click this operation to end the inference process.
- Lower right: includes model inference details page and log page
- Model inference details page
- Mainly record task name, dataset name, status, evaluation metrics, metrics values, start time, and end time.
- Log page
- If a task fails, users can locate the cause of the failure by viewing the log.
- Model inference details page
Note::
- Users only have five opportunities per month to launch formal inference evaluations.
Upload Model & Code Specifications
Open source sample code, please refer to GitHub
(1) Install flageval-serving
pip install flageval-servingorpip install --upgrade flageval-servingRefer to https://github.com/FlagOpen/FlagEval/tree/master/flageval-serving
(2) Prepare Model & Code
Currently, the platform only supports inference evaluation after finetuning the BackBone model. Below are the steps for adding the upstream model (BackBone) and its required components:
First, the upstream model folder structure is as follows, the platform provides an example structure and code. Please refer to the specific code for details:
upstream/example_model|—— model.py|—— convert.py|—— ModelWrapper.pyin model.py, two data classes need to be implemented: ExamplePretrainingConfig and exampleconfig. Initialize the pre-training parameter configuration and model structure, respectively. The specific requirements are as follows:
ExamplePretrainingConfig: use this class to configure pre-training parameters, such as sample rate, maximum and minimum length of input data, etc., such asupstream/wav2vec2/wa2vec2_model.py/AudioPretrainingConfig.ExampleConfig: this class configures the structure parameters of the custom model, such as the number of encoder layers, the dimensions of network input and output of each layer, the size of dropouts, etc.
In addition, model.py should implement the ExampleModel class, which defines the model structure. Please try to use PyTorch for implementation to avoid additional dependencies.
@dataclassclass ExamplePretrainingConfig: sample_rate: int = field( default = 16_000, metadata = { "help": "target sample rate. audio files will be up/down sampled to this rate" }, ) max_sample_size: Optional[int] = field( default = None, metadata = {"help": "max sample size to crop to for batching"} ) min_sample_size: Optional[int] = field( default = None, metadata = {"help": "min sample size to skip small examples"} ) pass @dataclassclass ExampleConfig: encoder_layers: int = field( default = 12, metadata = {"help": "num encoder layers in the transformer"} ) passclass ExampleModel(nn.Module): def __init__(self, config): super(ExampleModel, self).__init__() pass def forward(self, wavs, padding_mask): pass return features, mask- convert.py
convert.py file is used to convert checkpoint to a format compatible with our project. The structure of the converted checkpoint should be as follows:
{ "task_cfg": , # configuration for ExamplePretrainingConfig "model_cfg", # configuration for ExampleConfig "model_weight", # load model weights using model.load_state_dict(ckpt_state["model_weight"])}Users can use the load_converted_model function provided in convert.py to verify the compatibility of the converted model.
Python
def load_converted_model(ckpt: str): ckpt_state = torch.load(ckpt, map_location = "cpu") for required_key in ["task_cfg", "model_cfg", "model_weight"]: if required_key not in ckpt_state: raise ValueError( f"{ckpt} is not a valid checkpoint since the required key: {required_key} is missing" ) task_cfg = merge_with_parent(ExamplePretrainingConfig, ckpt_state["task_cfg"]) model_cfg = merge_with_parent(ExampleConfig, ckpt_state["model_cfg"]) model = ExampleModel(model_cfg) model.load_state_dict(ckpt_state["model_weight"]) return model, task_cfg- ModelWrapper.py
ModelWrapper.py serves as a unified interface for upstream models on the platform. A class needs to be created in this file, such as MyModel, with the following structure:
Python
class MyModel(nn.Module): def __init__(self, load_type, **kwargs): super(MyModel, self).init() # initialize here and load your model # to get config and .pt file ckpt_state = torch.load(ckpt, map_location = "cpu") self.task_cfg = merge_with_parent(ExamplePretrainingConfig, skpt_state["task_cfg"]) self.model_cfg = merge_with_parent(ExamplePretrainingConfig, skpt_state["model_cfg"]) self.model = ExampleModel(self.model_cfg) self.model.load_state_dict(ckpt_state["model_weight"]) def forward(self, wavs, padding_mask = None): device = wavs[0].device # implement forward structure, and return feature and feature_mask. dimensions are (B*L*D) def get_output_dim(self): # define your model's output dimension D, using 768 as an example return 768FlagEval-Serving Tool Detailed Guide
Users can upload models, code, data, and other evaluation files using the FlagEval-Serving tool. It also supports local testing.
The operation process is as follows:
FlagEval-Serving Tool Detailed Guide
Users can upload models, code, data, and other evaluation files using the FlagEval-Serving tool. It also supports local testing.
The operation process is as follows:
(1) Install flageval-serving
Markdown
pip install flageval-serving或pip install --upgrade flageval-servingOpen-source repository: https://github.com/FlagOpen/FlagEval/tree/master/flageval-serving
(2) Prepare Code, Model & Data
Different evaluation domains require different directory structures and API specifications.
Please refer to the specific requirements of each domain when preparing the files for upload.
For NLP model evaluations, local model debugging is also supported. Please refer to the operation specification for the NLP domain.
(3) Common Commands
    •        A unique token is required to upload or update files.
    •        You can get this token by clicking [Upload Model & Code] on the evaluation details page.
    •        If you are appending files in the current version, use the cp command along with the token provided in the file list page.
    •        Note: All commands below use single quotes ' in English.
| Commands | Meaning | Remarks |
|---|---|---|
| pip install --upgrade flageval-serving | Update to the latest version | Please make sure you are using the latest version. |
| flageval-serving upload --token='new token' /demo | Upload the local demo folder to the Flageval platform | 'new token' must be obtained from the [Upload Model & Code] section on the evaluation details page. |
| flageval-serving cp --token='old token' /temp /remote | Append a local folder to the remote directory linked to 'old token' | Similar to the Linux cp command: /temp can be either a directory or a file. If /remote/temp does not exist, it will be created. If it exists, files will be incrementally overwritten. Note: Only use the old token from the file details page—not the new token. |
| flageval-serving ls --token='old token' /remote | List directories and files under /remote on the platform | |
| flageval-serving | Display help commands |
(4) File Upload
Click [Upload Model & Code] on the evaluation page to get your token, then use the following command:
flageval-serving upload --token='TOKEN' demoUpload speed depends on the outbound bandwidth of the host machine and the inbound bandwidth of the evaluation platform. The maximum upload speed is approximately 12.5 MB/s.
Image Management
By clicking [Evaluation Management / Image Management], users can view both the preloaded image list provided by the platform and their own custom image list (images they have uploaded).
- Preloaded Images: The Flageval platform provides preconfigured images for various domains, including all necessary evaluation dependencies, which users can use directly.
Users can check detailed image information based on the image name, description, training framework, compatible hardware, and tags.
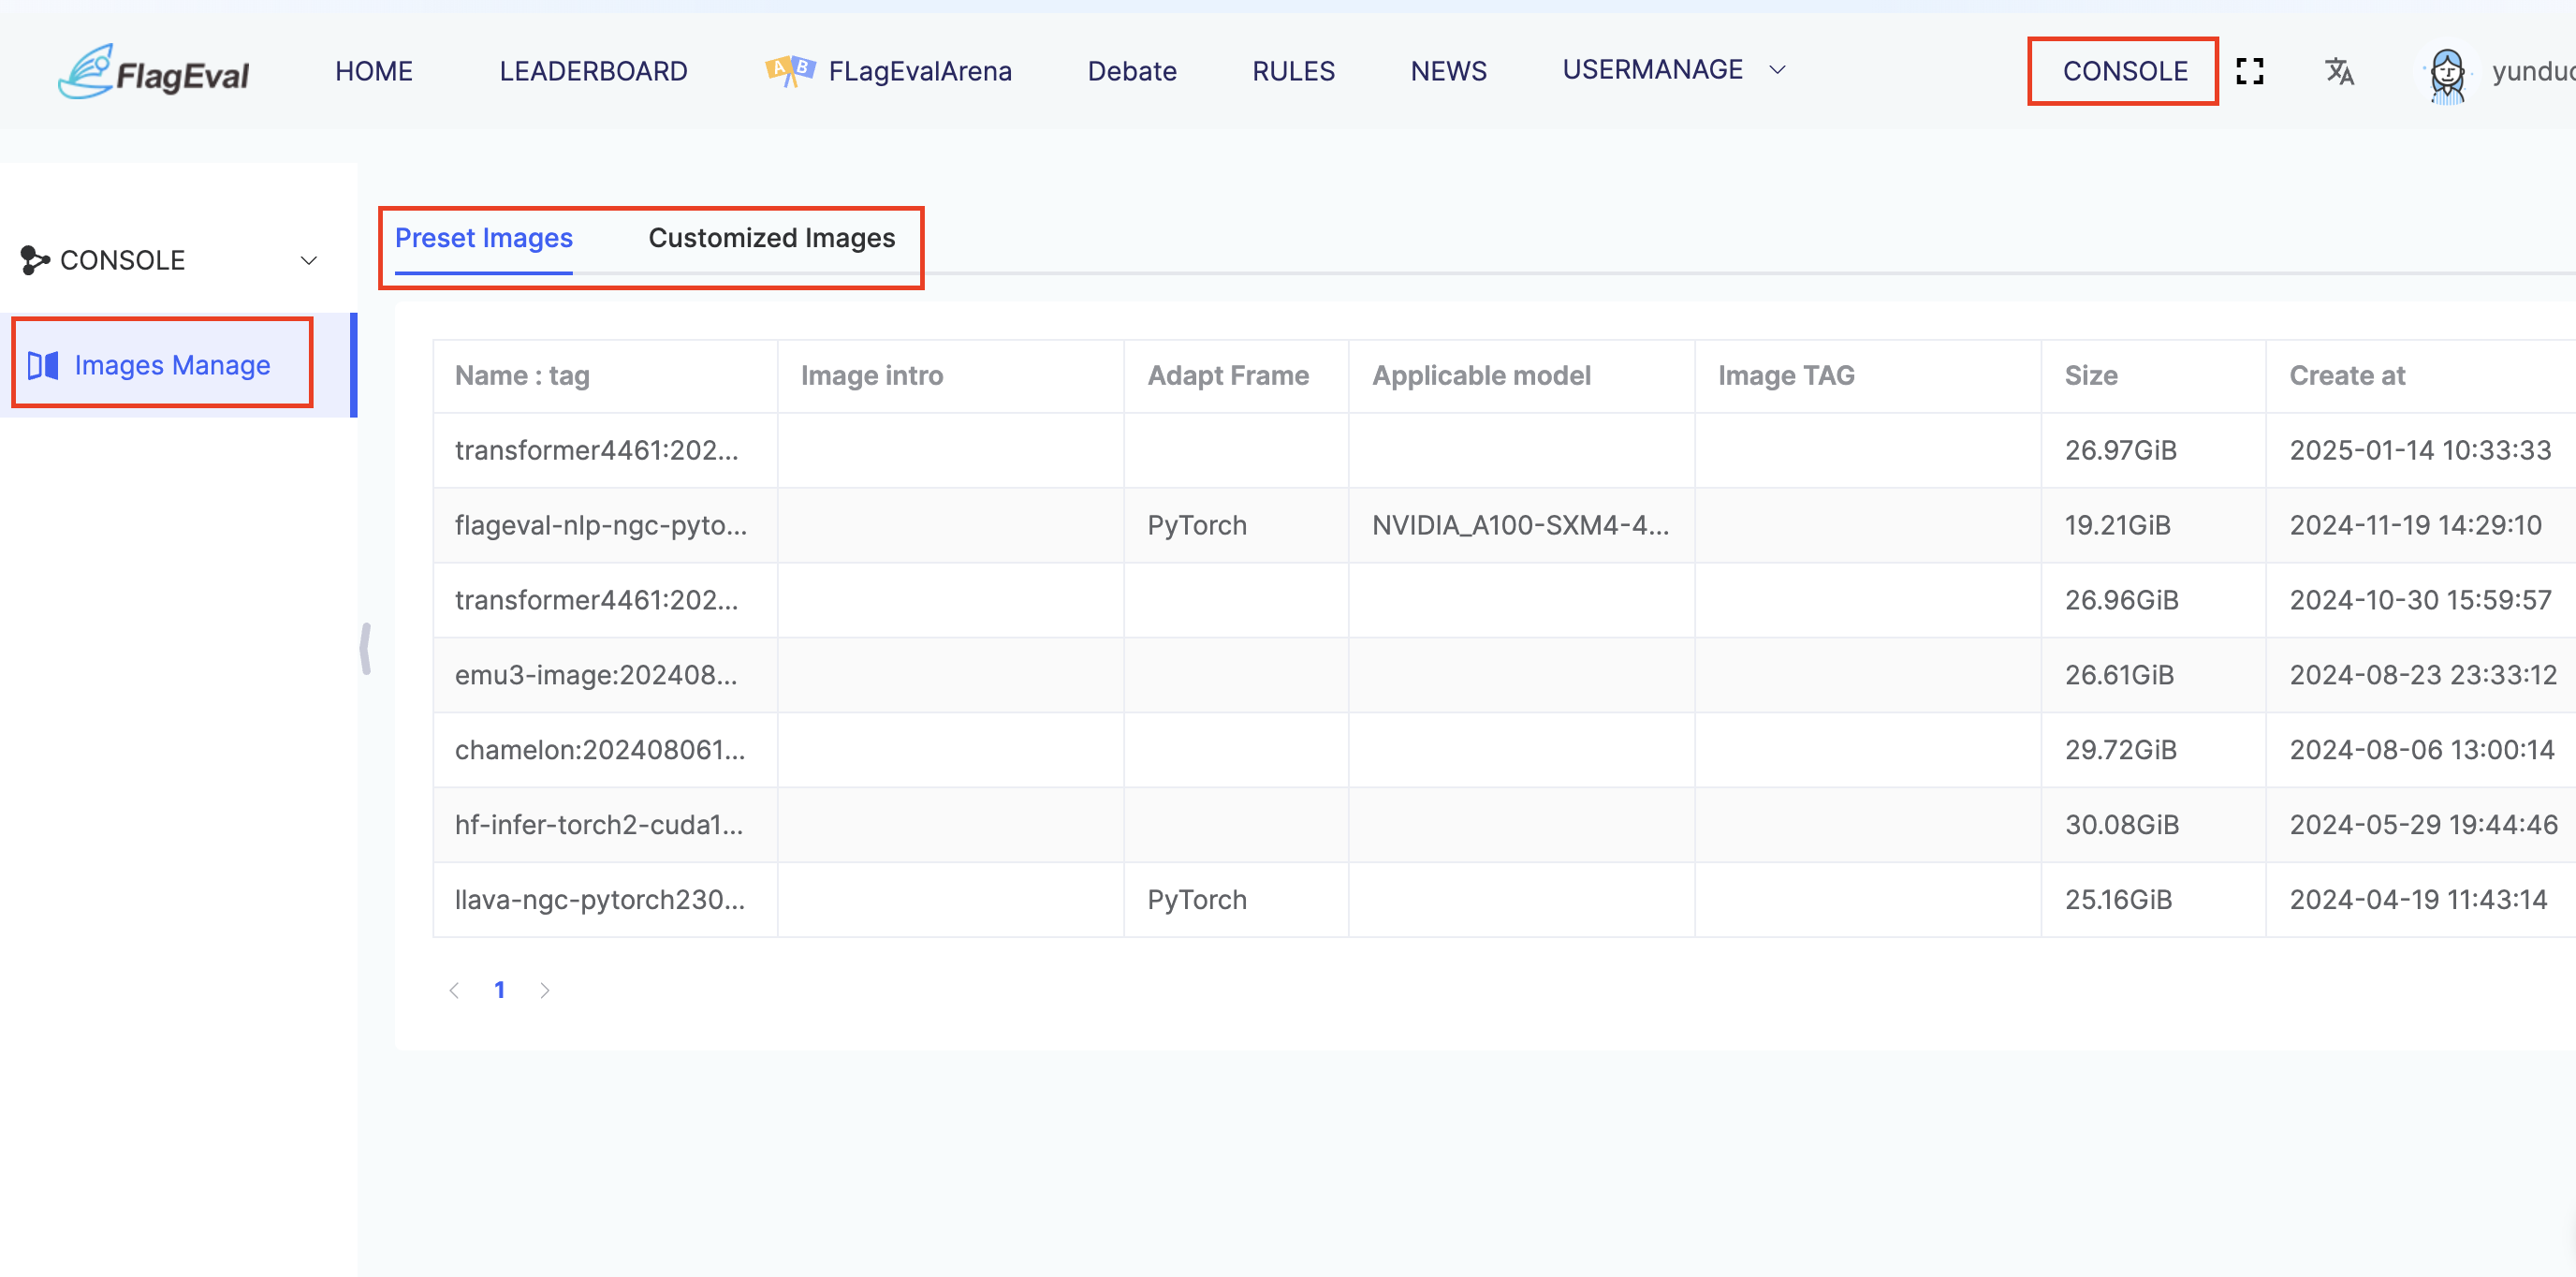
Custom Images: The Flageval platform allows users to import their own pre-built images for use in evaluation tasks.
Currently, the platform only supports importing existing images. It does not support building images on the platform using Dockerfiles. The Dockerfile provided by the user is for review purposes only, to be examined by the platform administrators during the approval process.
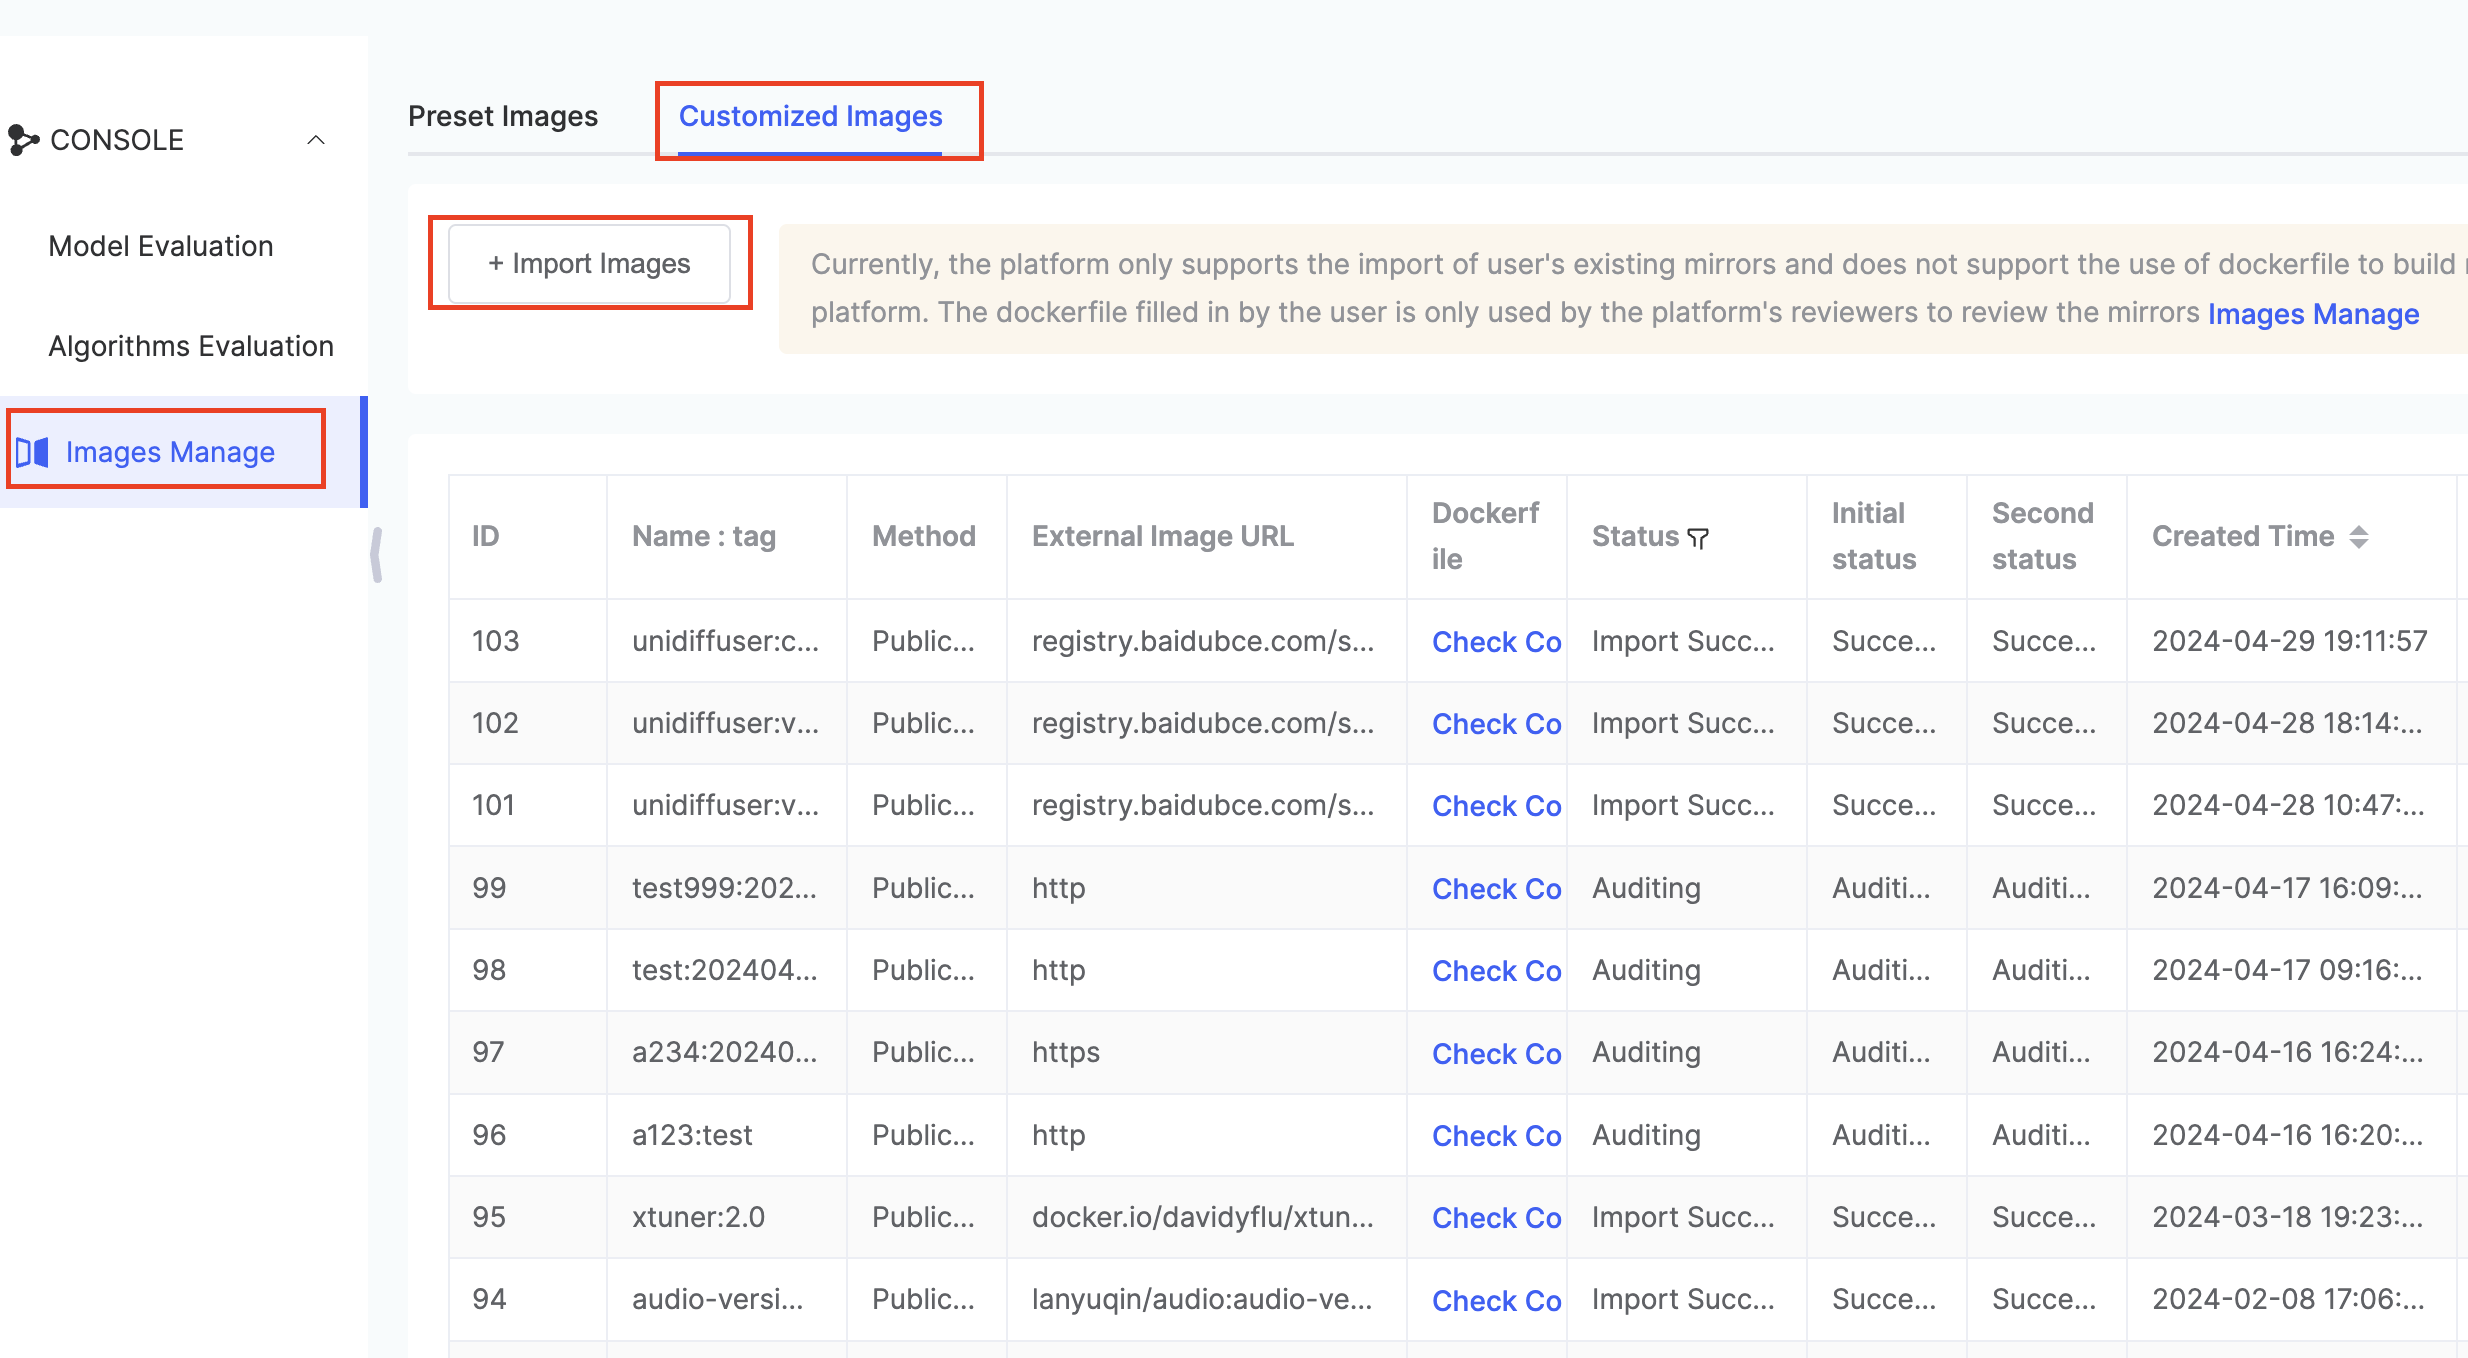
When the user clicks [+ Import Image], a [+ Import Image] dialogue box will pop up. Fill in the required parameters and click Submit to proceed.
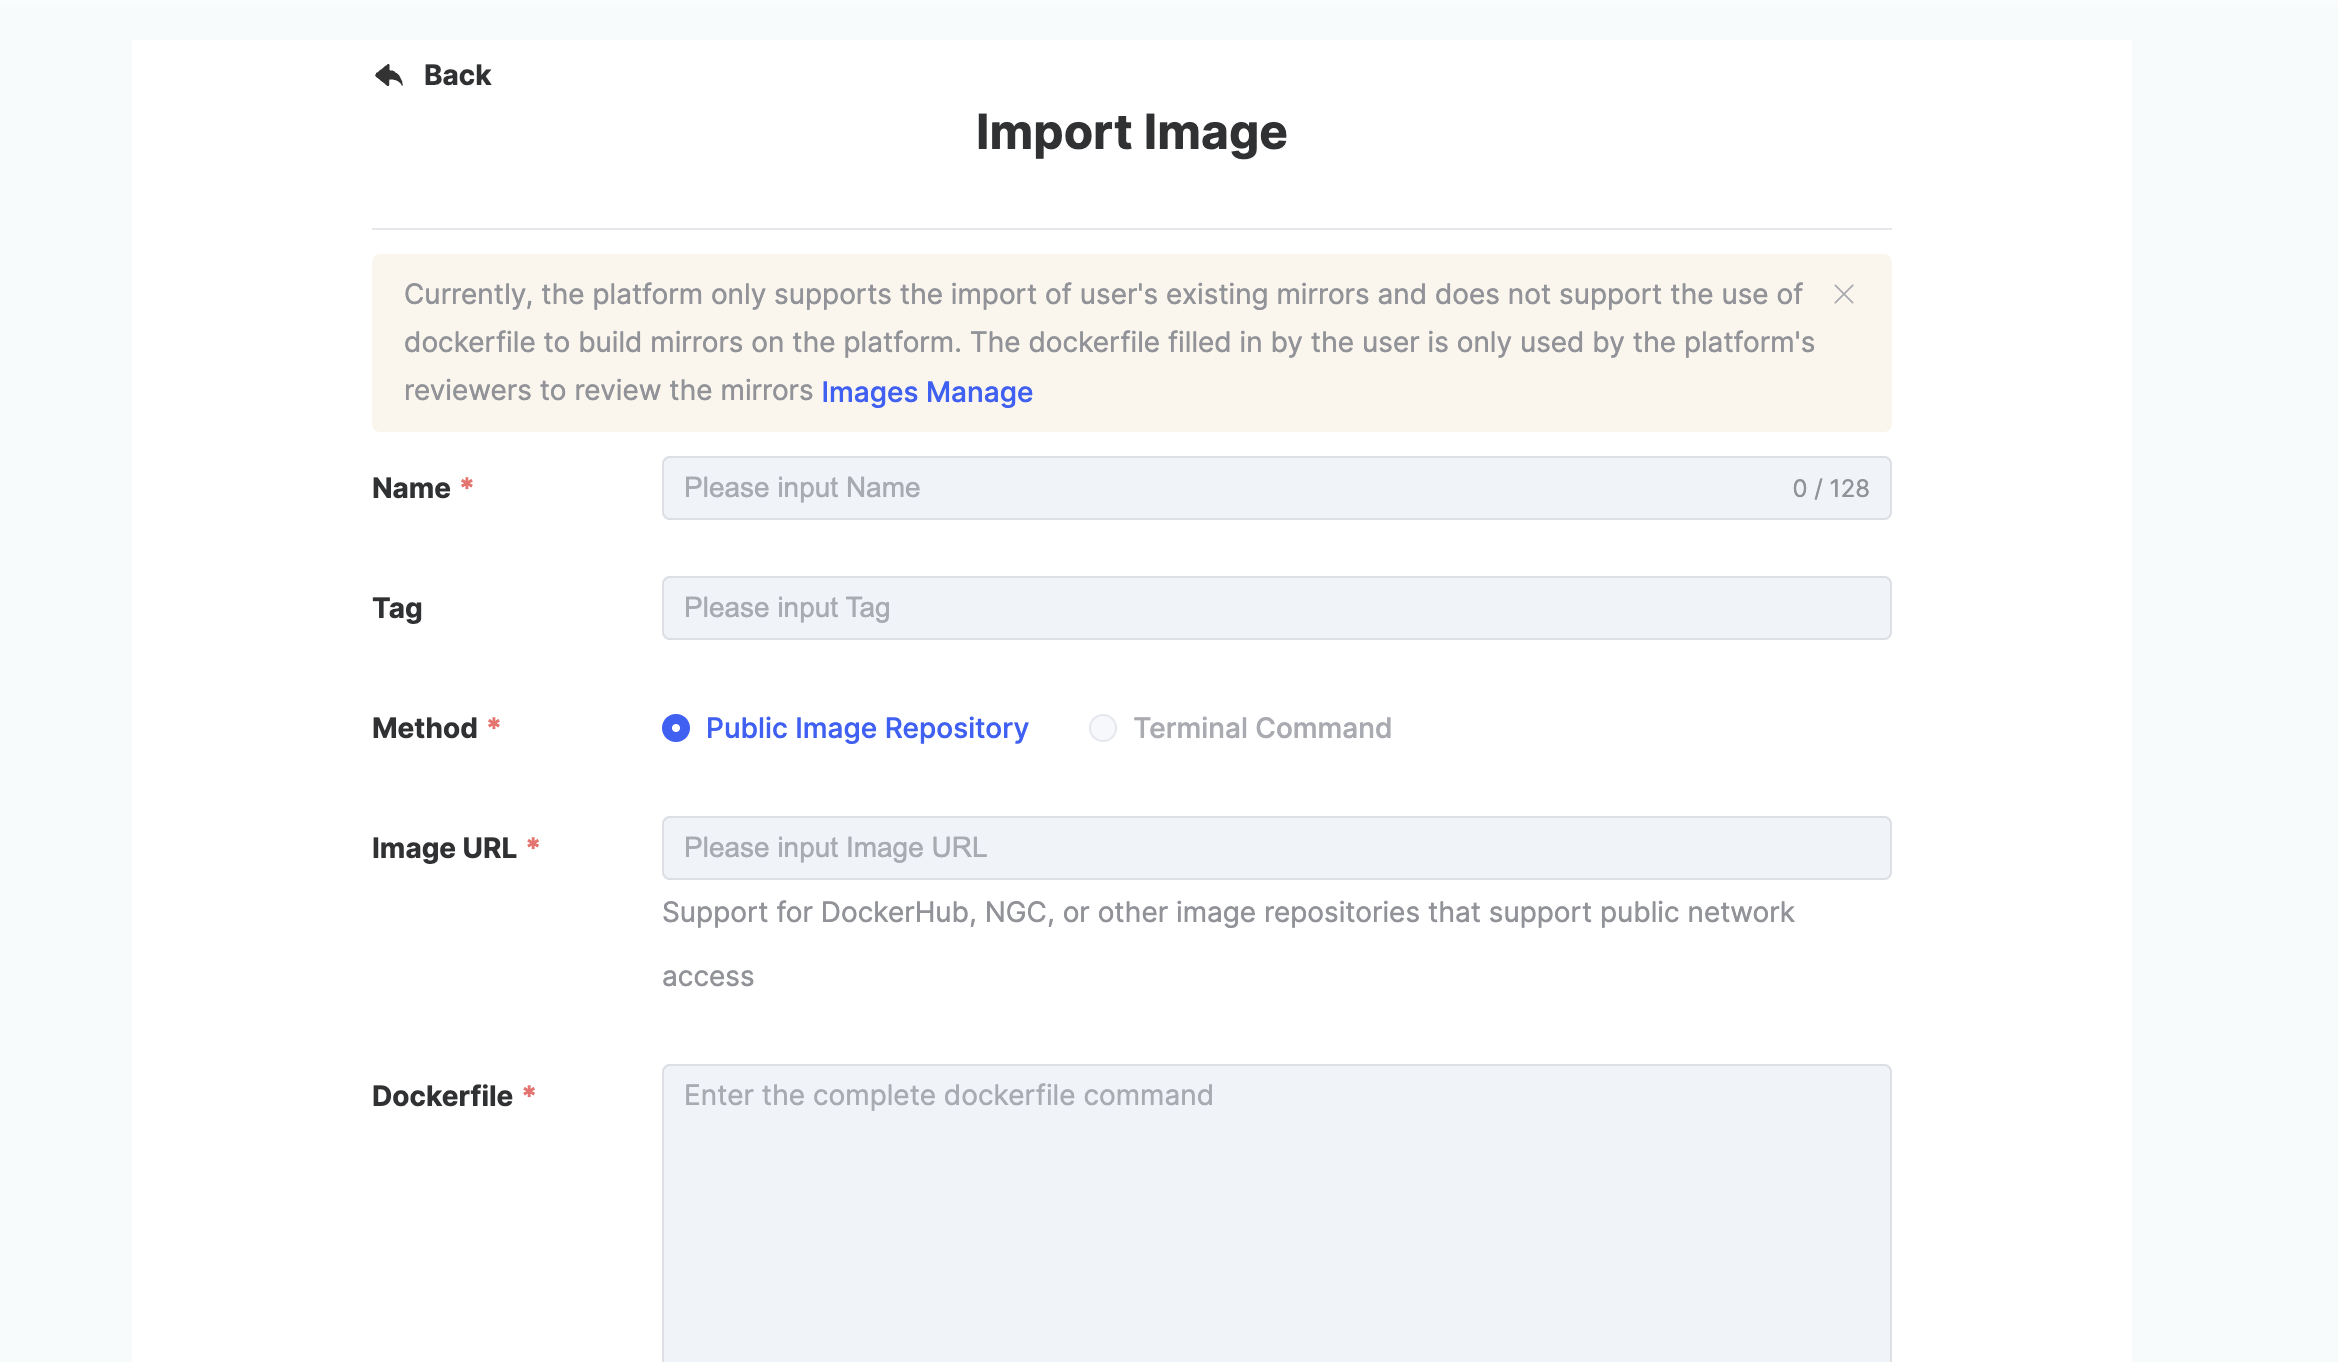
| Parameter | Explanation |
|---|---|
| Image Name | Enter the name of the image. Must be 3–128 characters in length and consist of lowercase letters, numbers, hyphens (-), and dots (.). Must start with a lowercase letter and end with a lowercase letter or number. Required. |
| Image Tag | Enter the image tag. If left blank, the default will be a timestamp. The use of the keyword latest is not allowed. Optional. |
| Import Method | Currently, only import from public image repositories is supported. |
| Image URL to Import | Enter the image URL. Required. Supports DockerHub, NGC, or other publicly accessible image repositories. |
| Dockerfile | Required. Provided for platform reviewers to inspect the image content. Note: For Dockerfile requirements, please refer to the [documentation]. |
| Image Description | Optional. Supports 0–256 characters. Chinese is supported. |
After the user clicks [Submit], the system returns to the Image Management list page. The platform administrator will review the imported image. Once approved, the image will be directly imported into the platform’s image repository, and the user will be able to use the image when creating evaluation tasks.
If the image is not approved, please check the reason for rejection and modify the image URL or Dockerfile according to platform specifications before re-importing.
Notifications for approval, successful import, or rejection will be sent to the user via email.
If there is no status update for an extended period, please contact the platform administrator for assistance.
Custom Image Building with Dockerfile
A Dockerfile is a text file used to build container images. It contains a series of instructions and parameters that define how the image should be constructed. Docker builds the image automatically by executing the instructions in the Dockerfile using the docker build command. For details on Dockerfile syntax, please refer to the official documentation, and you may also consult the Quick Start Guide for a beginner-friendly overview.
When performing offline evaluations, if the platform’s preloaded images do not meet the user’s requirements, the user can provide a Dockerfile, and the platform will assist in generating a usable image.
Common Dockerfile keywords include:
| Command Keyword | Meaning |
|---|---|
| FROM | Specifies the base image upon which the current image is built. This must be the first command in the Dockerfile. The selected base image must be secure and trustworthy. It is recommended to prioritize platform-preloaded images or official images. |
| RUN | Defines the commands to execute during image build. These are used to install packages or perform setup steps while constructing the image. |
| ENV | Used to set environment variables during the image build process (e.g., ENV MY_PATH="/usr/mytest"). These variables are persisted in the container and can be accessed after the container starts. |
| ARG | Defines temporary variables used during image build (e.g., ARG TMP="mytemp"). These variables are only available at build time and are not accessible after the container is started. |
Note:
- The following environment variables set in ENV are provided by the container and must not be modified.
- NVIDIA_, HOSTNAME, KUBERNETES_, RANK, MASTER_, AIRS_, CUDA_, NCCL_, PADDLE_* Dockerfile Usage Recommendations:
- The FROM base image must be selected from the platform-provided candidate images.
- Minimize the number of image layers. Commands like RUN and COPY generate new layers during the build process, so it is recommended to use && to chain multiple commands into a single RUN statement.
The following command creates two image layers:
RUN apt-get install -y openssh-serverRUN mkdir -p /run/sshdAfter modifying to the following command, two layers are merged into one, which helps reduce the overall image size.
RUN apt-get install -y openssh-server \ && mkdir -p /run/sshd- When the command is long, it is recommended to split it into multiple lines, and sort multi-line parameters for better readability.
- For example, you can sort the list of packages alphabetically to avoid duplicate installations and improve code clarity. Here’s a sample:
RUN apt-get update && apt-get install -y \ bzr \ cvs \ git \ mercurial \ subversion \ && rm -rf /var/lib/apt/lists/*- Reduce image size by cleaning up caches:
RUN apt-get -y ... && apt-get clean- When installing Python packages, it is recommended to use:
RUN pip install --no-cache-dir -i {custom index URL} {package}- Reduce image size by cleaning up caches:
RUN apt-get -y ... && apt-get clean- When installing Python packages, it is recommended to use:
RUN pip install --no-cache-dir -i {custom index URL} {package} - When installing Conda-related packages, it is recommended to include clean-up commands afterward. The following parameters mean: • RUN conda clean -p (Remove unused packages) • RUN conda clean -t (Remove tar files) • RUN conda clean -y --all (Remove all packages and cached files)
- Use the --no-cache=true option with the docker build command to disable build caching.
Dockerfile Example:This example corresponds to the platform image: flageval-nlp-ngc-pytorch2303:v1.0.
This image already meets the environment requirements for mainstream models such as YuLan-Chat-2-13b, LLaMA, ChatGLM2-6B, and Baichuan-13B-Chat.
If this image meets your needs, it is recommended to use it.
FROM nvcr.io/nvidia/pytorch:23.03-py3
RUN apt-get update
RUN apt-get install -y openssh-server && mkdir -p /run/sshd
Recommended versions; users may install based on their model needs.
It is advised to separate transformer-related packages from others for clarity.
RUN pip install --no-cache-dir \
    transformer-engine==0.6.0 \
    transformers==4.31.0 \
    transformers-stream-generator==0.0.4
RUN pip install --no-cache-dir \
    sentencepiece==0.1.98 \
    accelerate==0.21.0 \
    colorama==0.4.6 \
    cpm_kernels==1.0.11 \
    streamlit==1.25.0 \
    fairscale==0.4.13
Qwen model dependency
RUN pip install tiktoken
Platform Image Approval Principles
Currently, the platform mainly provides NVIDIA card series graphics card. It is recommended to use NVIDIA's official images (nvcr.io/nvidia) as the base image. If using the PyTorch framework, it is recommended to use nvcr.io/nvidia PyTorch image as the FROM source. For images from other sources, if the approver judges that there is a security risk, then it will not be approved.
If you use other brands of graphic cards, you can use the image provided by the platform for testing. If it does not meet your needs, please contact the operation and maintenance personnel (flageval@baai.ac.cn) for processing.
Here are some suggestions for dockerfile:
- The first line of Dockerfile must be the FROM command, indicating the source of the base image. Otherwise, the image import request will be rejected.
- In the image, the platform needs to communicate with the backend k8s cluster, and SSH needs to be installed.
- Try not to use commands such as COPY and ADD in the dockerfile. If you use these two commands, add comments to explain their content.
- According to the security requirements of images, there cannot be operations such as wget and curl in RUN to download unknown packages.
- Users need to use the system's built-in commands to install the official system package.
- The imported image URL filled in needs to be able to be downloaded using the docker command.
- Try to specify the use of domestic sources when installing packages.
The platform has a size limit for images: 40Gi.
Image security essential requirements
- Forbid images that consist of high-risk security bugs that are publicly available and have published fixes.
- It is forbidden to use officially discontinued published versions for imaging.
- Forbid images from installing any malicious programs such as viruses, Trojan horse, backdoors, mining, and AFK.
- Forbid the use of any pirated or cracked versions of programs.
- Forbid the use of any program that may endanger platform security.
Note:
To ensure the security and compliance of service images, we will regularly scan the images that has been listed. If we find any security bugs or violations in images, we will remove the images and pursue the legal responsibility of the uploader. Thank you for your support and cooperation on our platform.
View Evaluation Results
- Viewing Evaluation Results in the NLP Domain
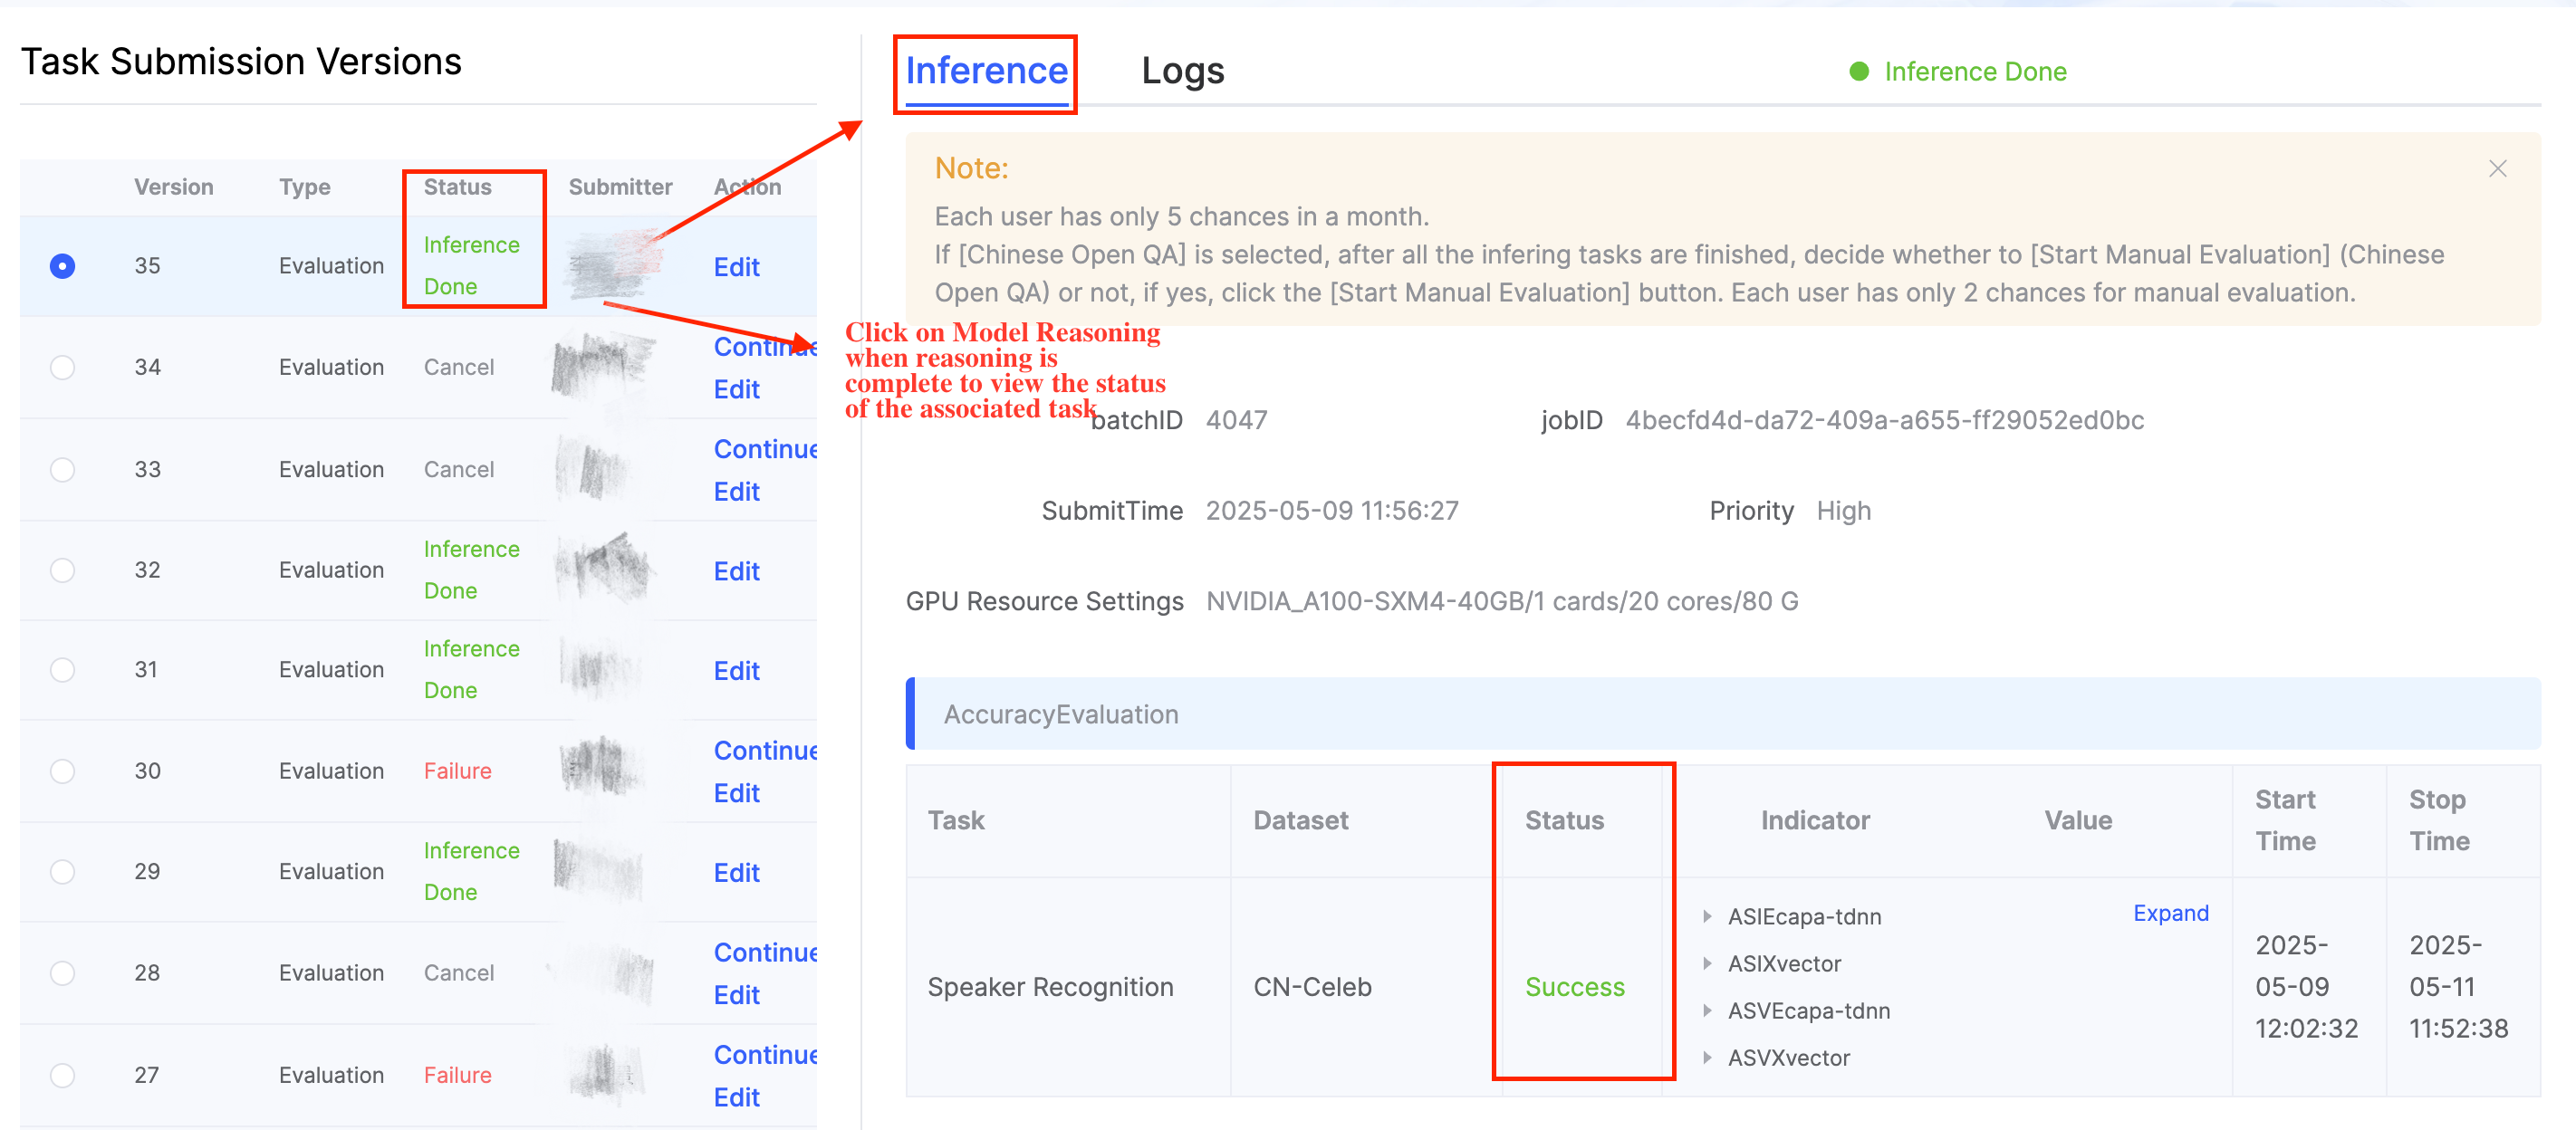
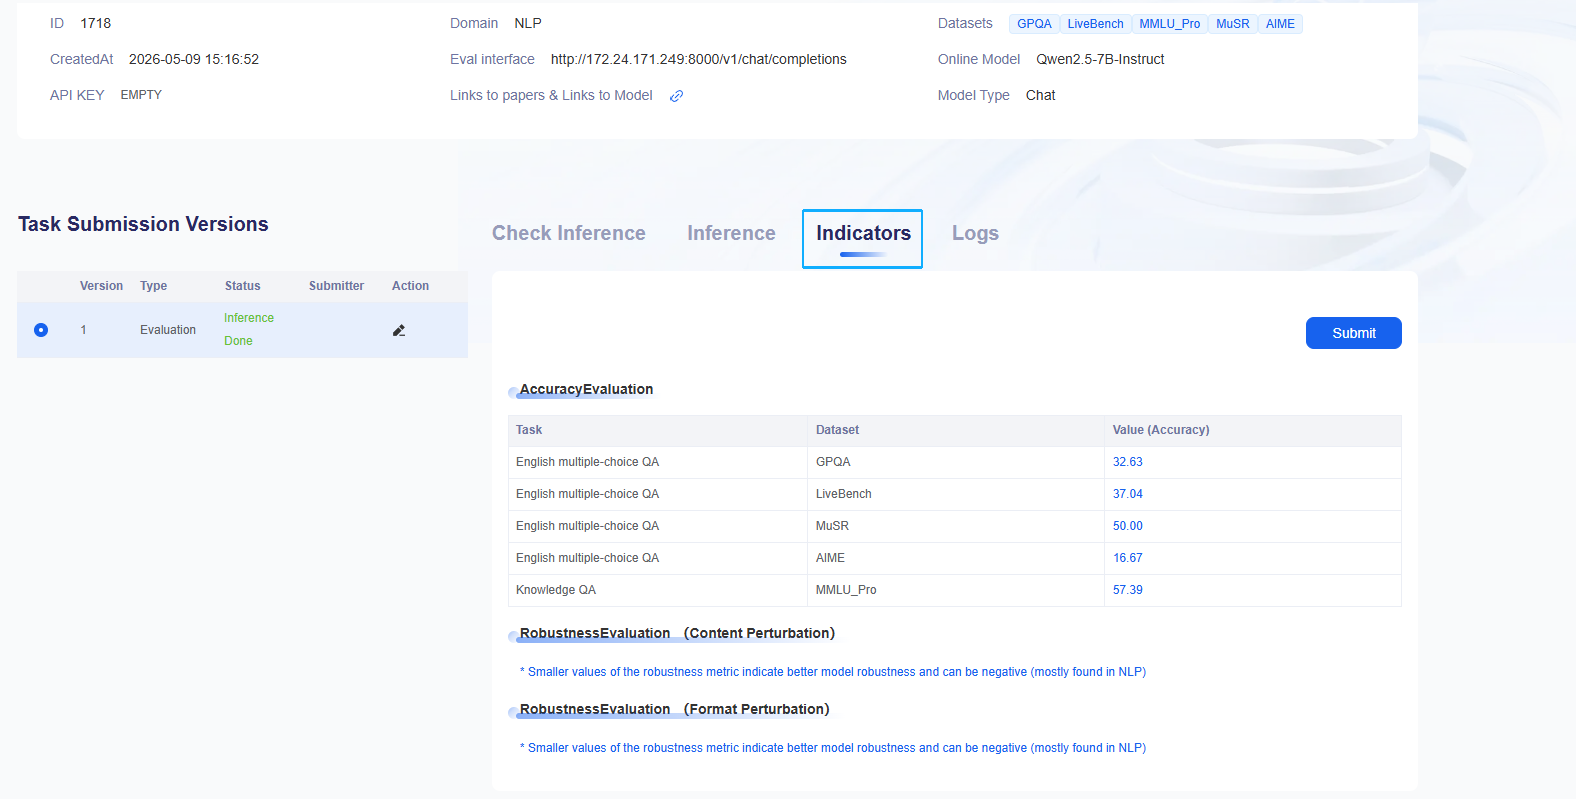
Once the related task status shows success, you can view the detailed results under indicators. 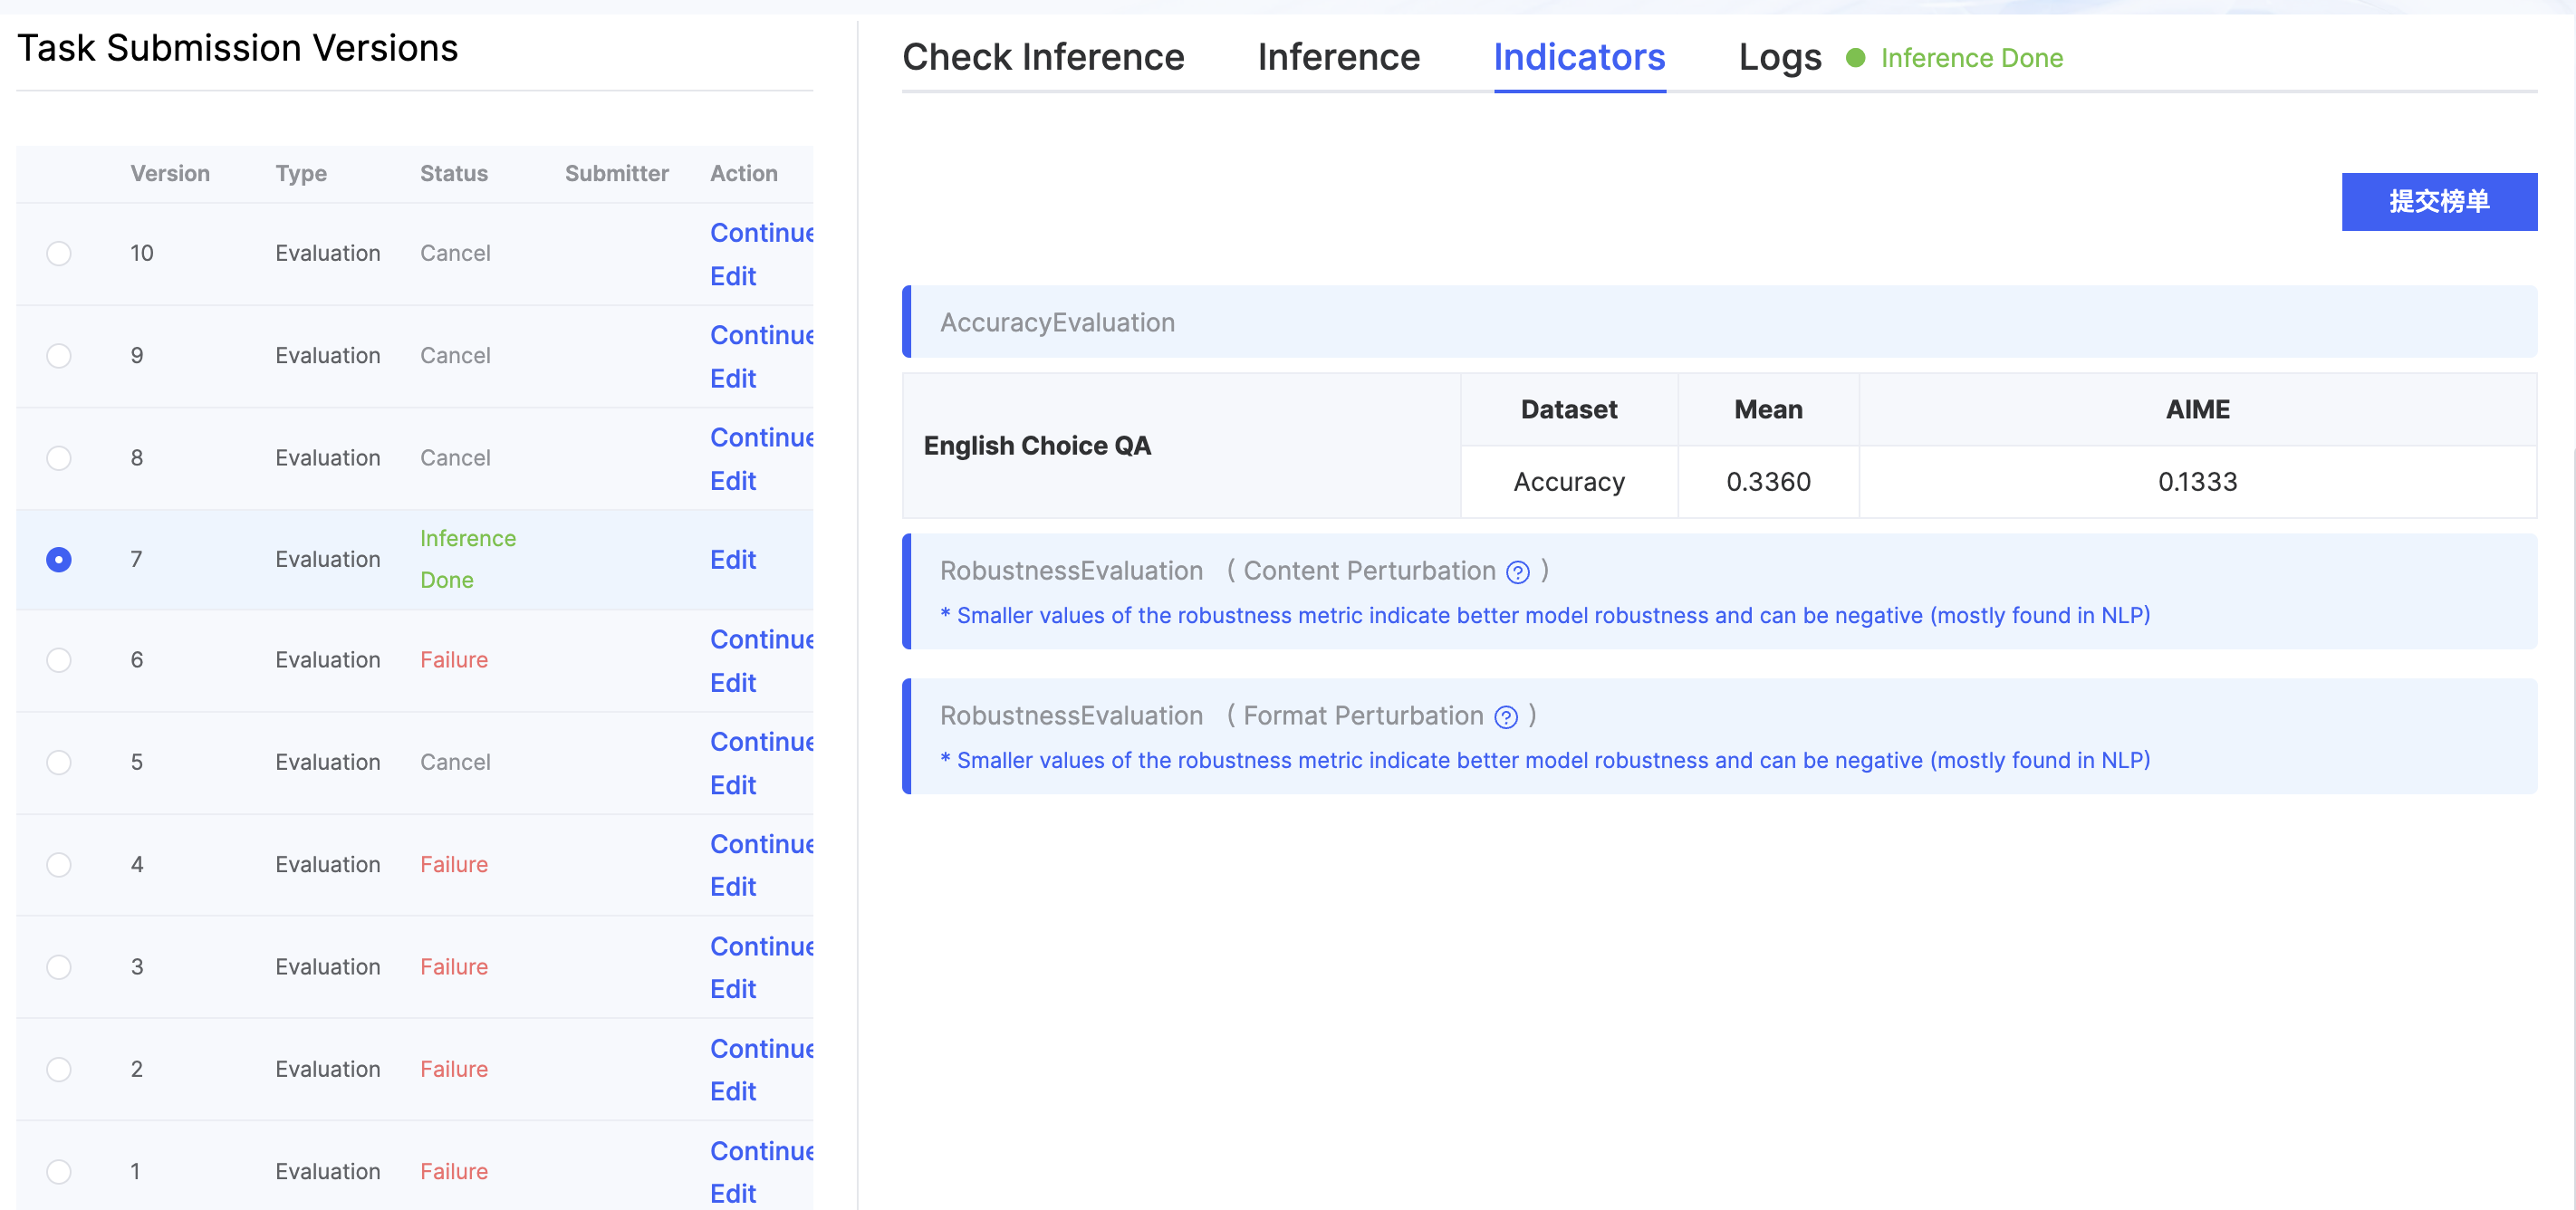
- Viewing Evaluation Results in the CV Domain
Once the evaluation task shows Inference Completed, click Fine-tuning & Inference Details to view the evaluation results. 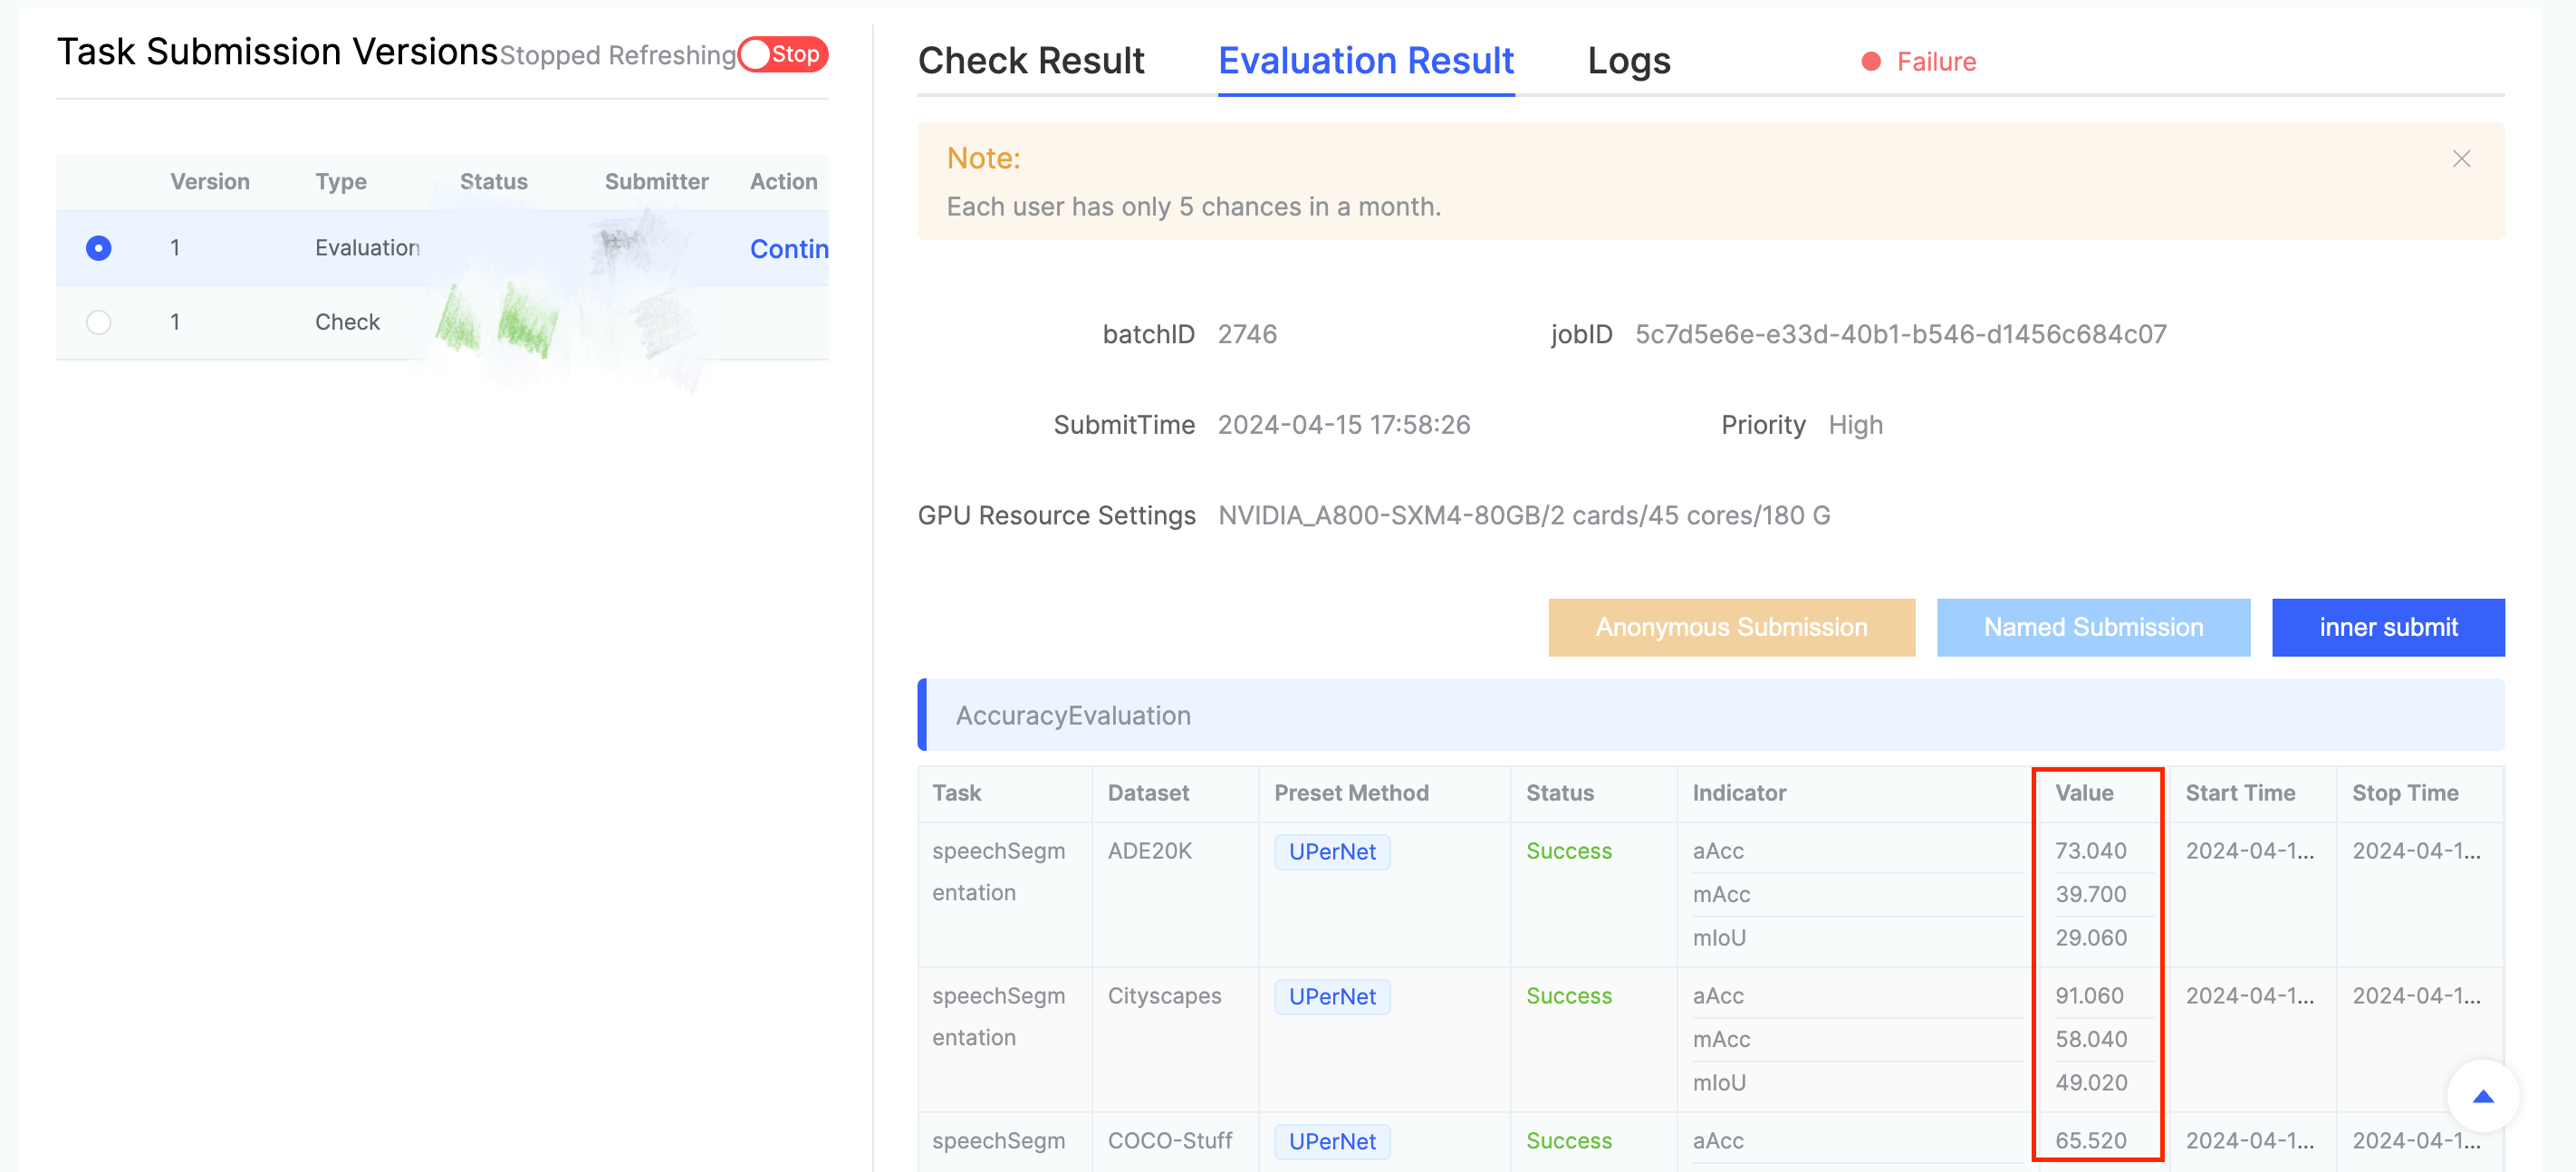
- Viewing Evaluation Results in the Multimodal Domain
Once the evaluation task status shows Inference Completed, click Inference Evaluation Details to view the specific results.

- Viewing Evaluation Results in the Audio (Speech) Domain
Once the evaluation task status shows Inference Completed, click Model Inference to view the specific results. 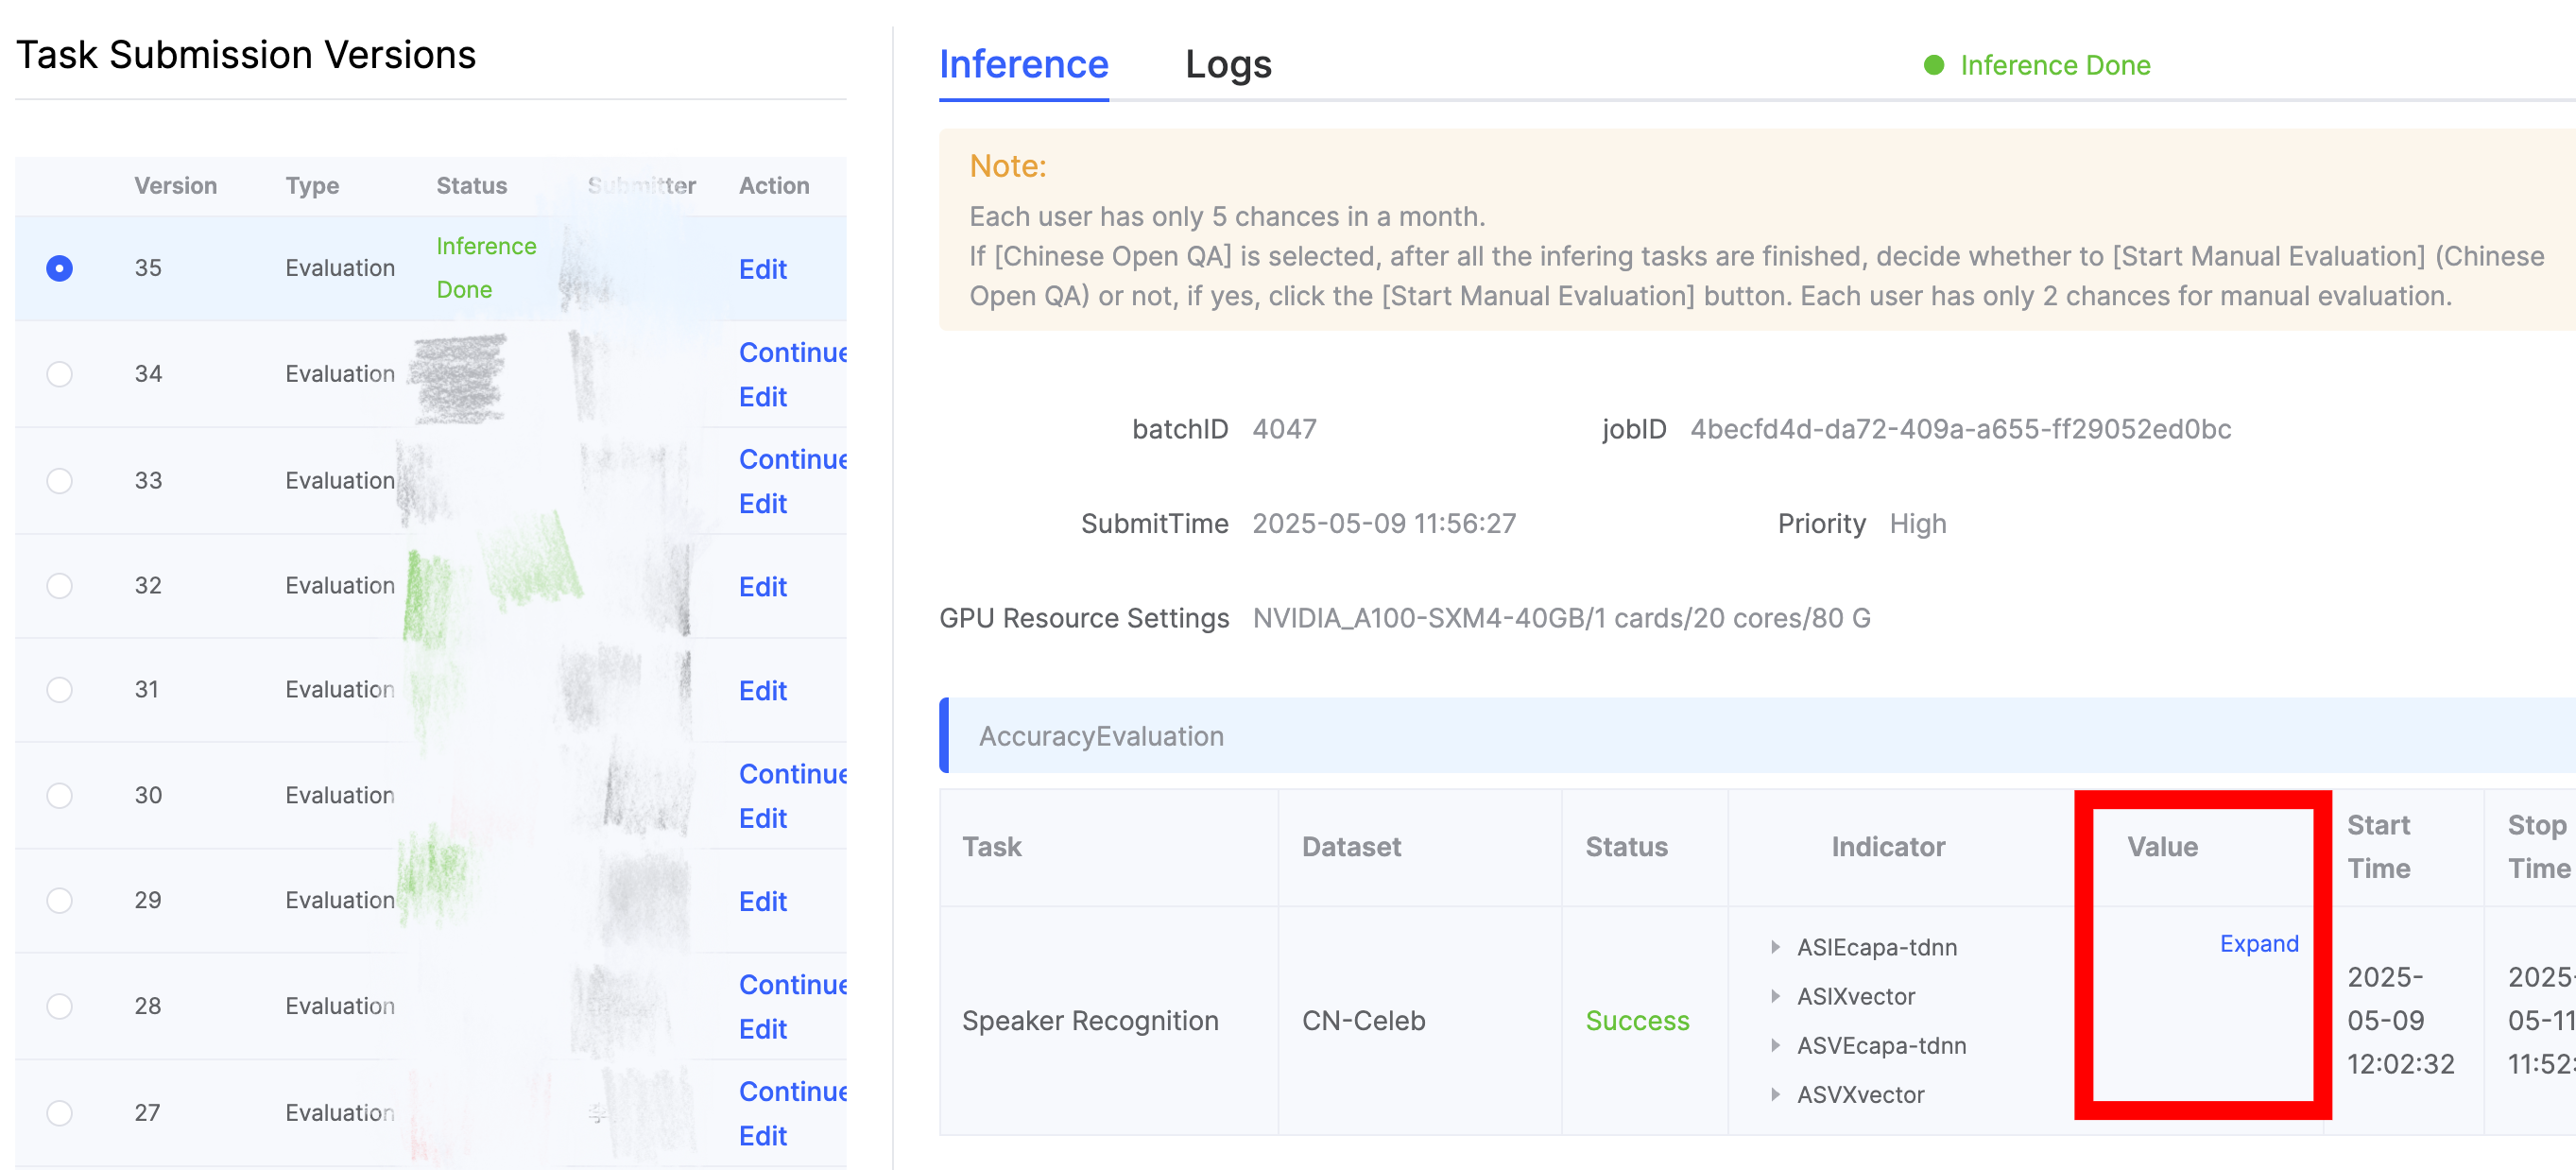
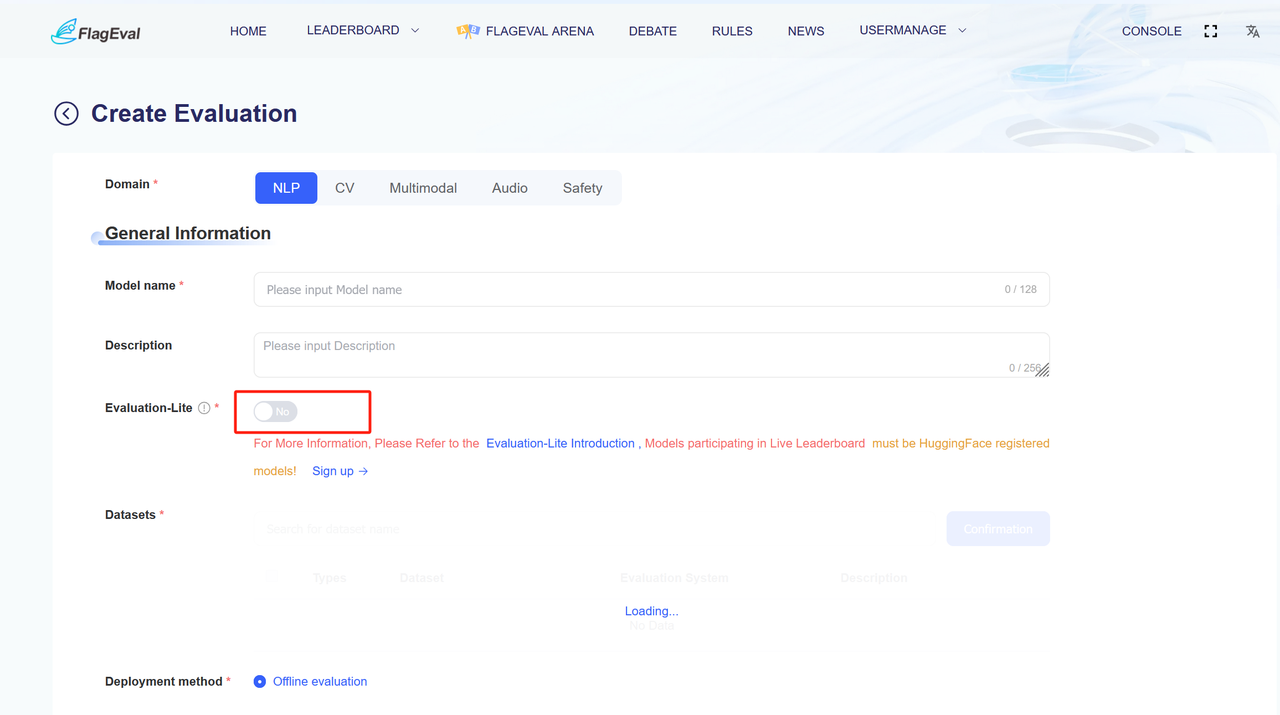
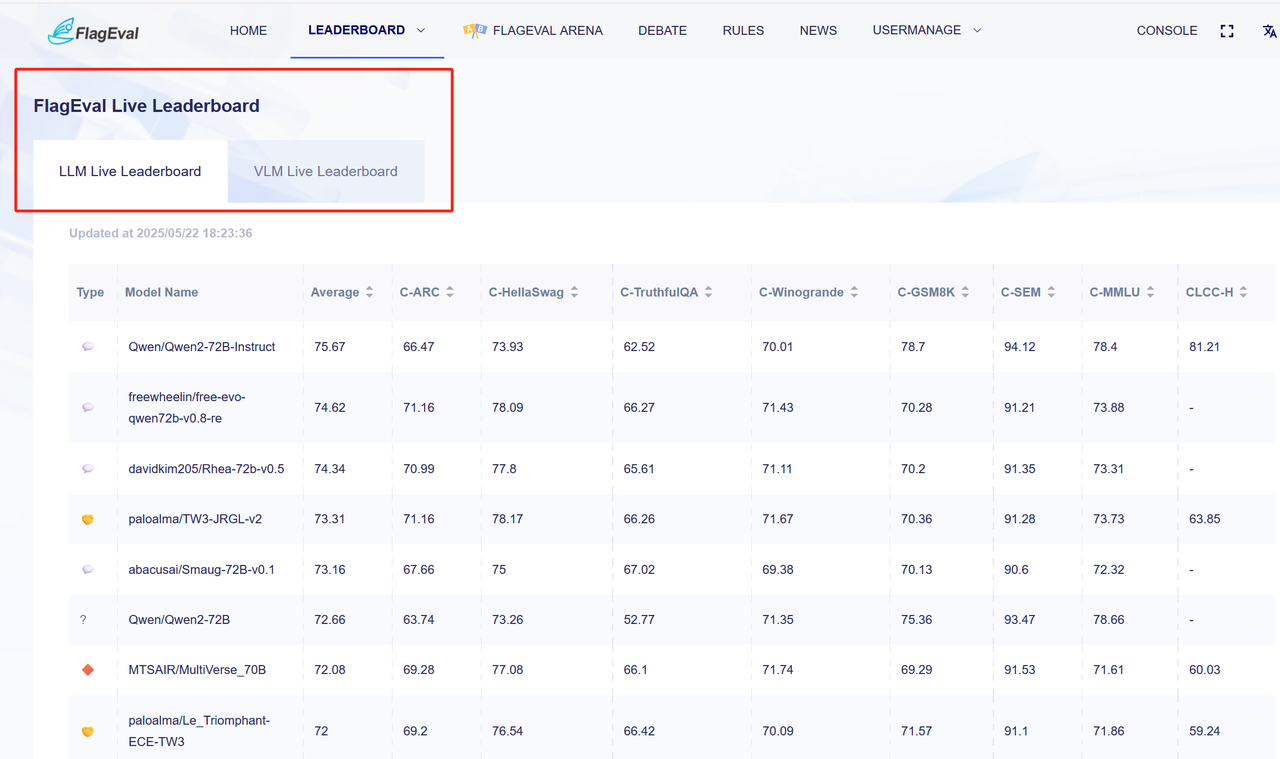
Evaluation-Lite Introduction
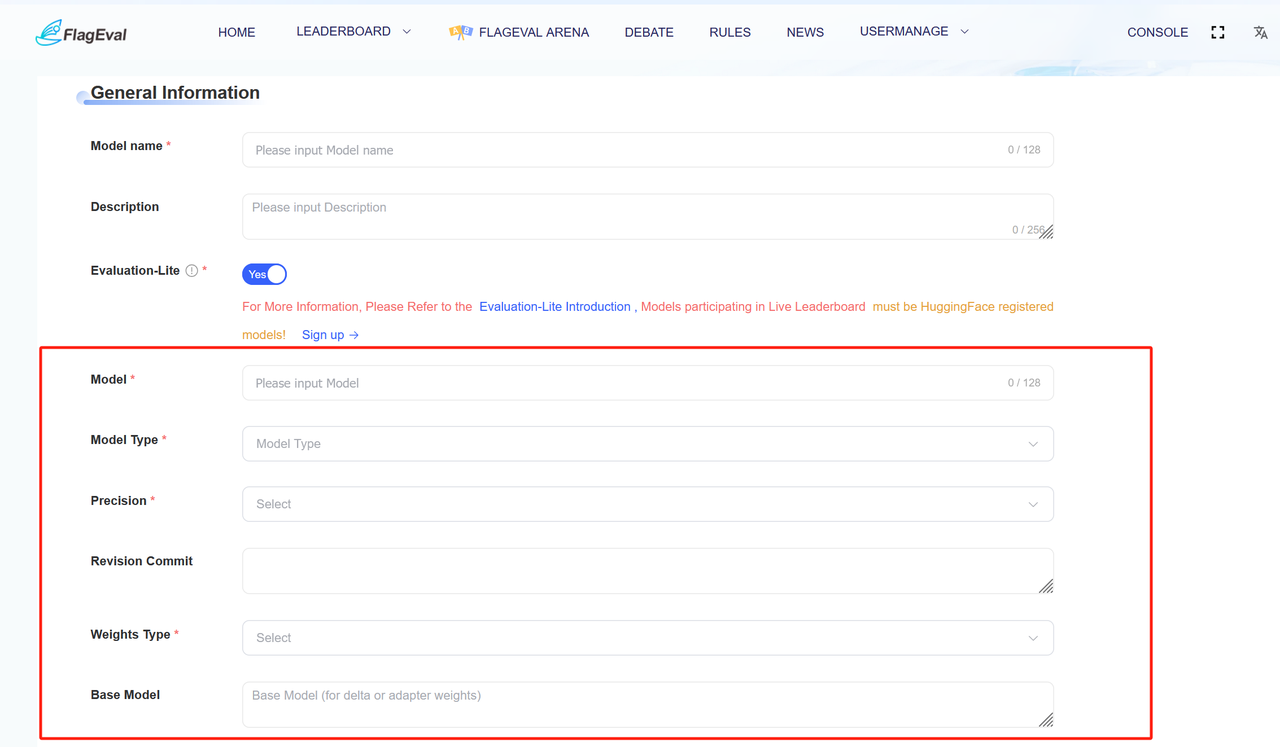
The Evaluation-Lite on this platform is only available for assessing the NLP and multimodal abilities now. By default, it is turned off. Once manually enabled, the evaluation results will be automatically uploaded to the 「FlagEval Leaderboard-lite」.
If the model under evaluation is evaluated through API invocation, it is necessary to prepare the standard format API interface and API key in advance in accordance with the FlagEval platform interface specification.FlagEval-API Interface Requirements
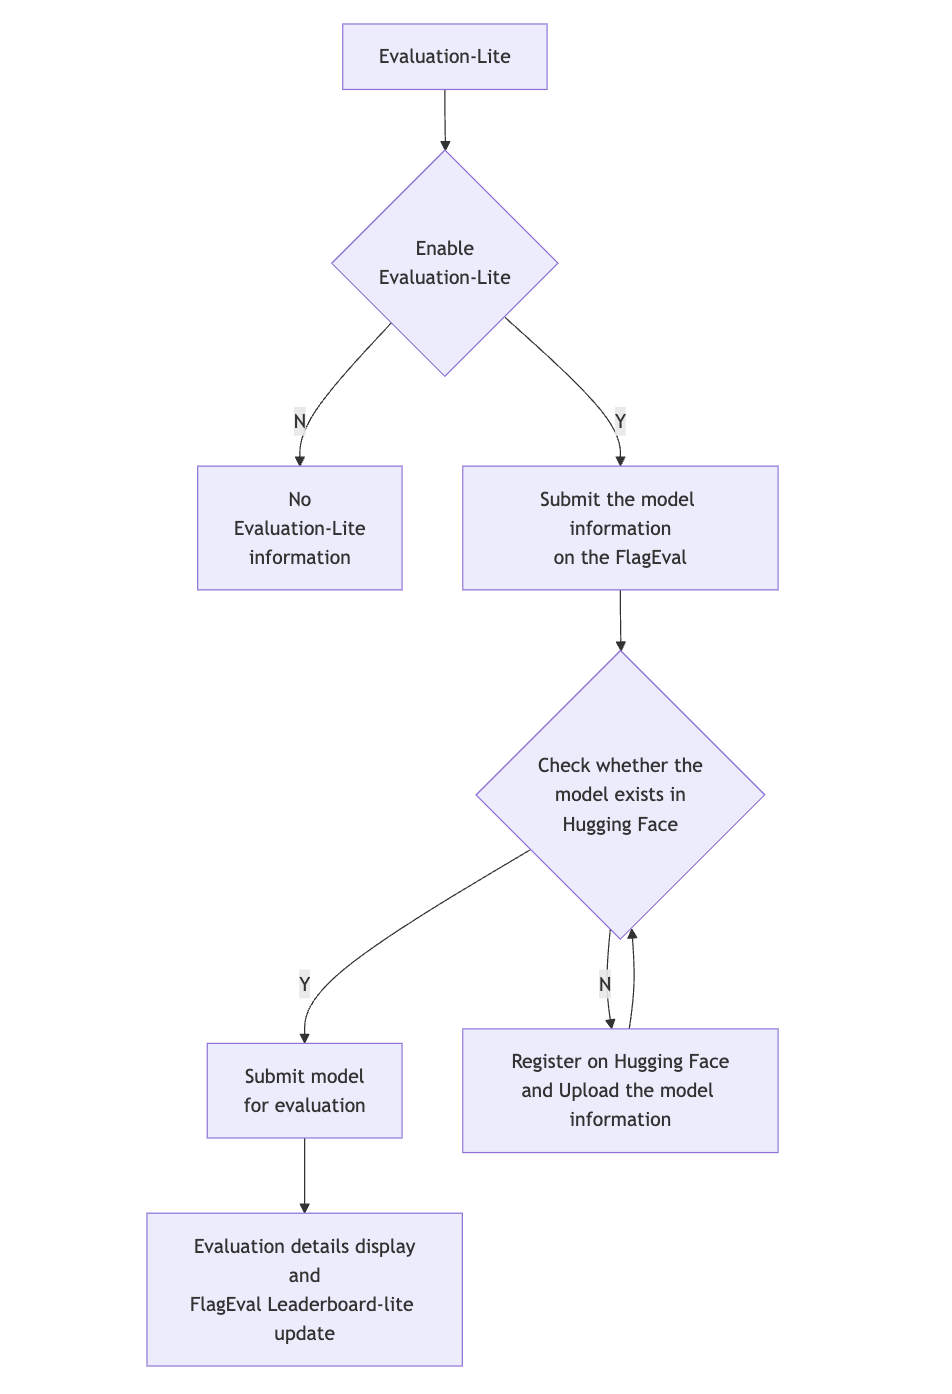
If the model under evaluation is an open-source model, it must be verified by Hugging Face and must be a registered model of Hugging Face before the evaluation. The following is the user operation process:
- Choose whether to enable「Evaluation-Lite」. Once enabled, the evaluation results will be automatically uploaded to the「FlagEval Leaderboard-lite」.
- After selecting the「Evaluation-Lite」button, choose the deployment method (currently, multimodal models already support API evaluation, and NLP models are about to be adapted).
- API Evaluation:For models evaluated through API calls, fill in the model information on the drop-down page, including「Model Name」、「Description」、「Deployment Method」、「Evaluation Interface」、「Online Model Name」、「Online API KEY」

- Private deployment:The private deployment method supports the open-source model.
- After enabling the「Evaluation-Lite」, the current model meta-information will be verified to check if the model name exists in Hugging Face. If not, it will redirect to the Hugging Face page for model registration
- After the Hugging Face model verification is passed, users can submit the model for evaluation.
The evaluation time depends on the size of the current model under evaluation. The progress of the current evaluation task can be viewed in the evaluation details.
After the model evaluation is completed, the evaluation results will be displayed synchronously in the evaluation details and 「FlagEval Leaderboard-lite」.
Multi-Chip Model Adaptation Evaluation
Page Access
- Platform Login: New users first visit the FlagEval platform homepage to register and log in to their platform account.

- Registration for Evaluation: After completing registration, navigate to the platform homepage and click on [Evaluation Console] to register for evaluations. Users need to complete their personal information, which will then be reviewed by the platform administrator. Only users who pass the verification will be granted access to view the Evaluation Console. The review results will be notified to users via email.
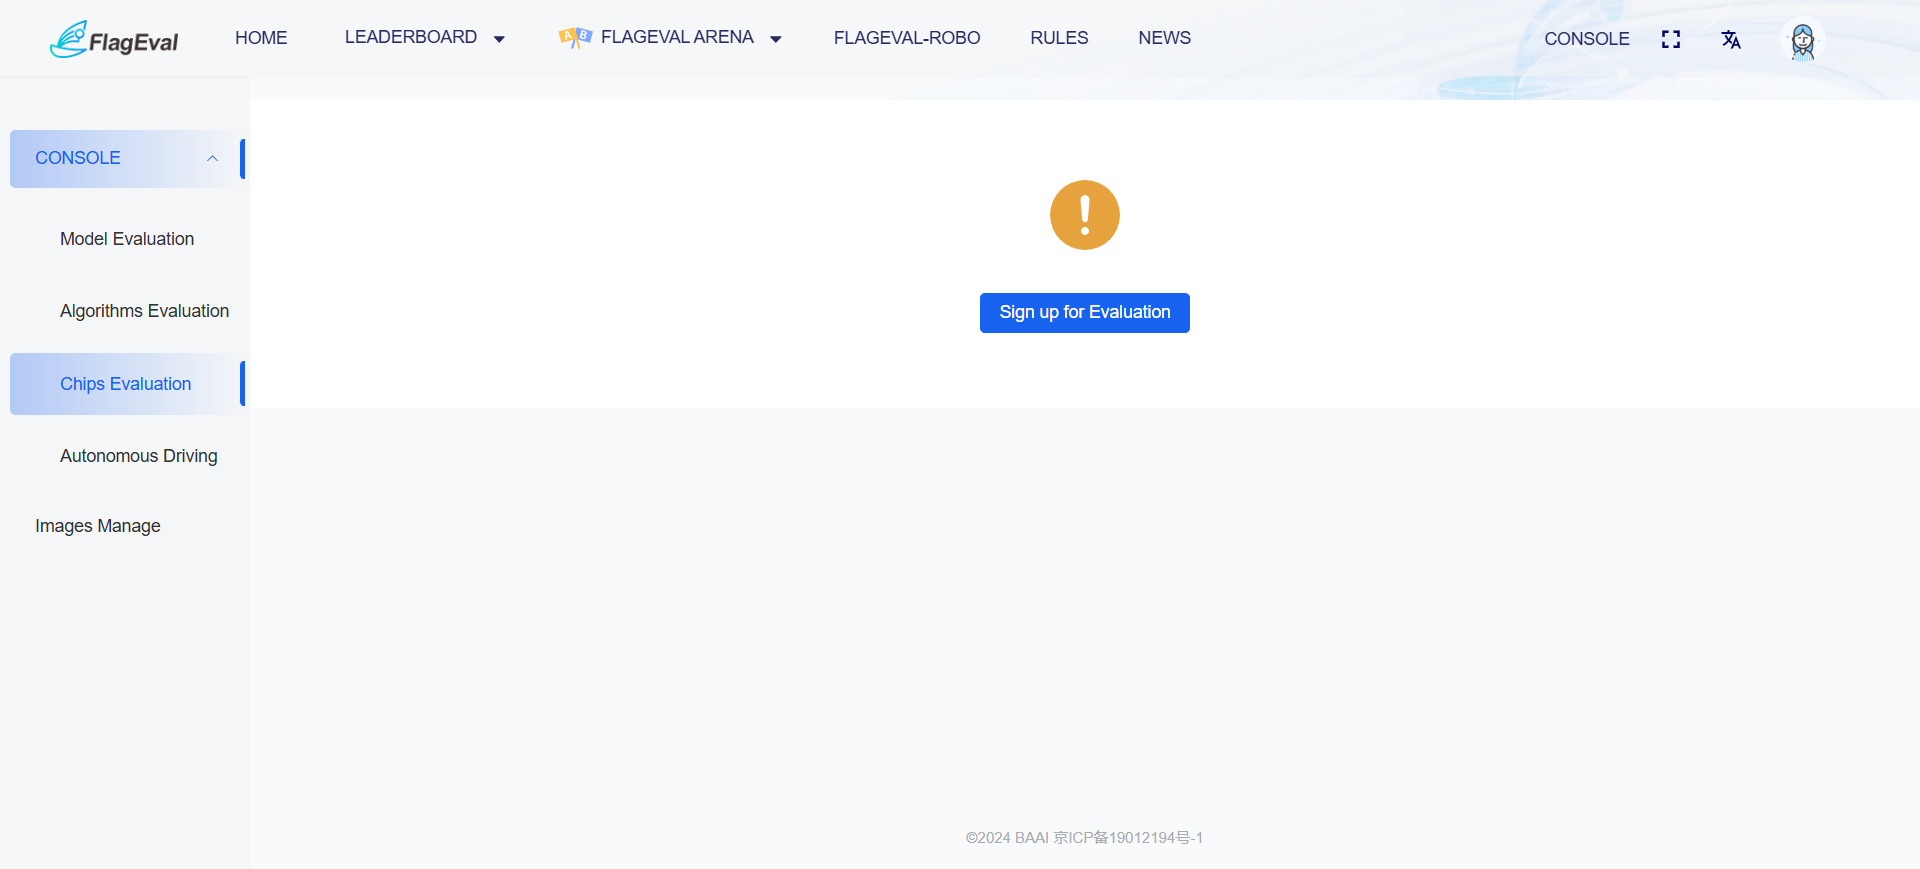
- Module Navigation: Authorized users can see the "Multi-Chip Model Adaptation Evaluation" option in the left function menu bar of the Evaluation Console. After clicking this option, the content area on the right will automatically jump to and load the page information for this module.
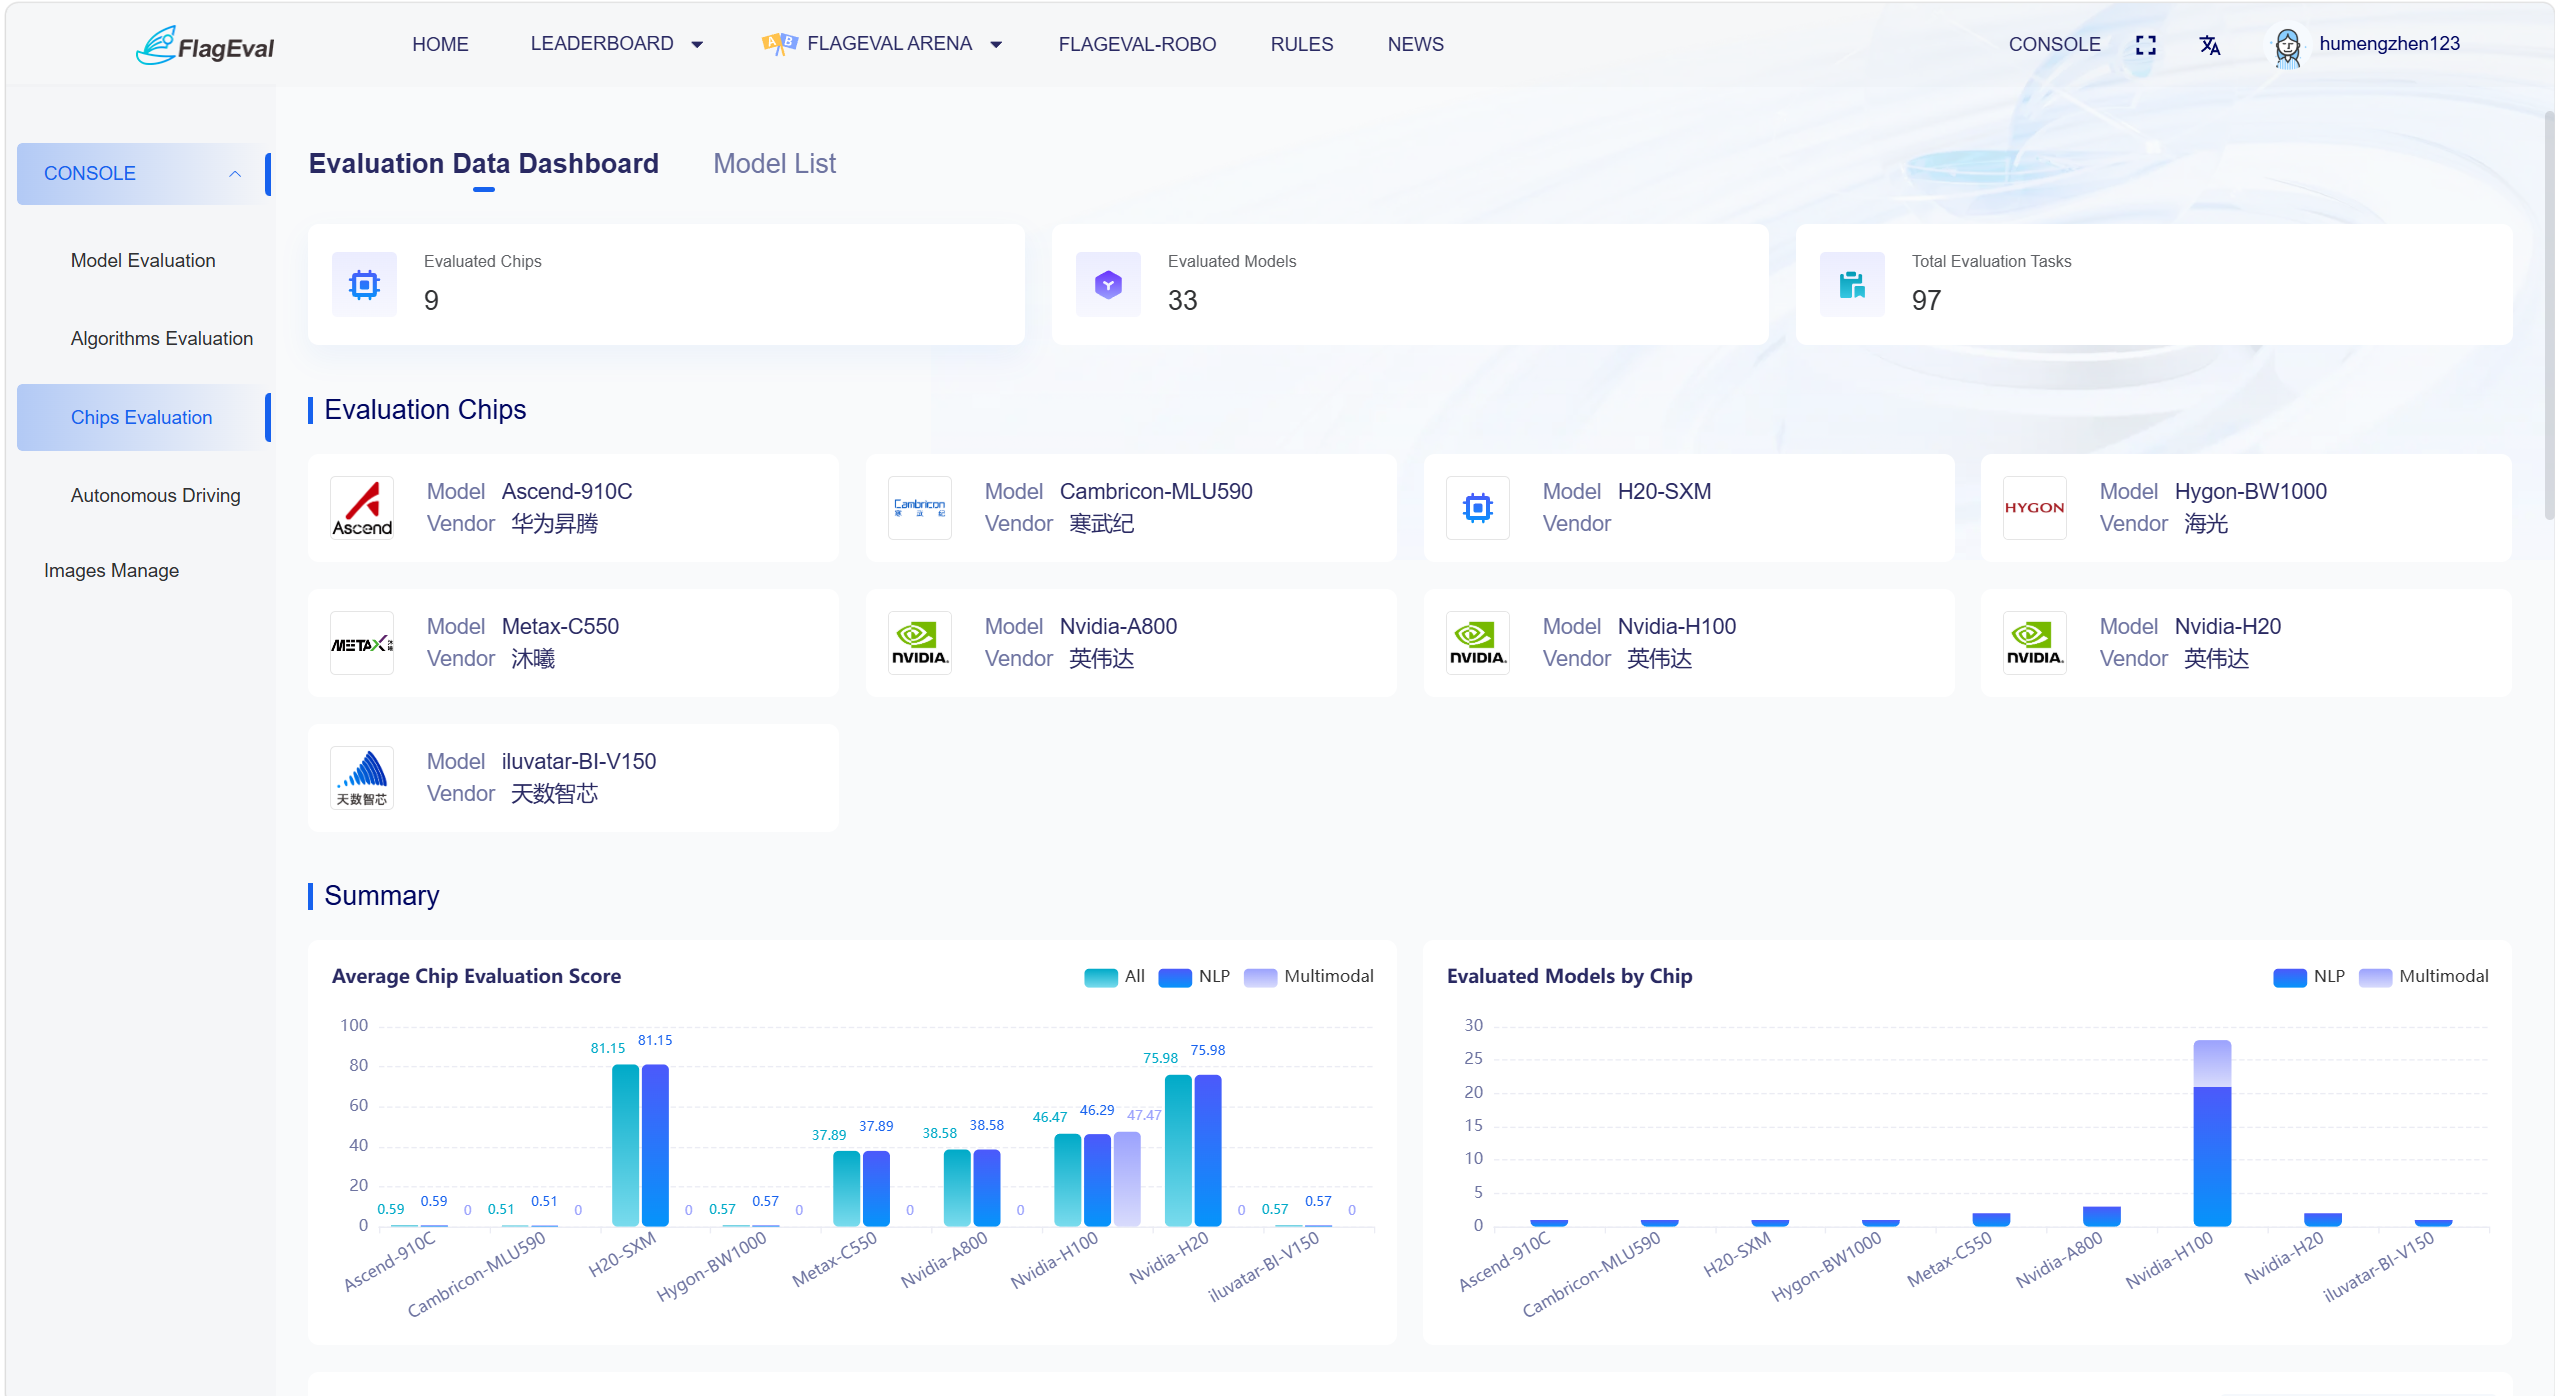
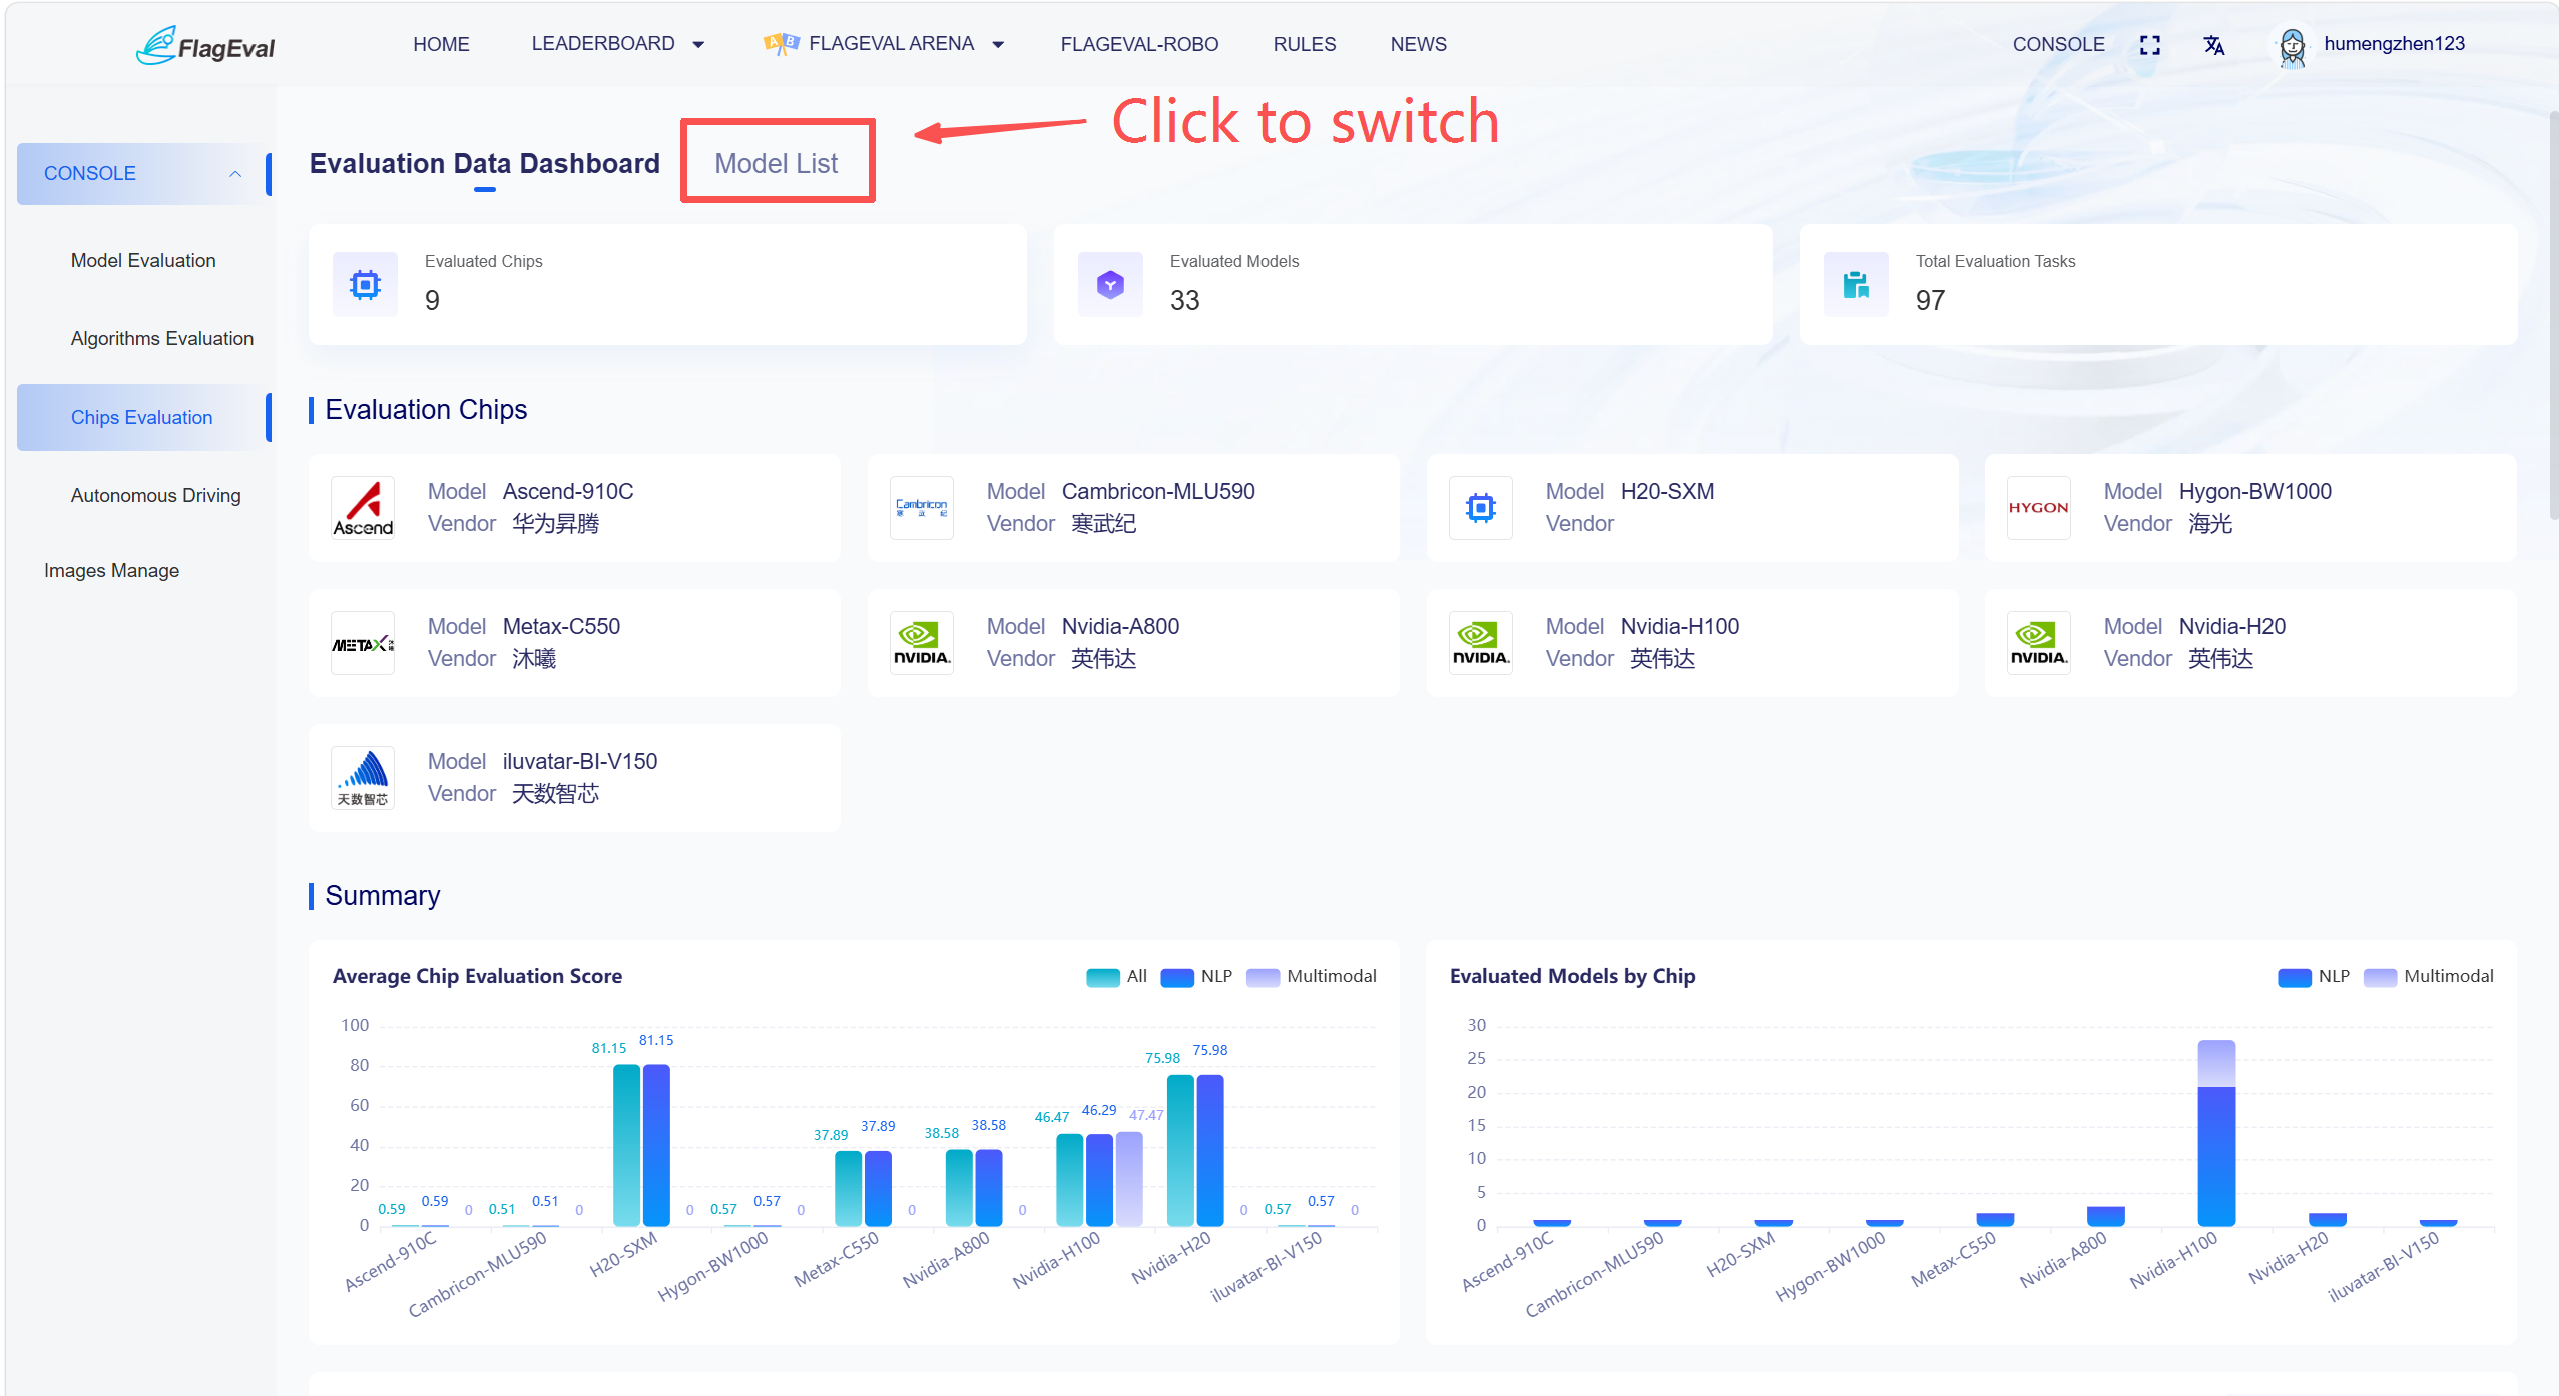
- Sub-page Switching: "Multi-Chip Model Adaptation Evaluation" contains two sub-pages—"Evaluation Data Dashboard" and "Model List". Users can switch between sub-pages via the tabs at the top of the page.
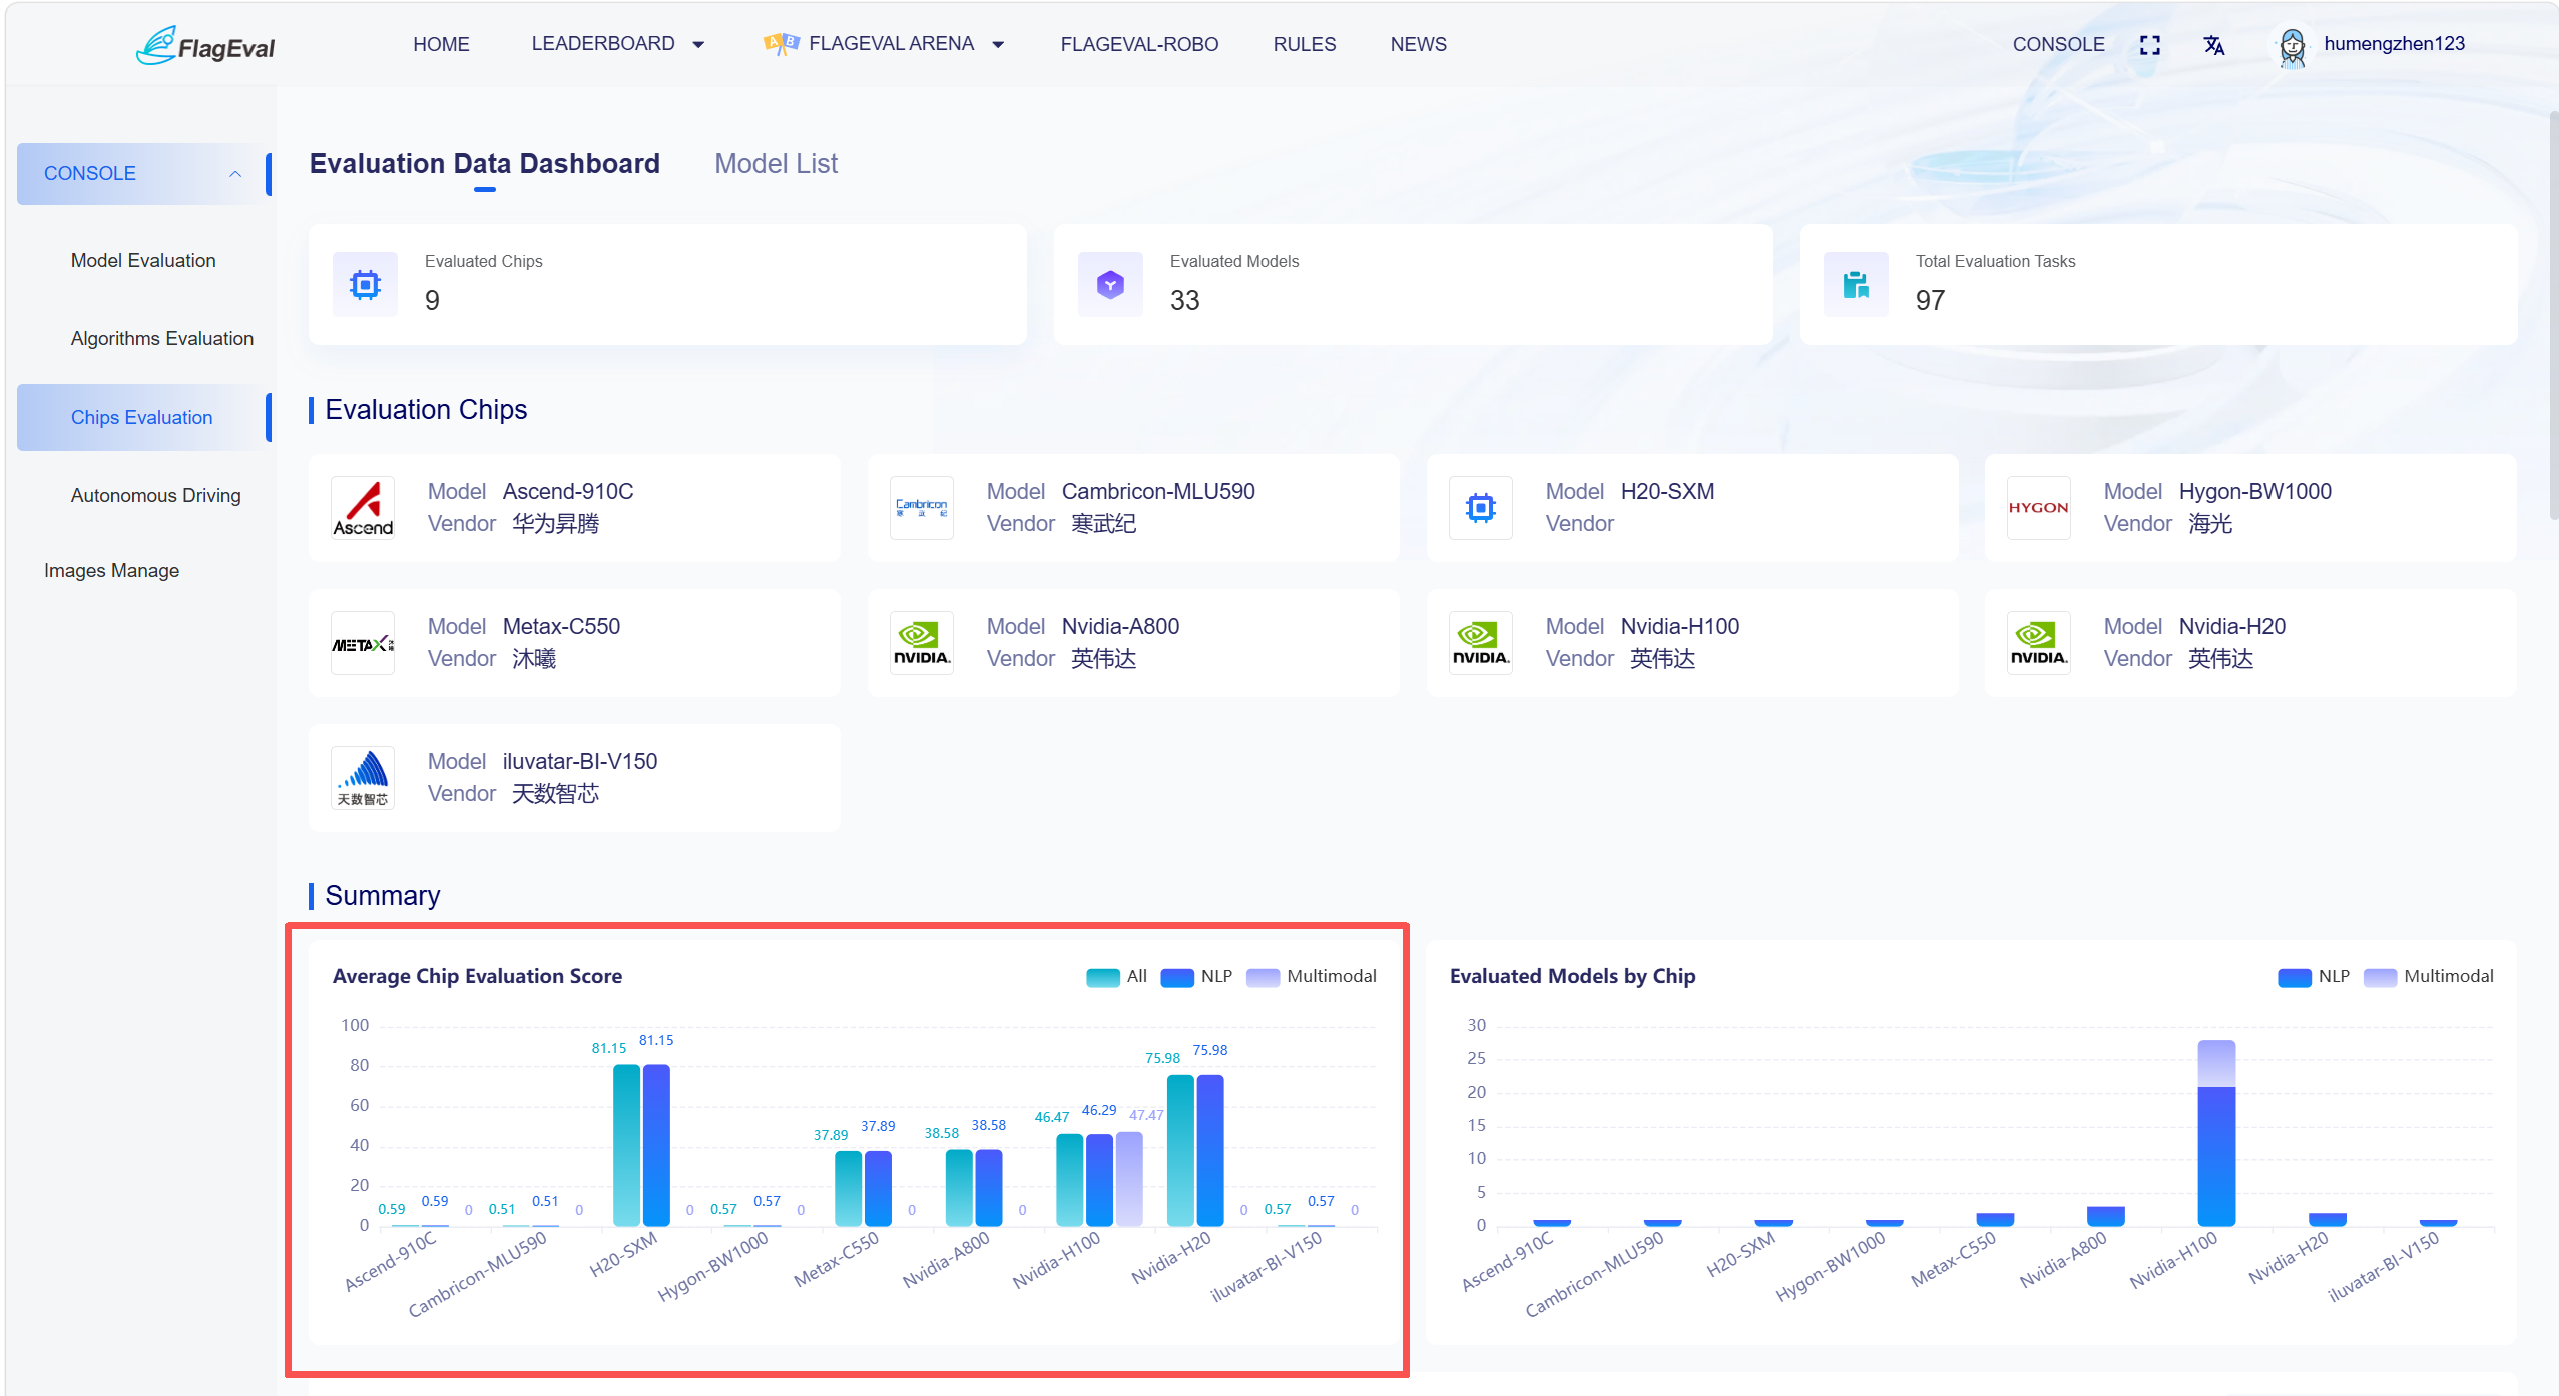
Evaluation Data Dashboard Page
- After entering the "Multi-Chip Model Adaptation Evaluation" module, the system displays the "Evaluation Data Dashboard" page by default. This page consists of four sections from top to bottom: "Top Data Labels", "Adapted Chip List", "Statistical Summary", and "Model Adaptation Evaluation Status by Chip".
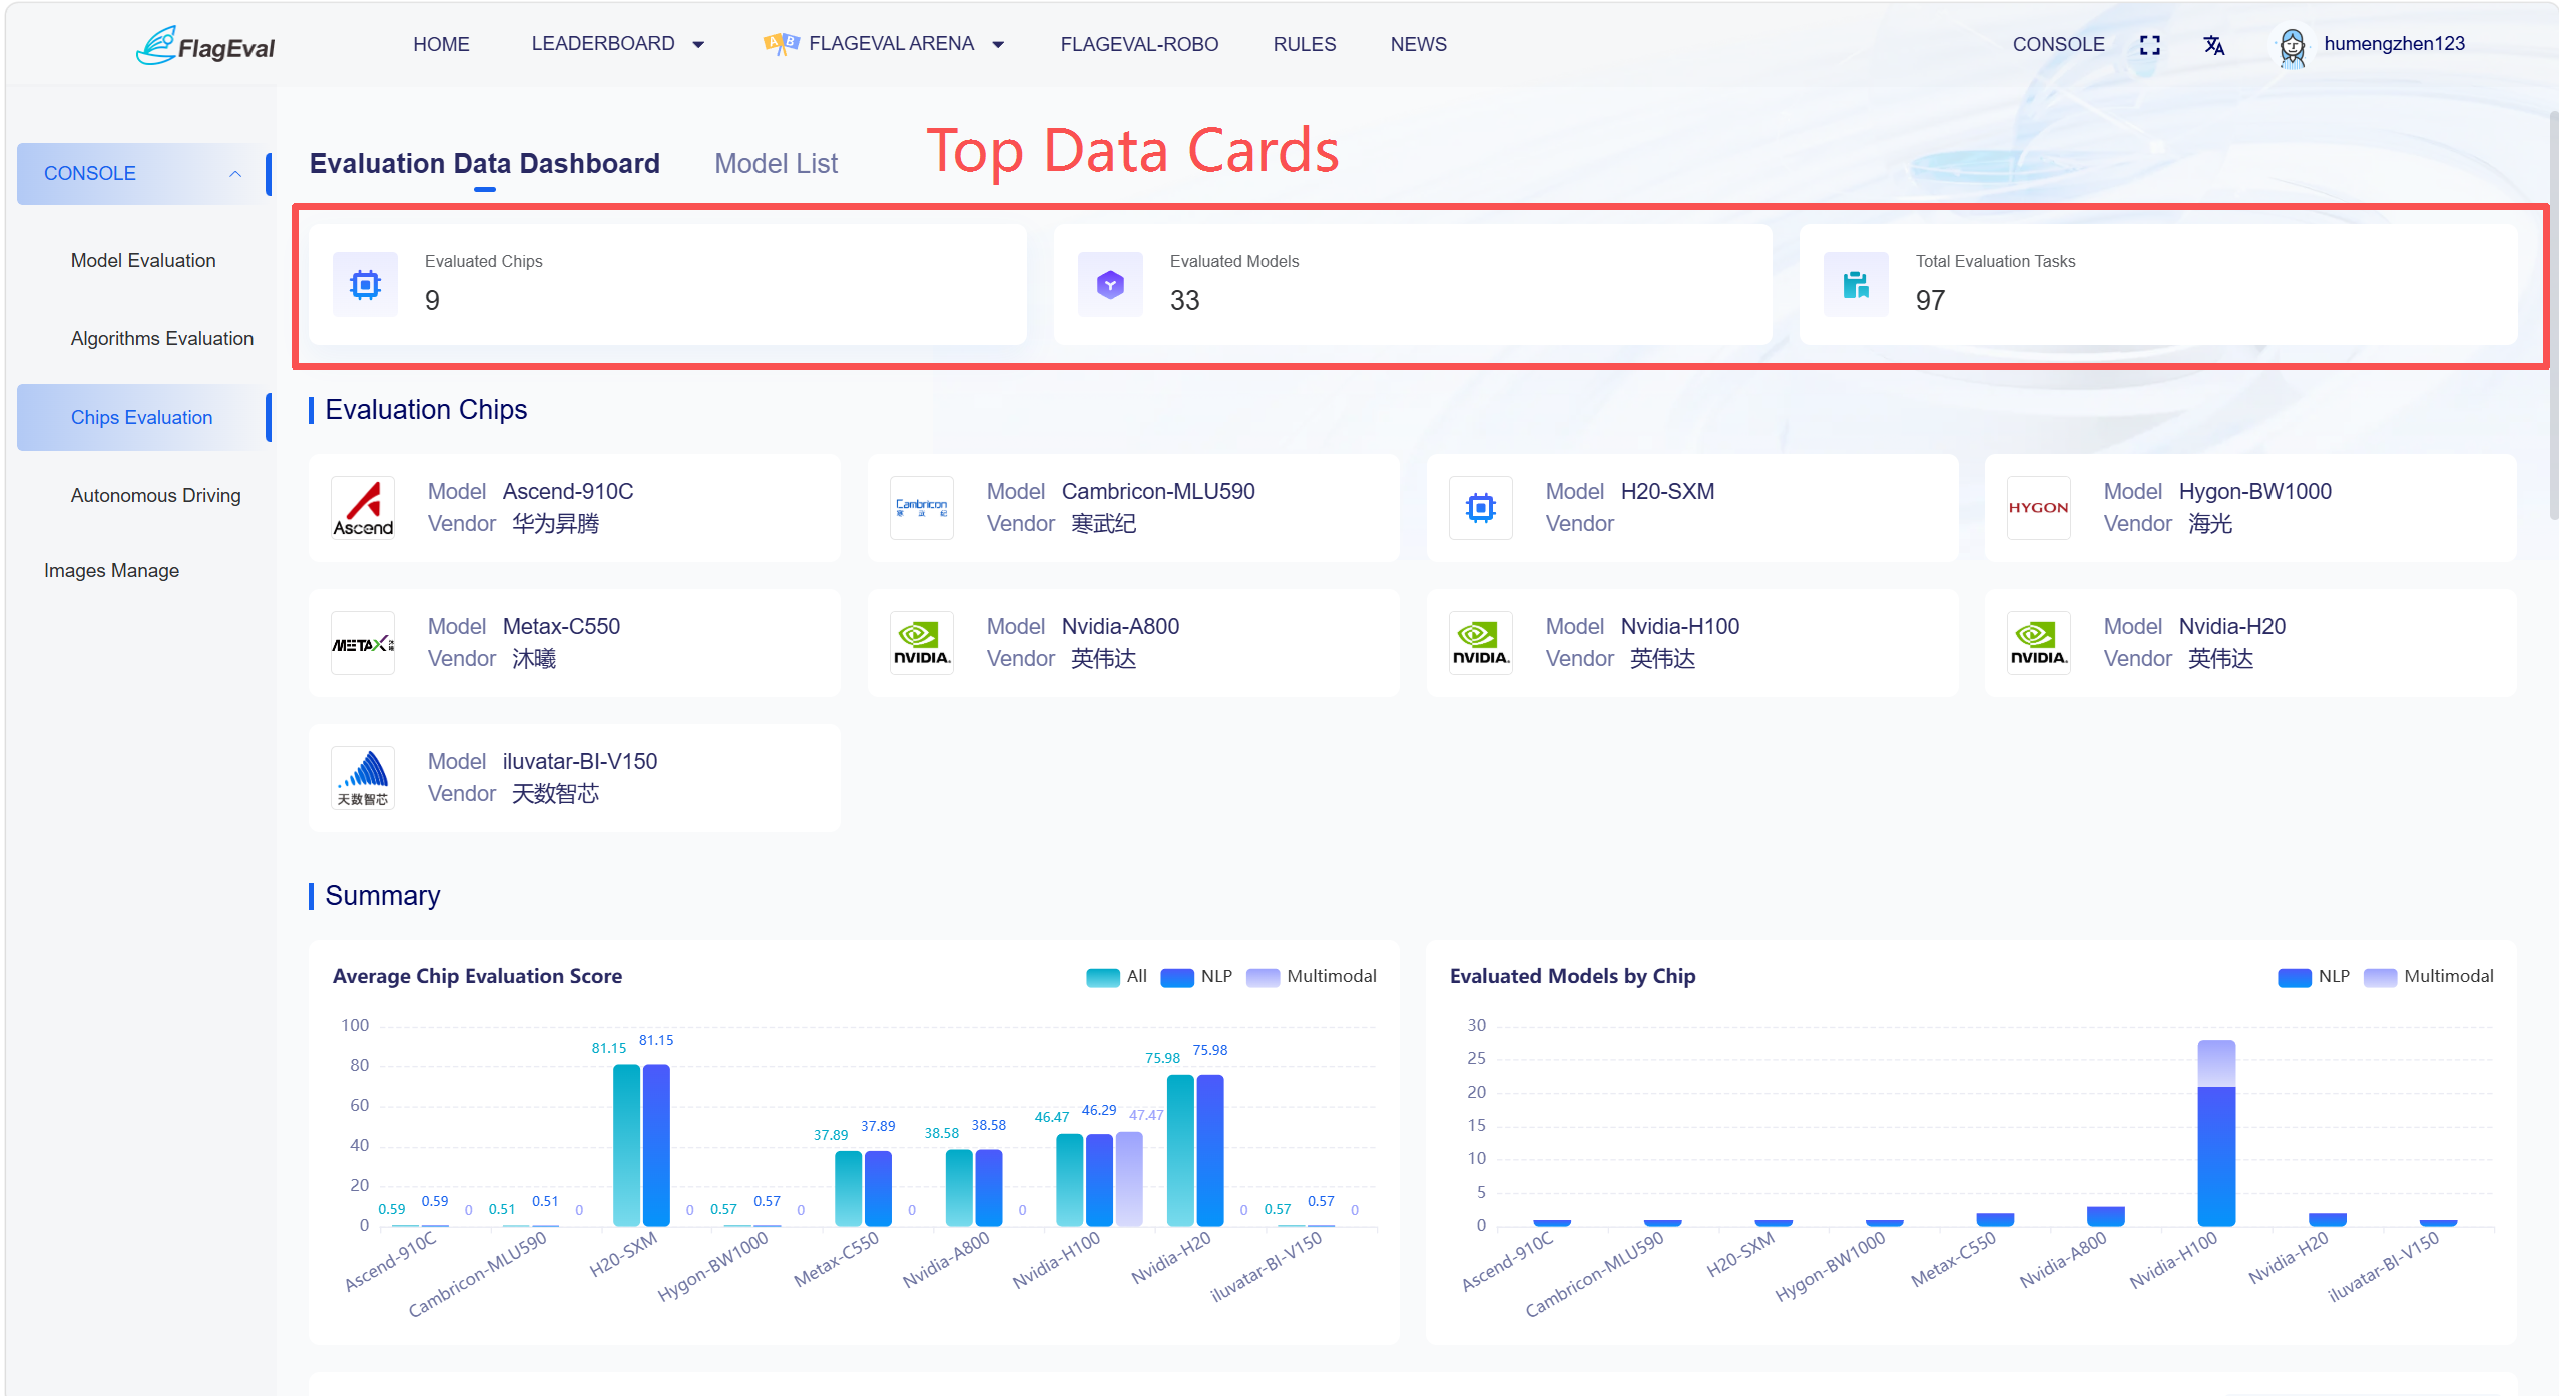
Top Data Labels
- Displays the overall chip evaluation status on the current platform.
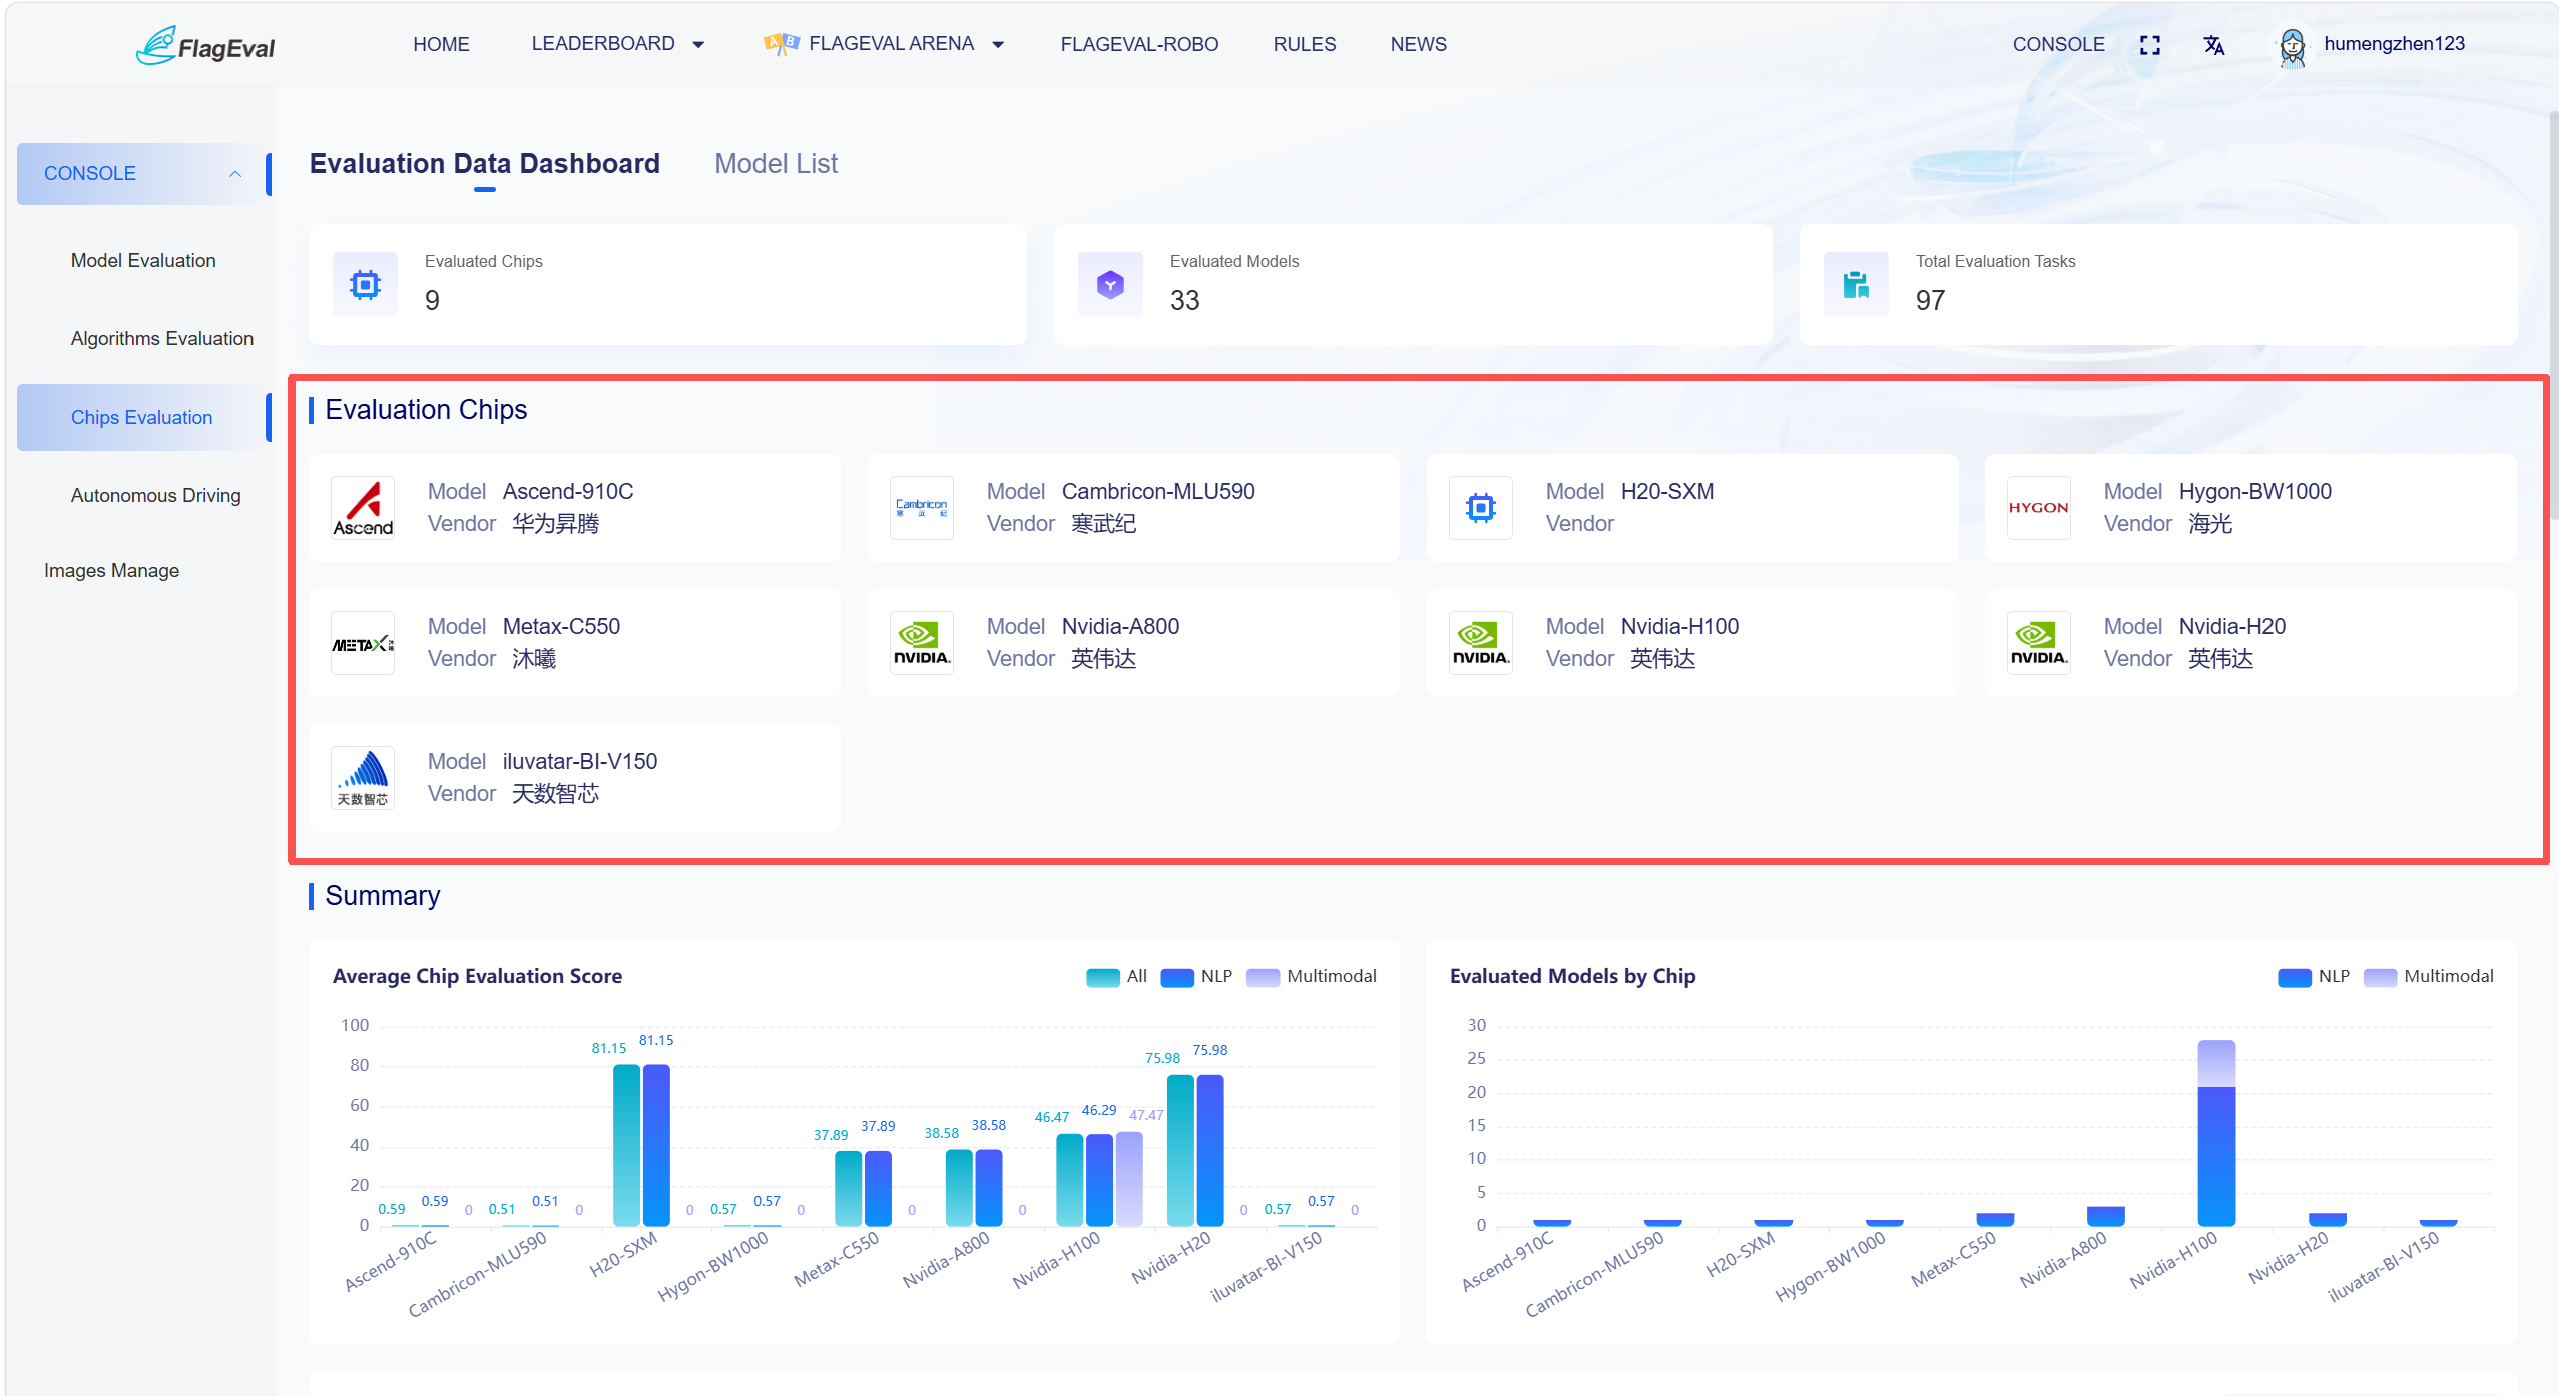
Adapted Chip List
- This area displays information about the adapted chips. The specific fields include: chip logo, chip model, and chip manufacturer.
Statistical Summary - Average Score
Content in this section is displayed as a bar chart, allowing users to quickly compare the overall evaluation capabilities of different chips.
Chart Descriptions:
Horizontal Axis: Chip model, where each chip contains three columns of data: "All", "NLP", and "Multimodal".
Vertical Axis: Average evaluation score.
Legend presented in the upper right of the chart:
All: The average evaluation score of all participating models under this chip.
NLP: The average evaluation score of NLP models under this chip.
Multimodal: The average evaluation score of multimodal models under this chip.
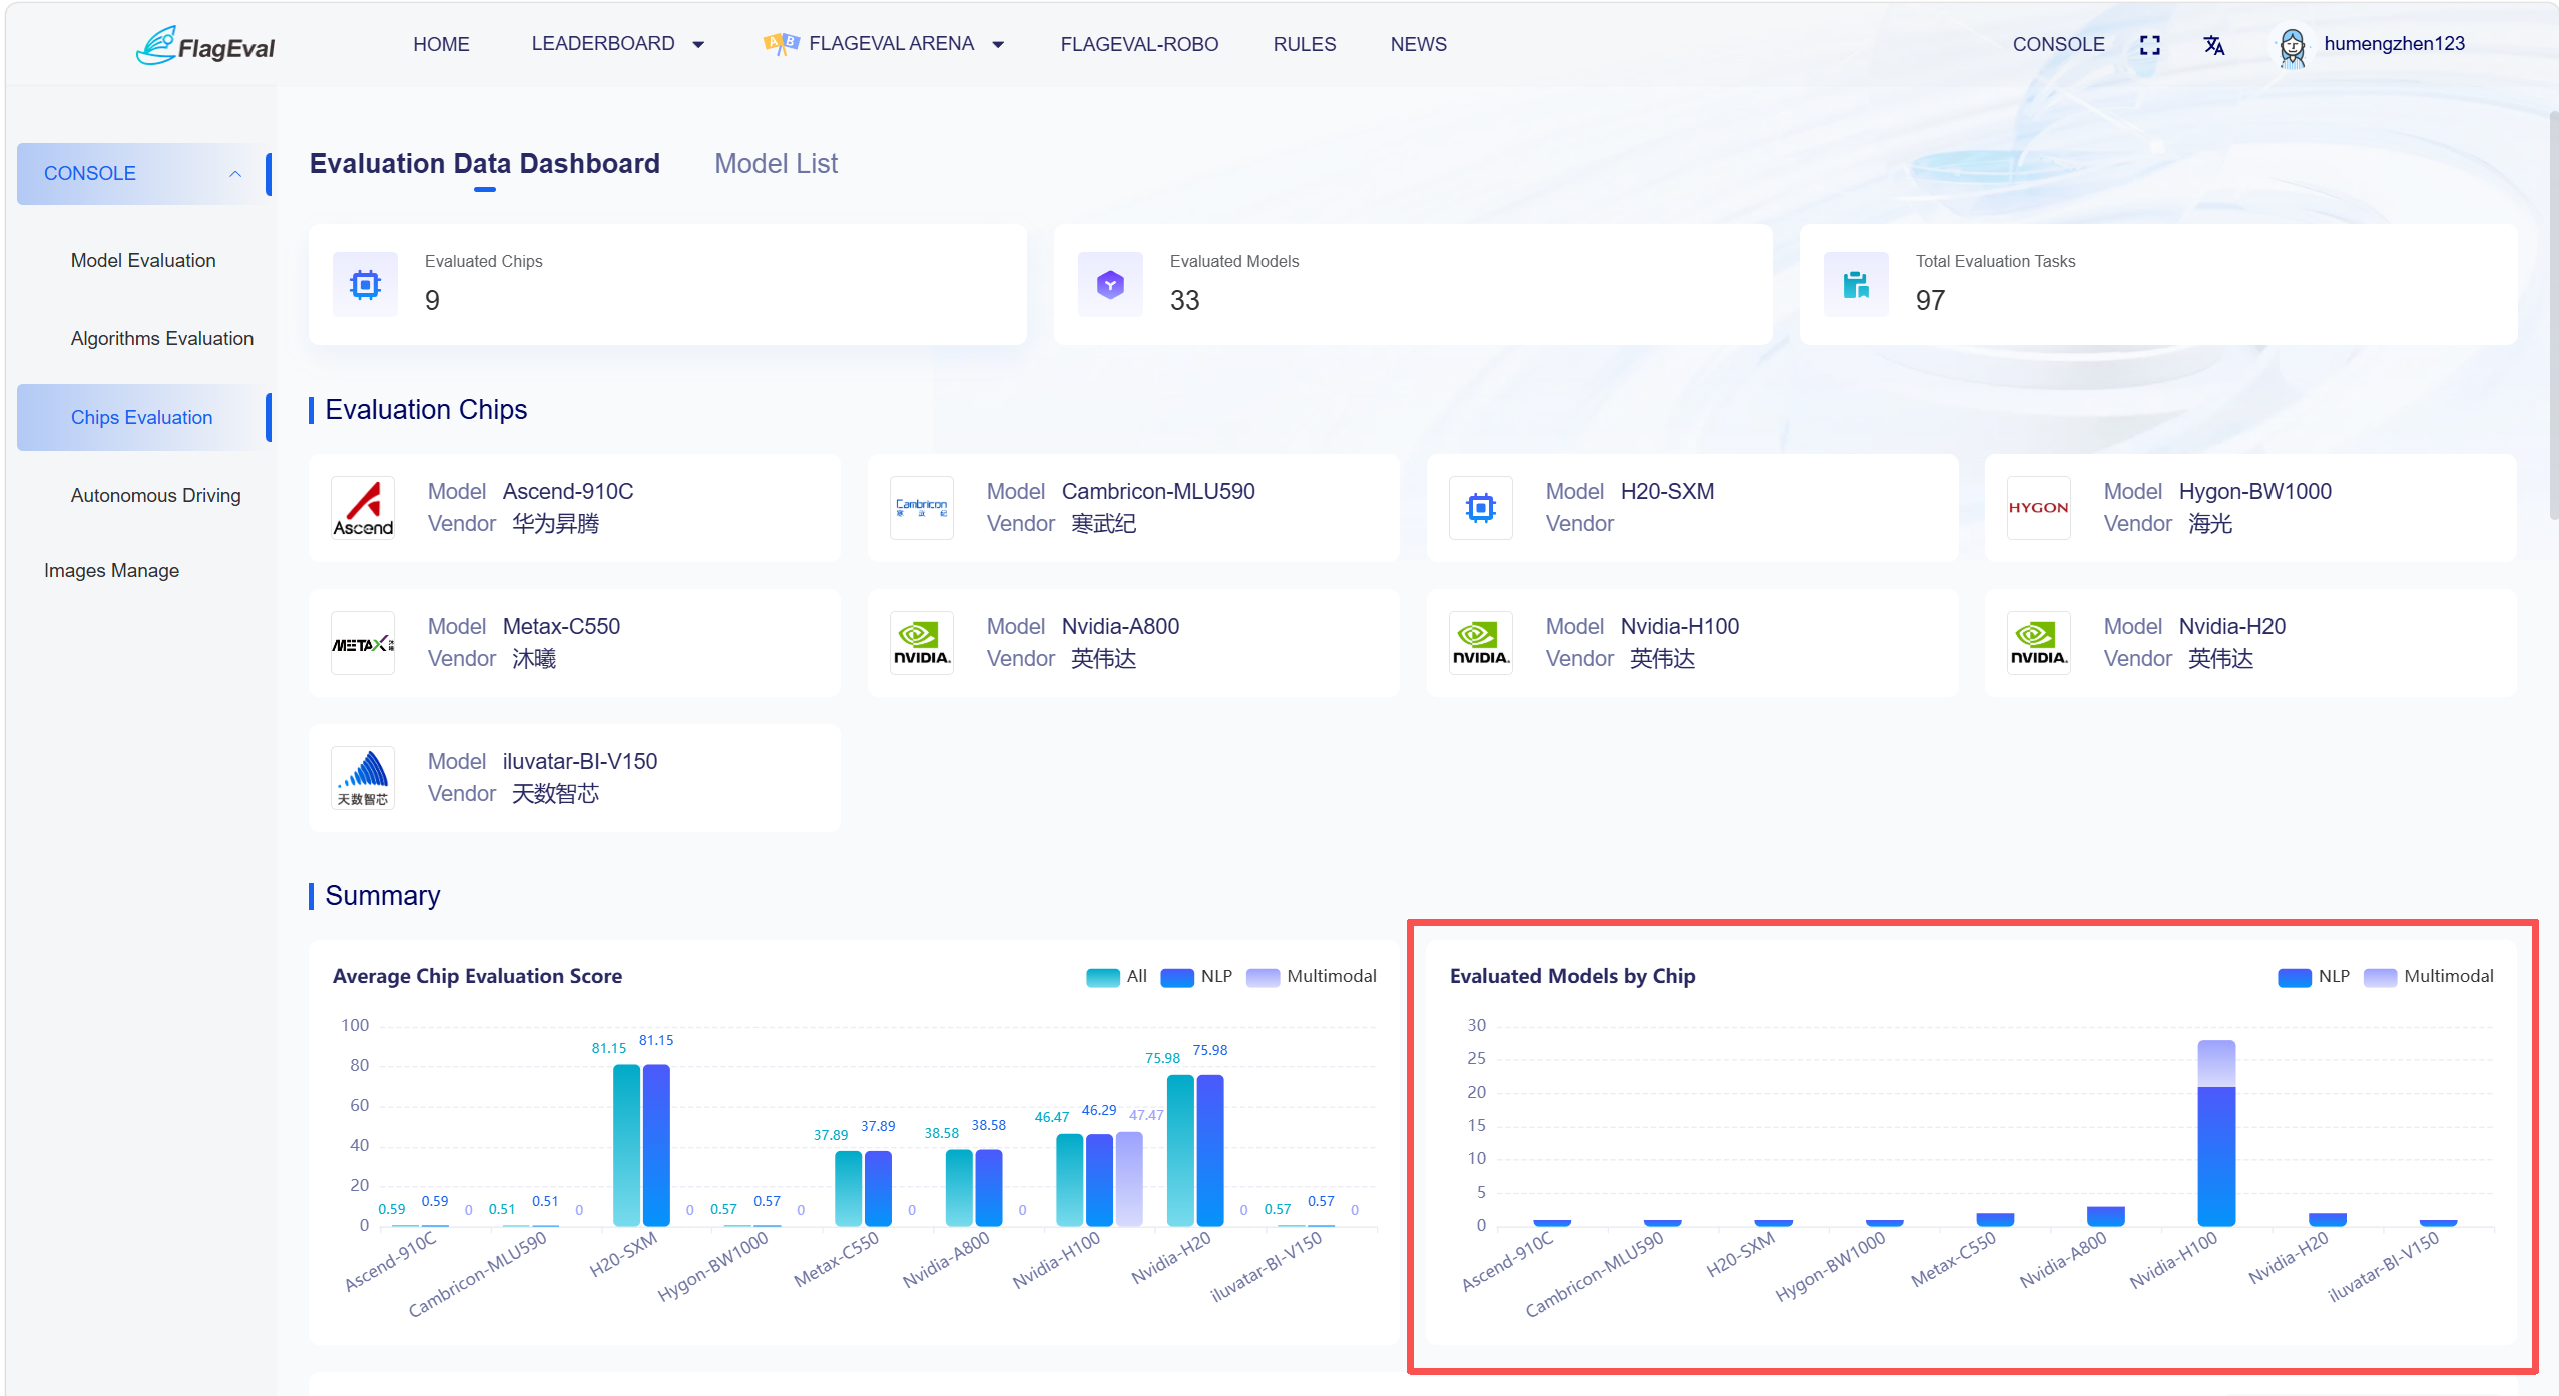
Statistical Summary - Number of Models
Content in this section is displayed as a stacked bar chart, allowing users to understand the ecosystem coverage and model adaptation scale of each chip.
Chart Descriptions:
Horizontal Axis: Chip model.
Vertical Axis: Number of chips.
Legend presented in the upper right of the chart:
NLP
Multimodal
Hovering the mouse over the corresponding area of the chart allows users to view the specific number of models.
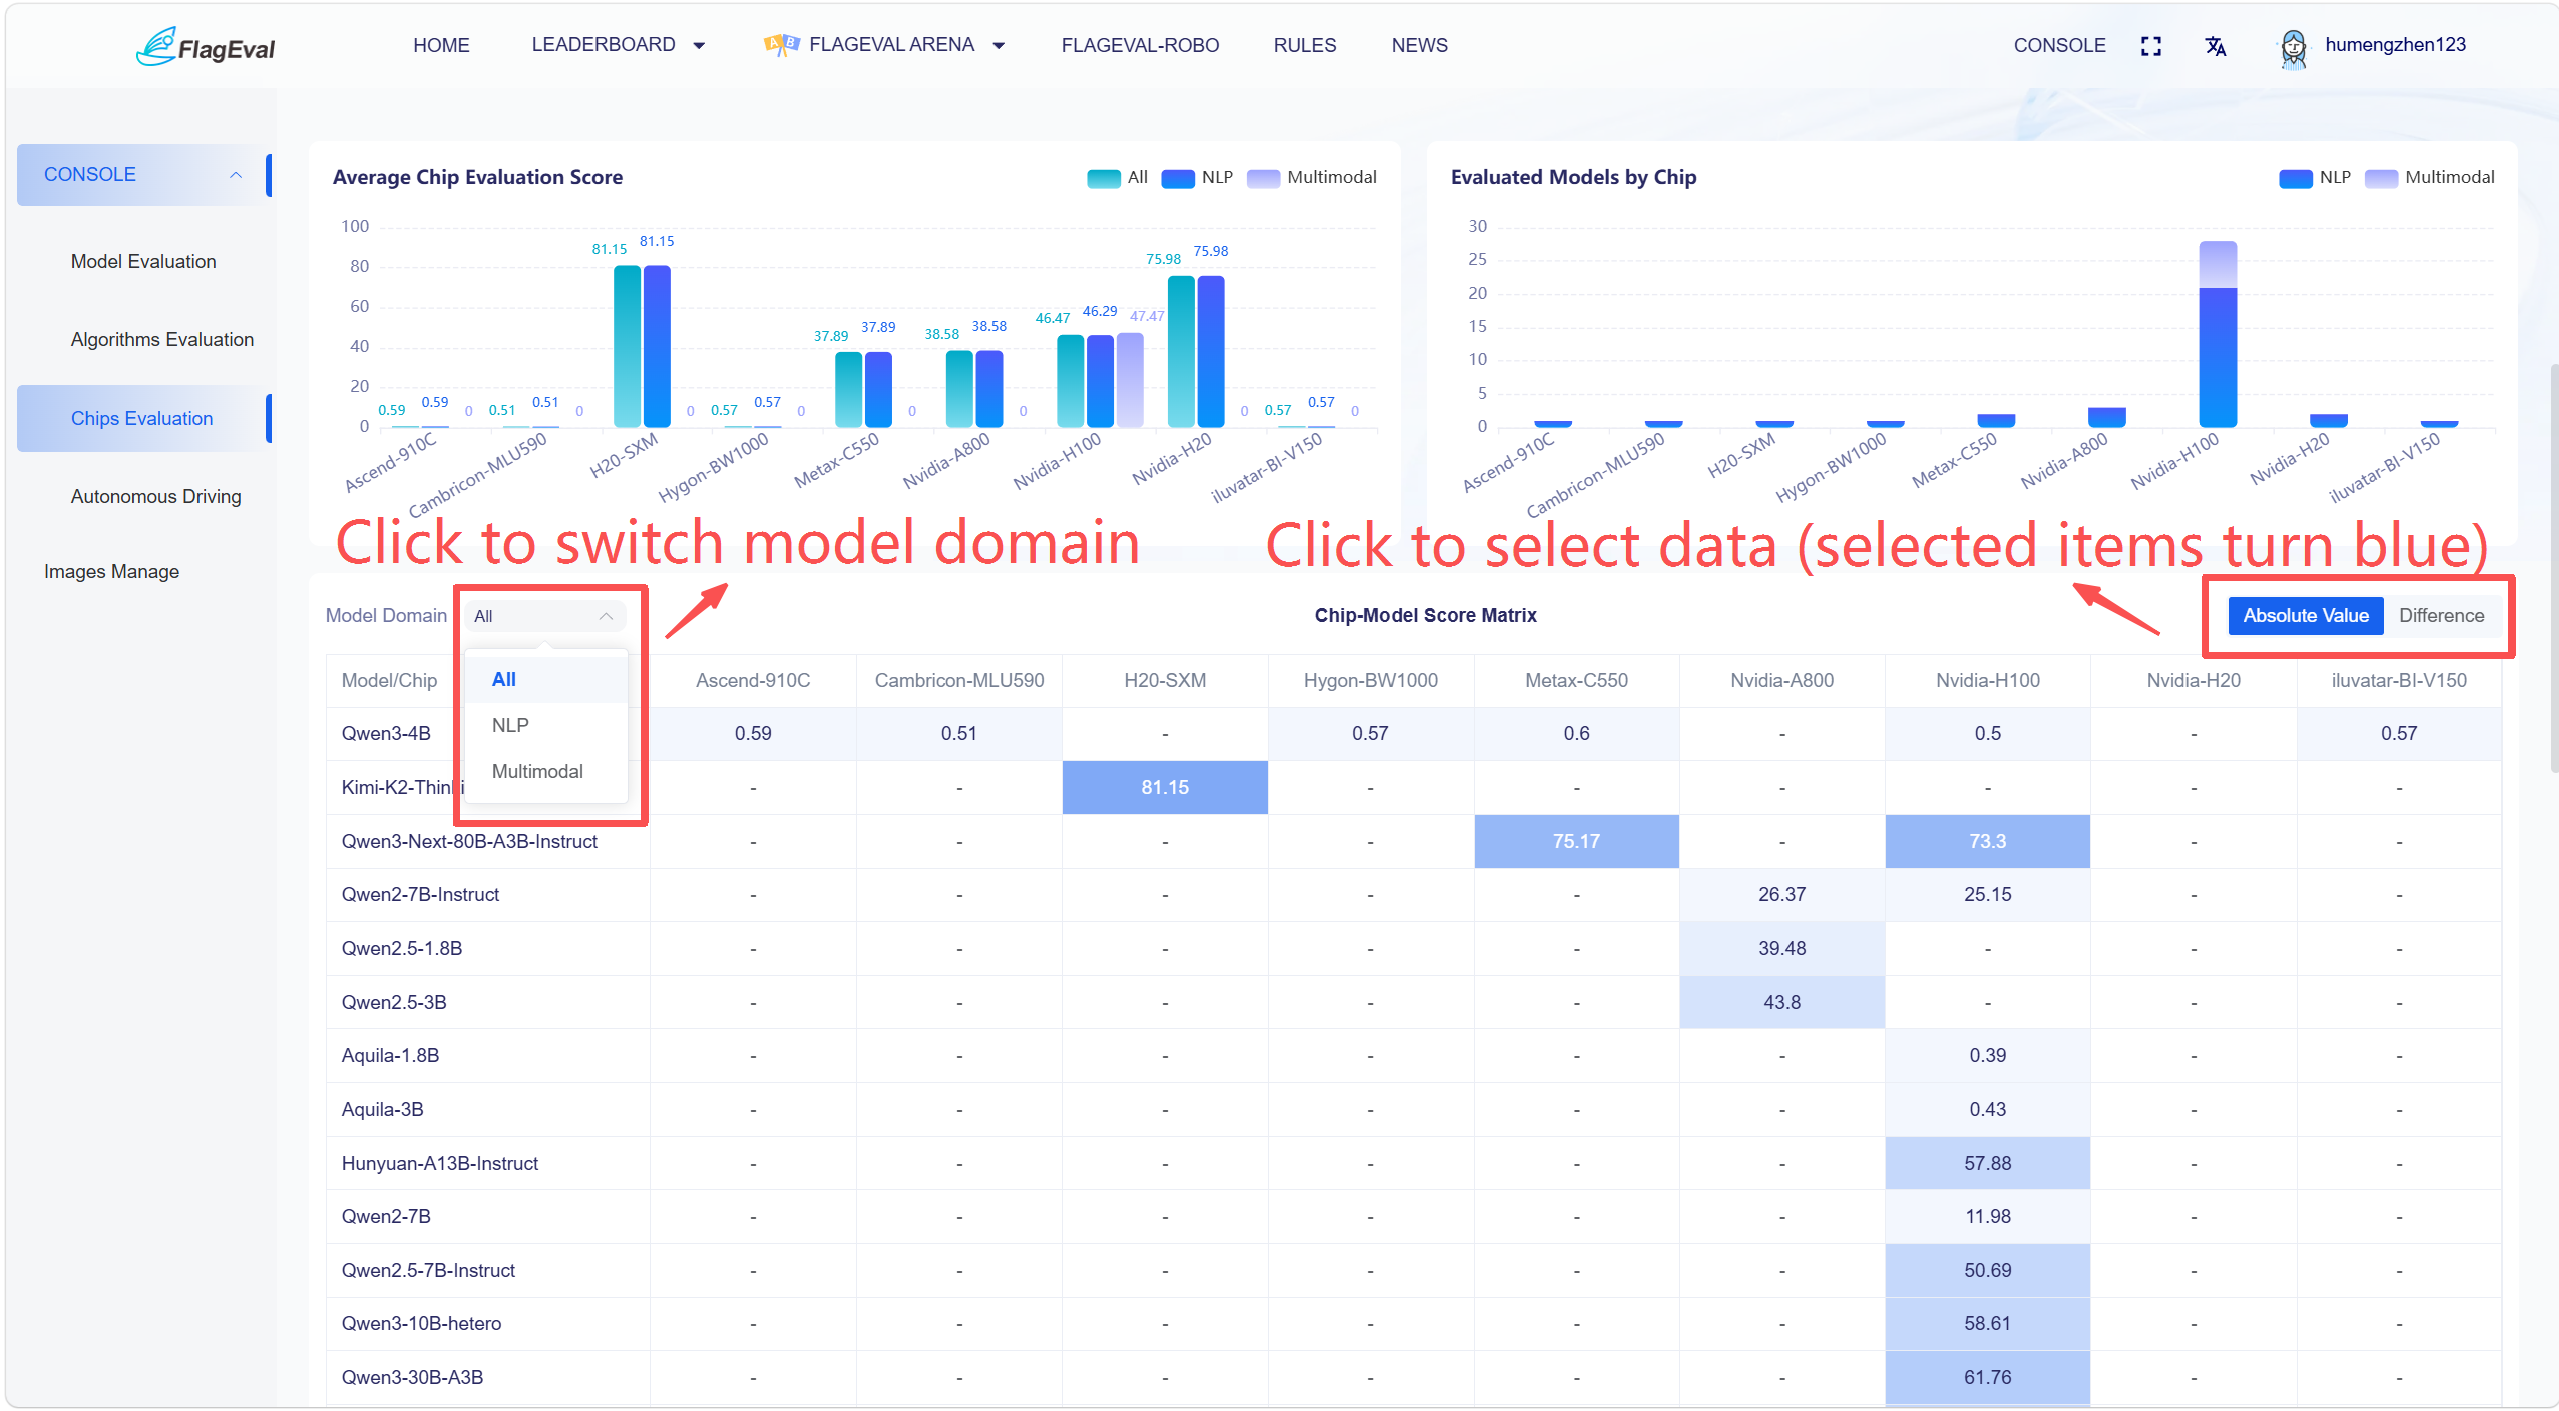
Statistical Summary - Chip-Model Scoring Matrix
This section presents the evaluation results of models across different chips in the form of a heatmap.
Chart Descriptions:
Row: Model Name.
Column: Chip Name.
Cell Color Intensity represents the level of evaluation results.
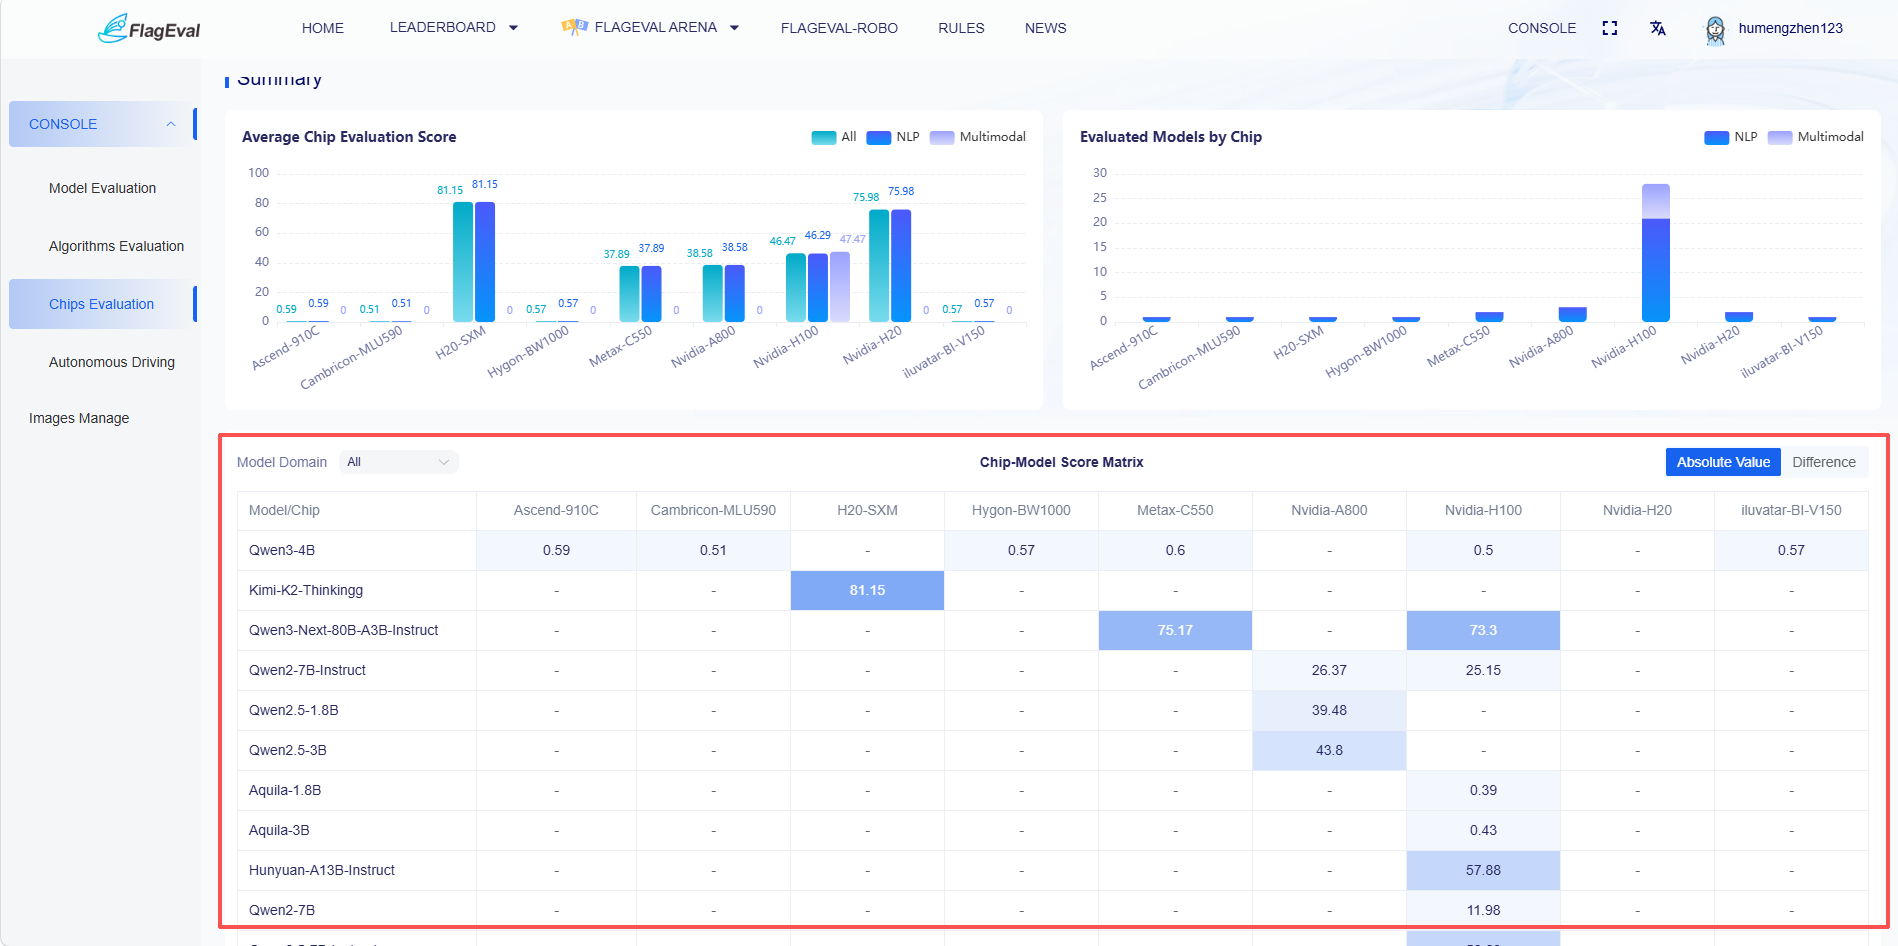
In the top left corner, users can switch the model domain via a dropdown box: All, NLP, Multimodal; in the top right corner, users can select data by clicking (the selection turns blue): Absolute Score, Score Difference with Nvidia-H100.
Model Adaptation Evaluation Status by Chip
This section displays the overall evaluation status of each chip in a tabular format. The specific fields are:
| Field Name | Description |
|---|---|
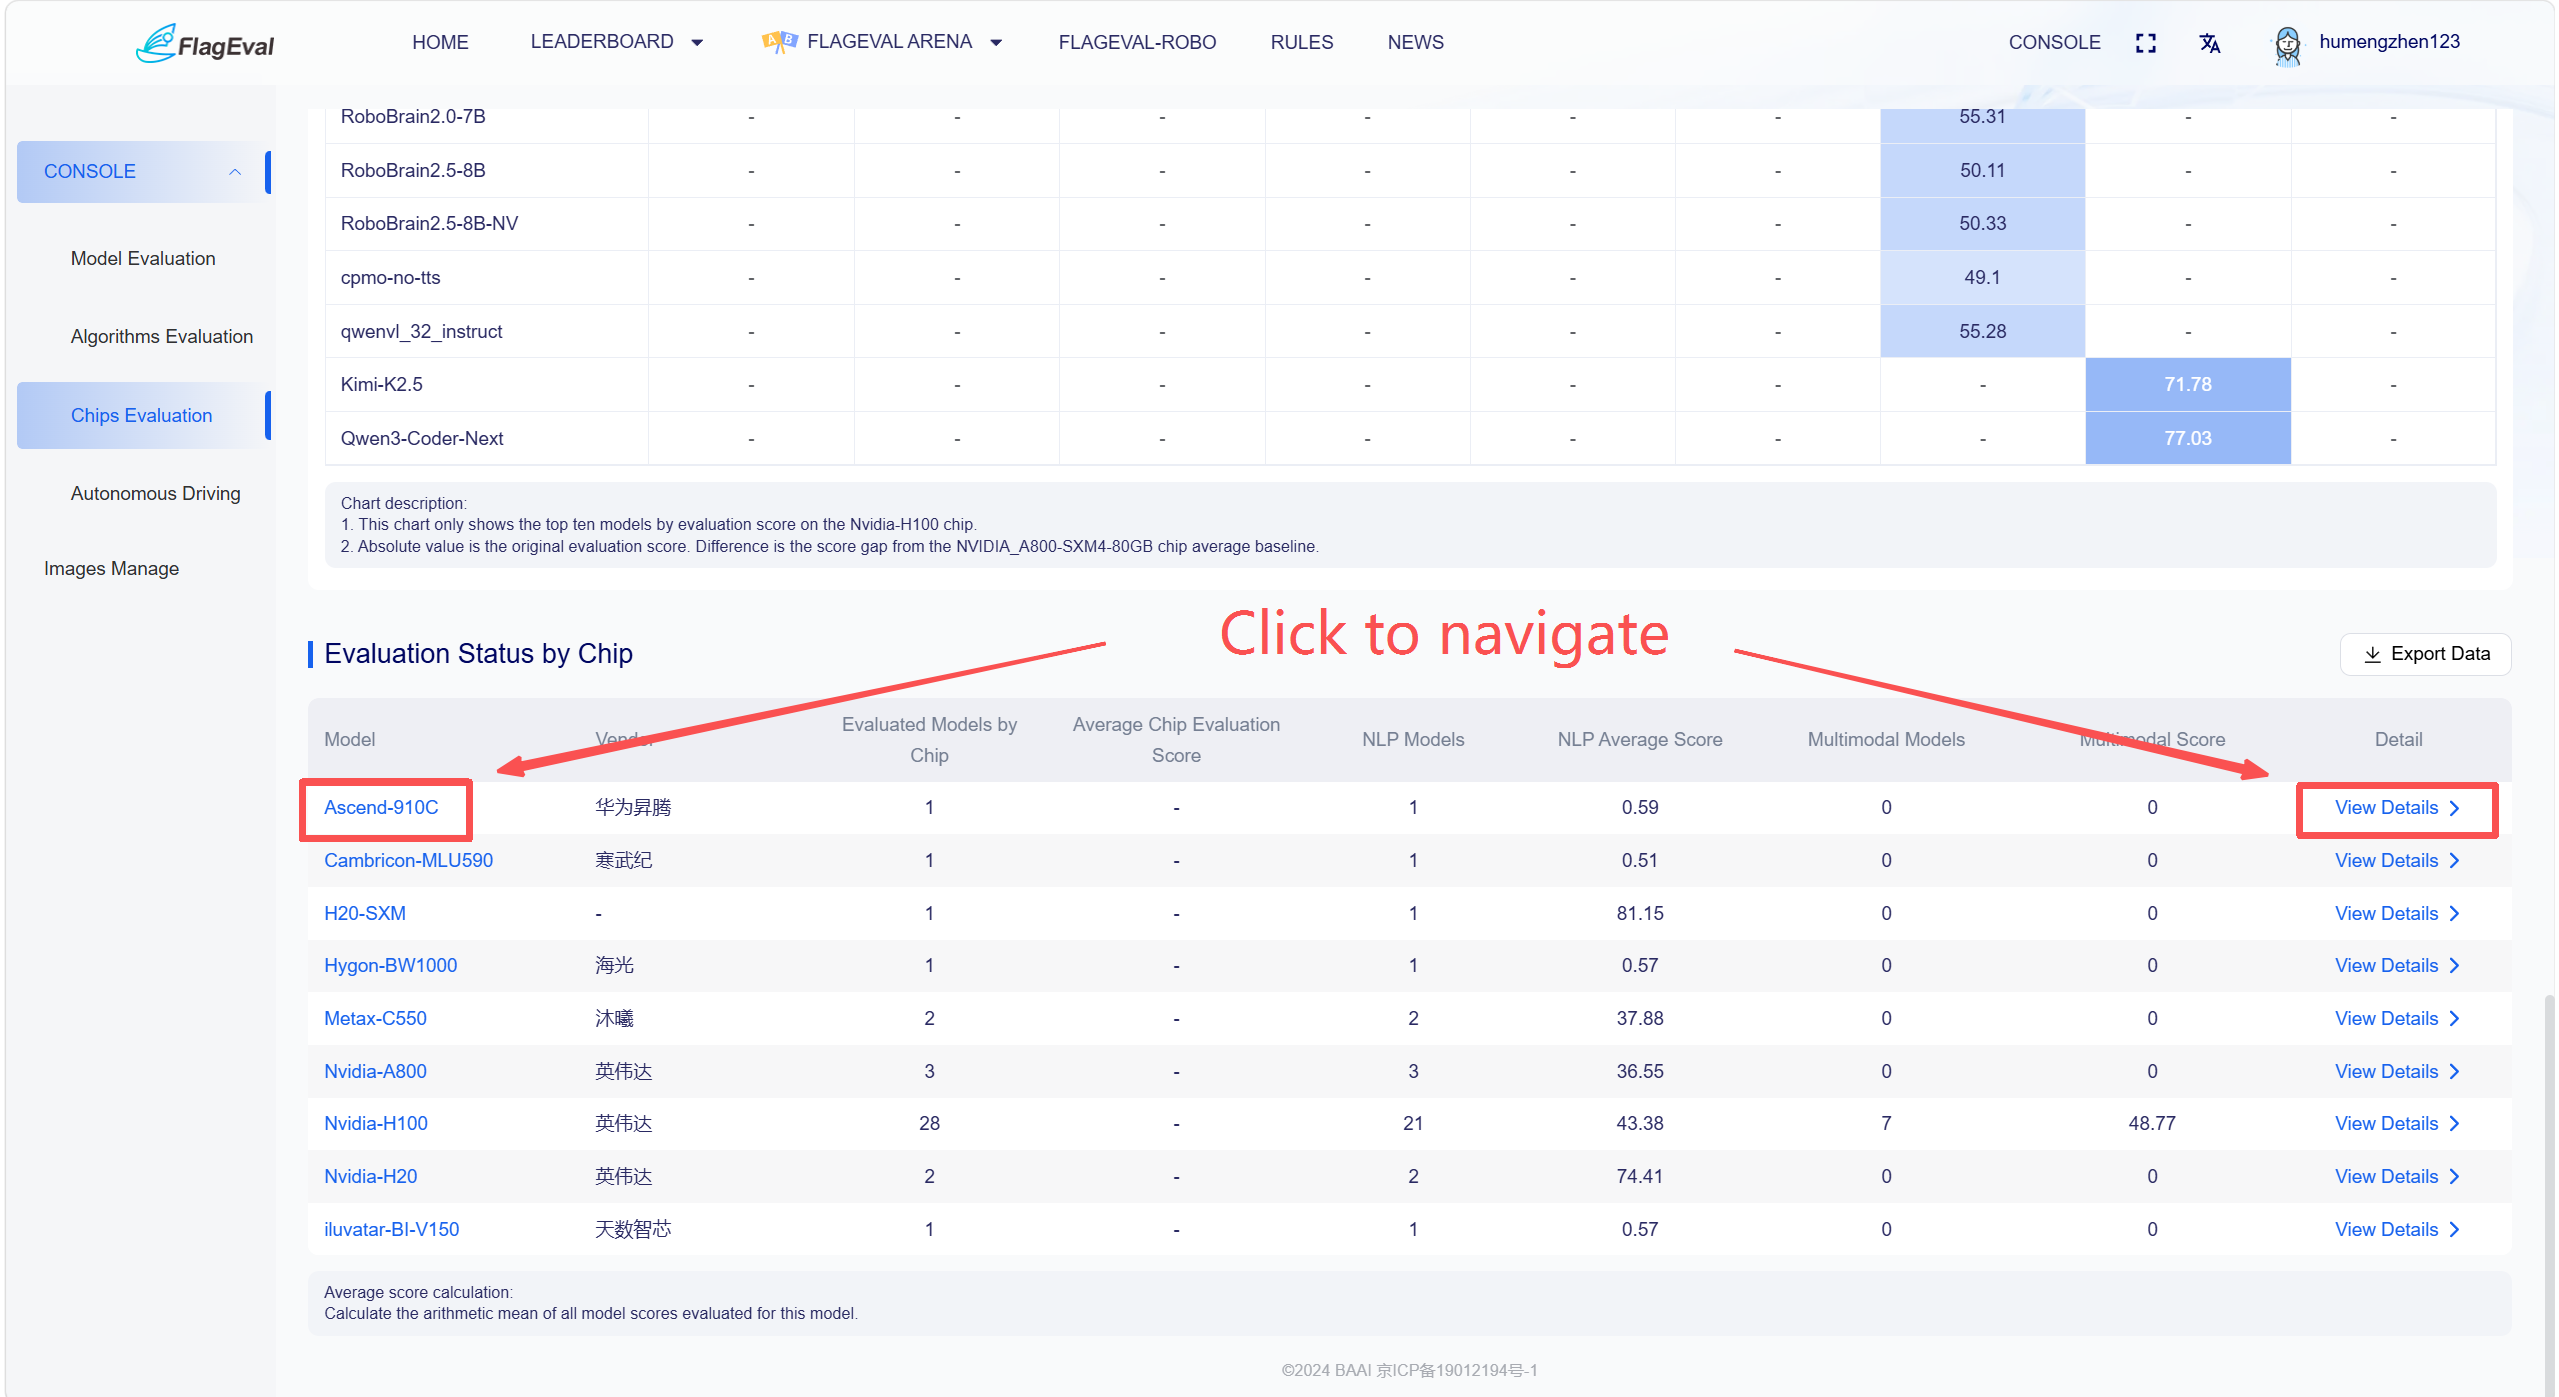
| Model | The model of the participating chip; click to view chip details. |
| Manufacturer | The manufacturer to which the chip belongs. |
| Model Count | The number of models that have completed evaluation. |
| Average Score | The average score of all participating models for the current chip. |
| Details | Click to view detailed information for the corresponding chip. |
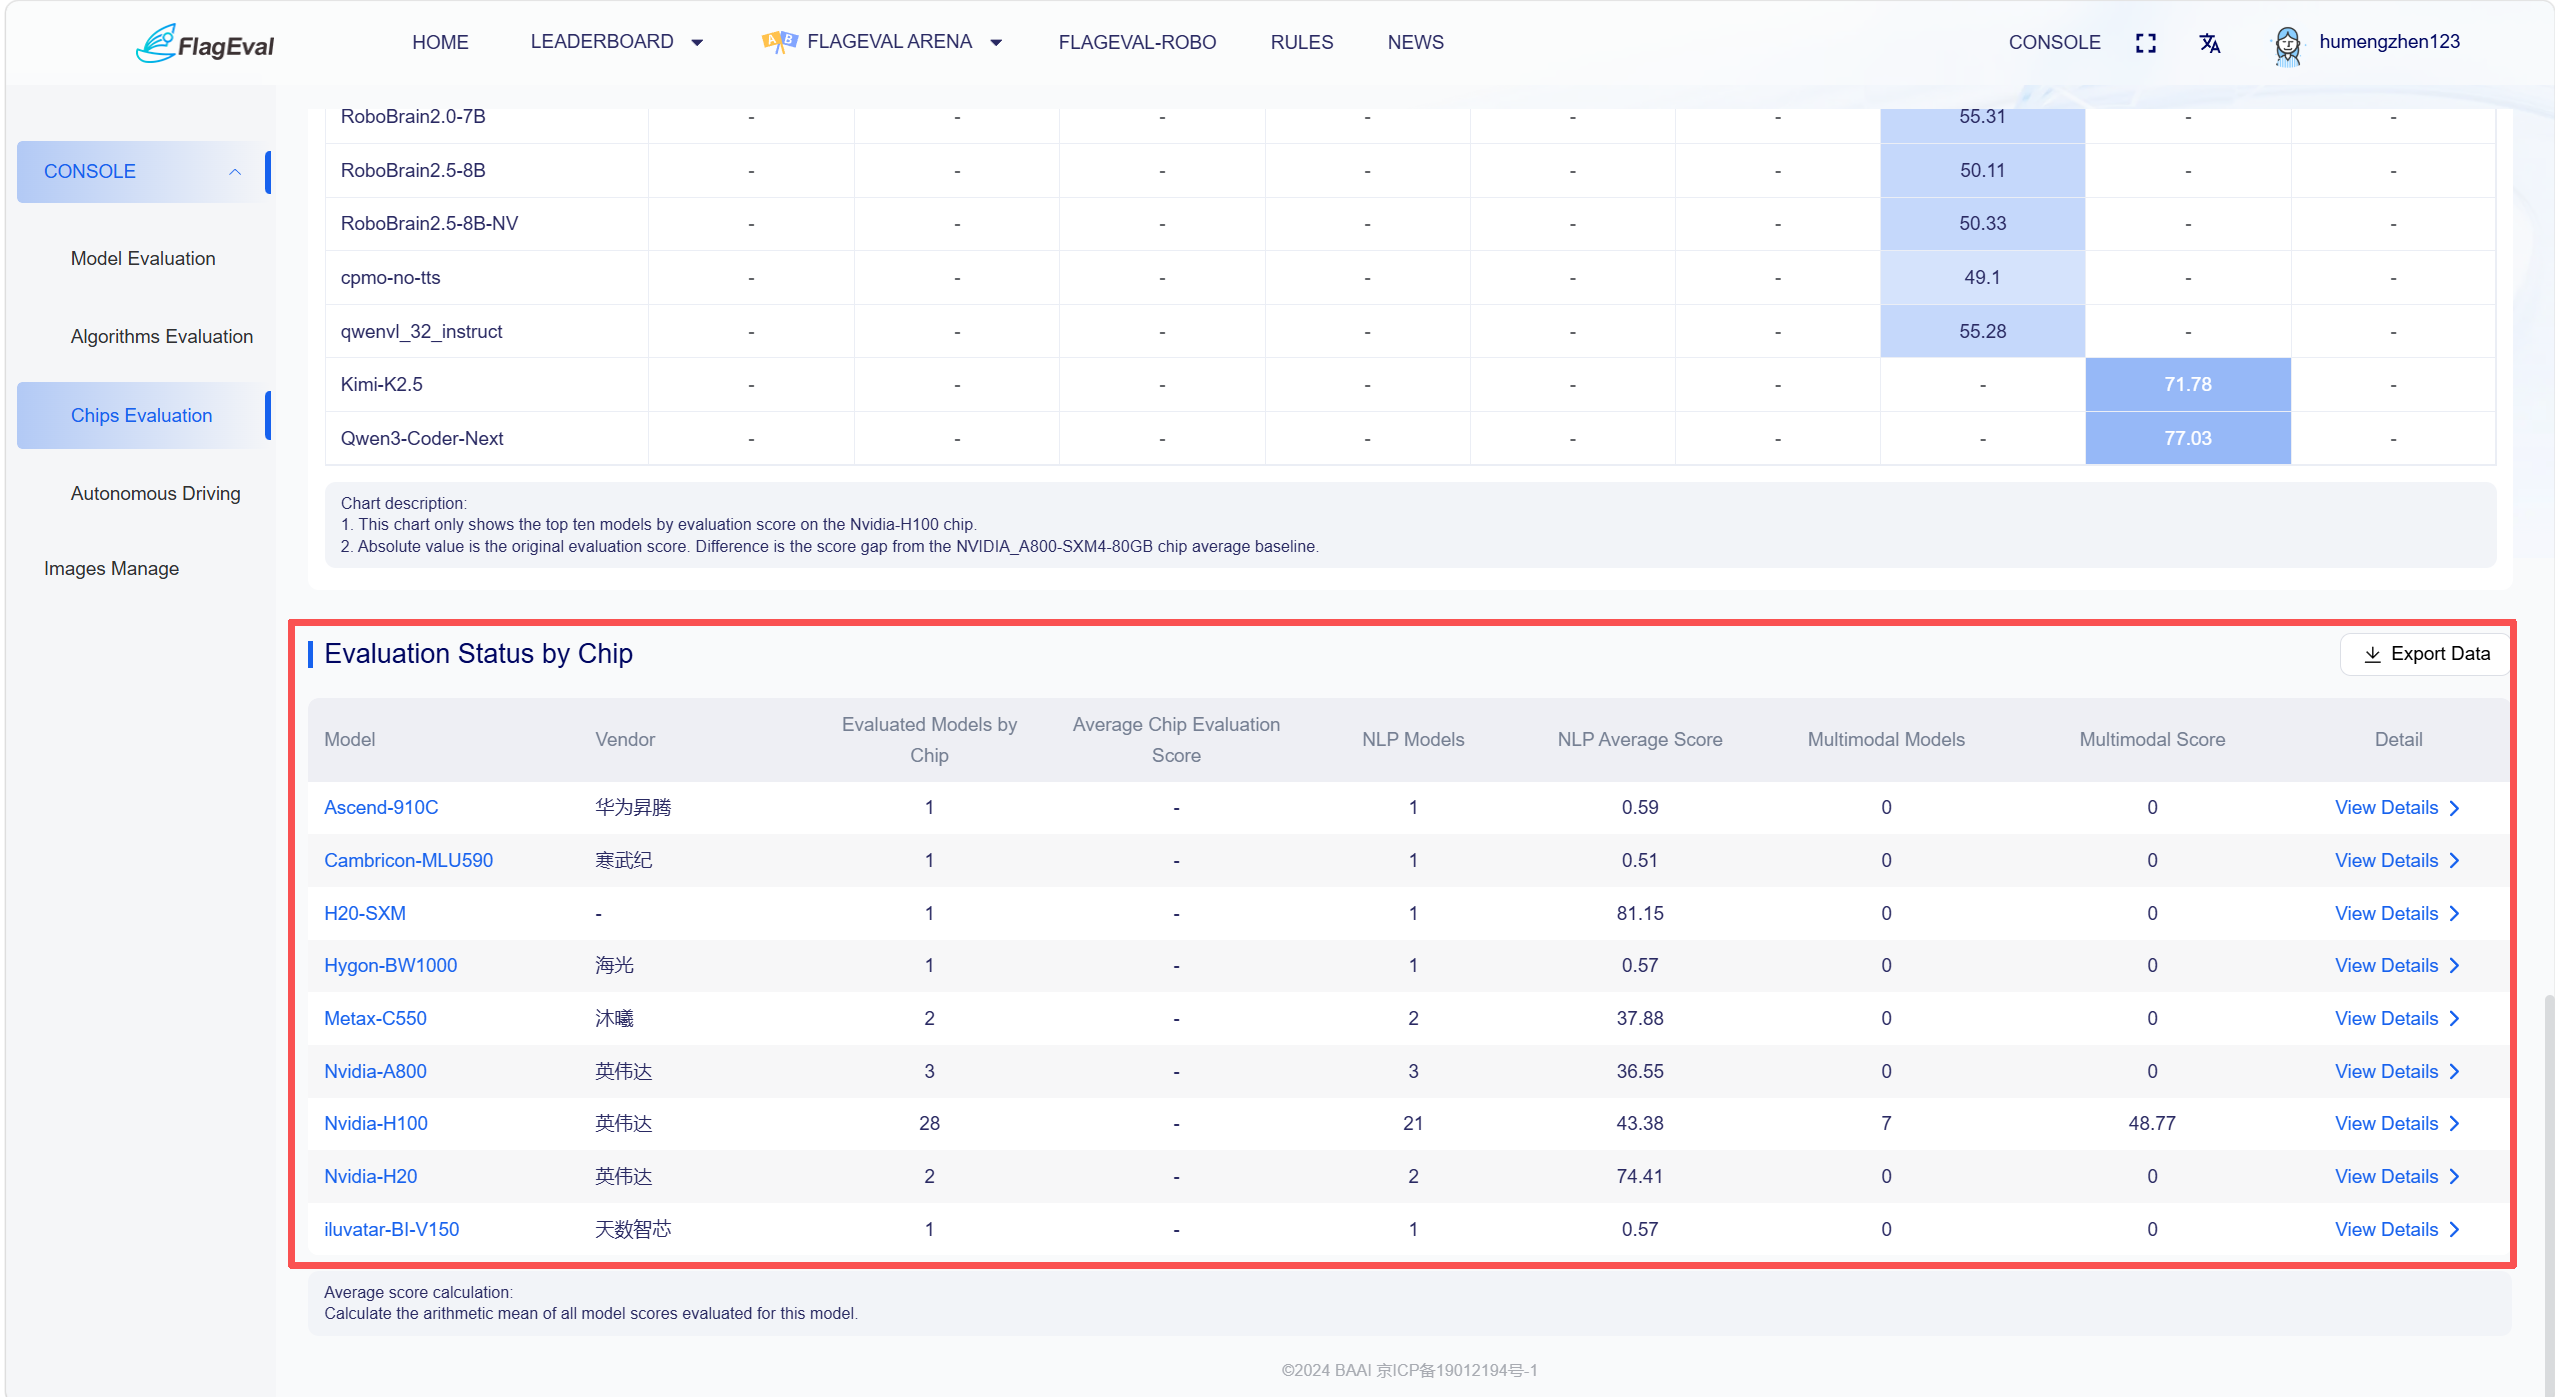
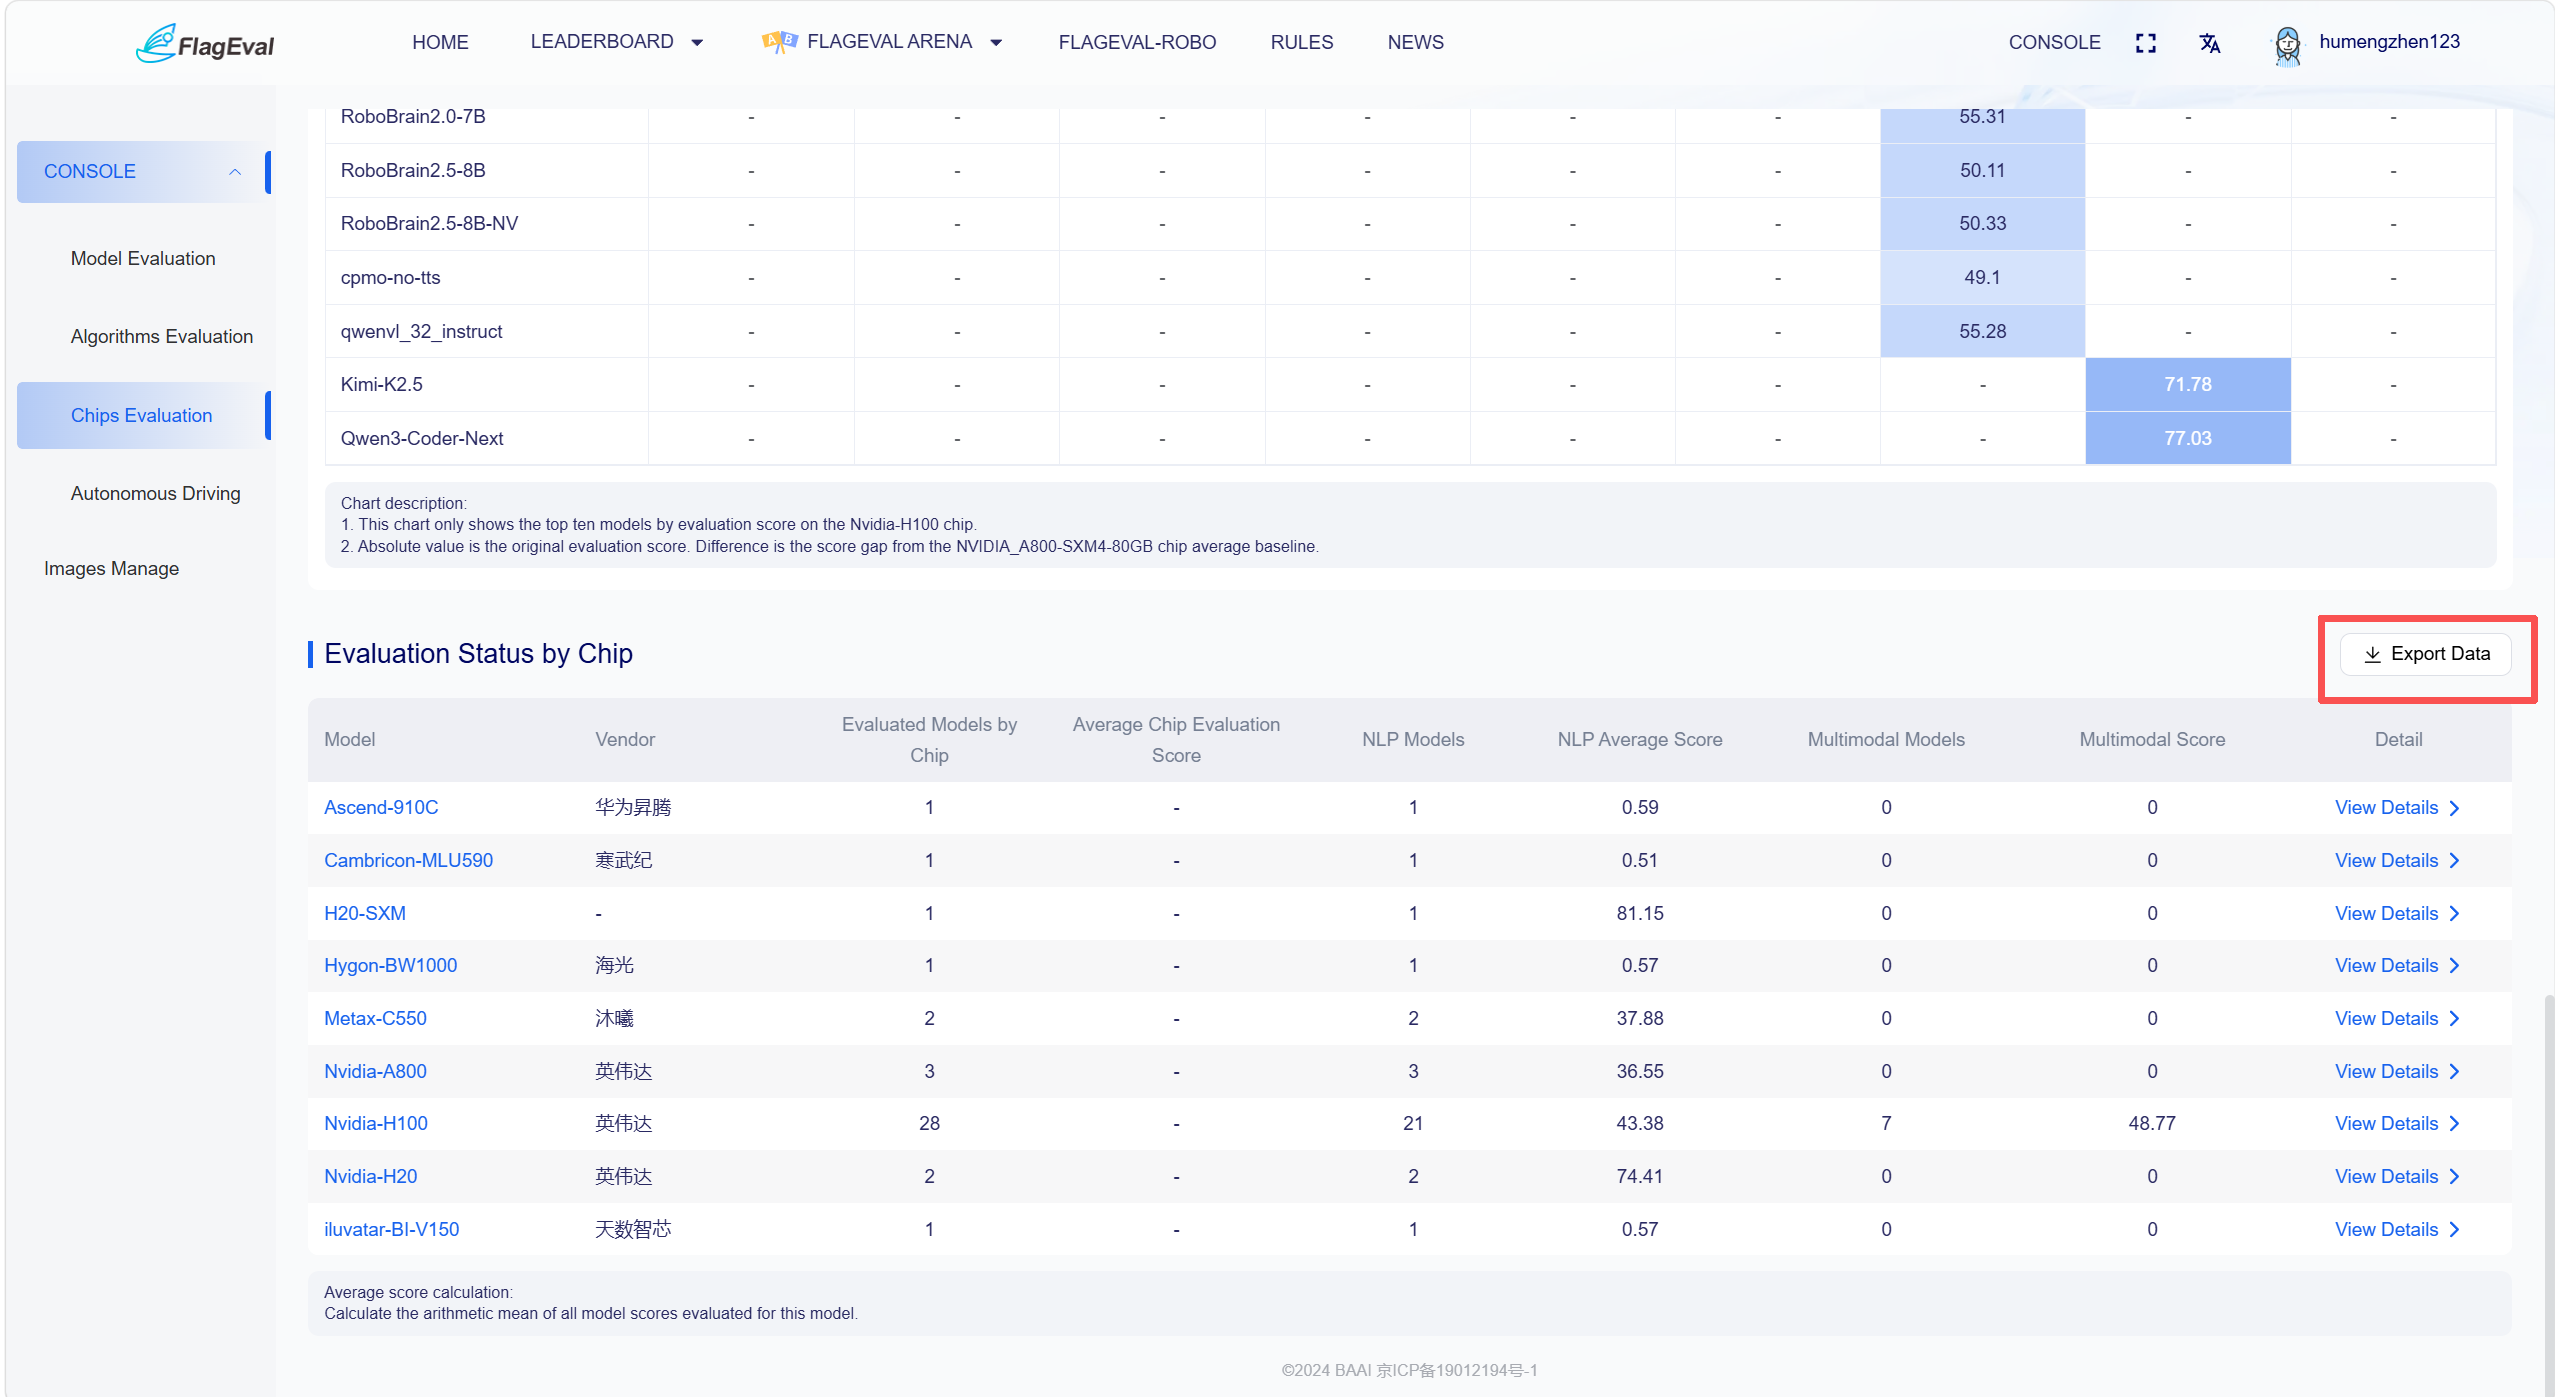
In the top right corner, users can click the "Export Data" button to automatically download a spreadsheet .xlsx file (excludes the Details column).
Clicking on a specific chip model in blue text or clicking "View Details" in the details column of the table will redirect to the details page of that chip.
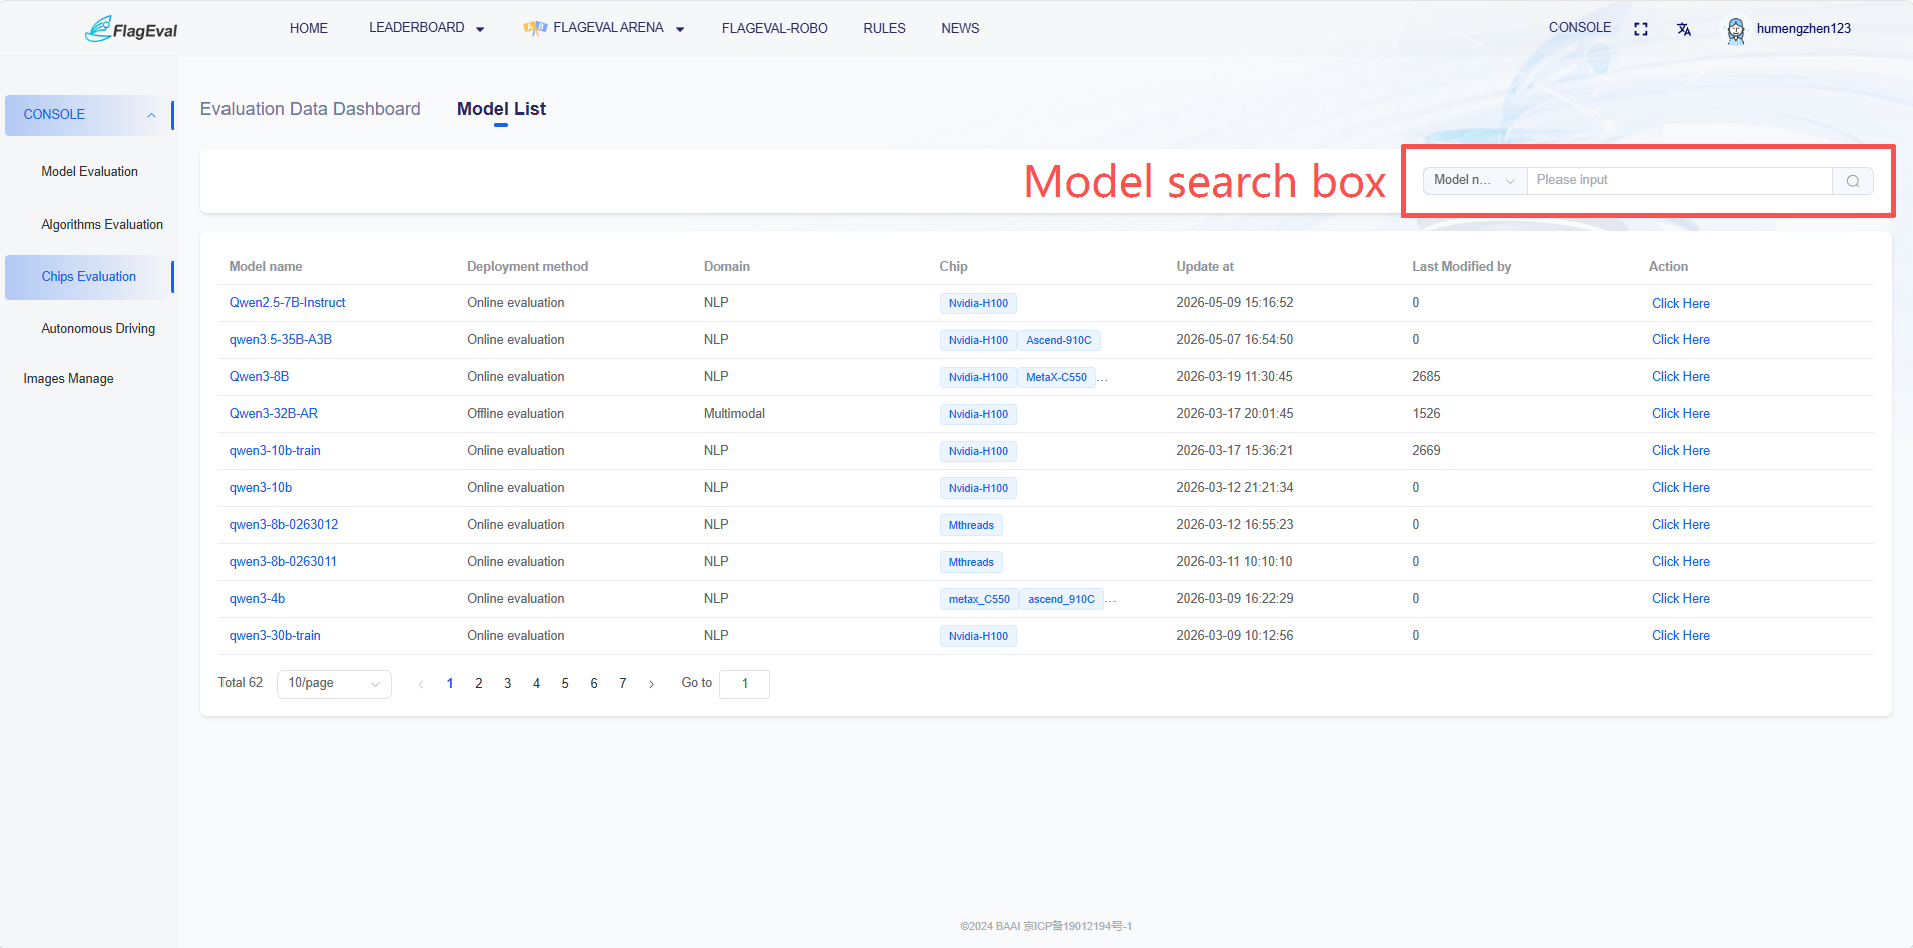
Evaluation Model List Page
Model Search Box
- Operation: In the search box at the top right of the page, select "Model Name" and enter keywords. It supports fuzzy queries based on the model name, helping users quickly locate target models among a large number of adapted models.
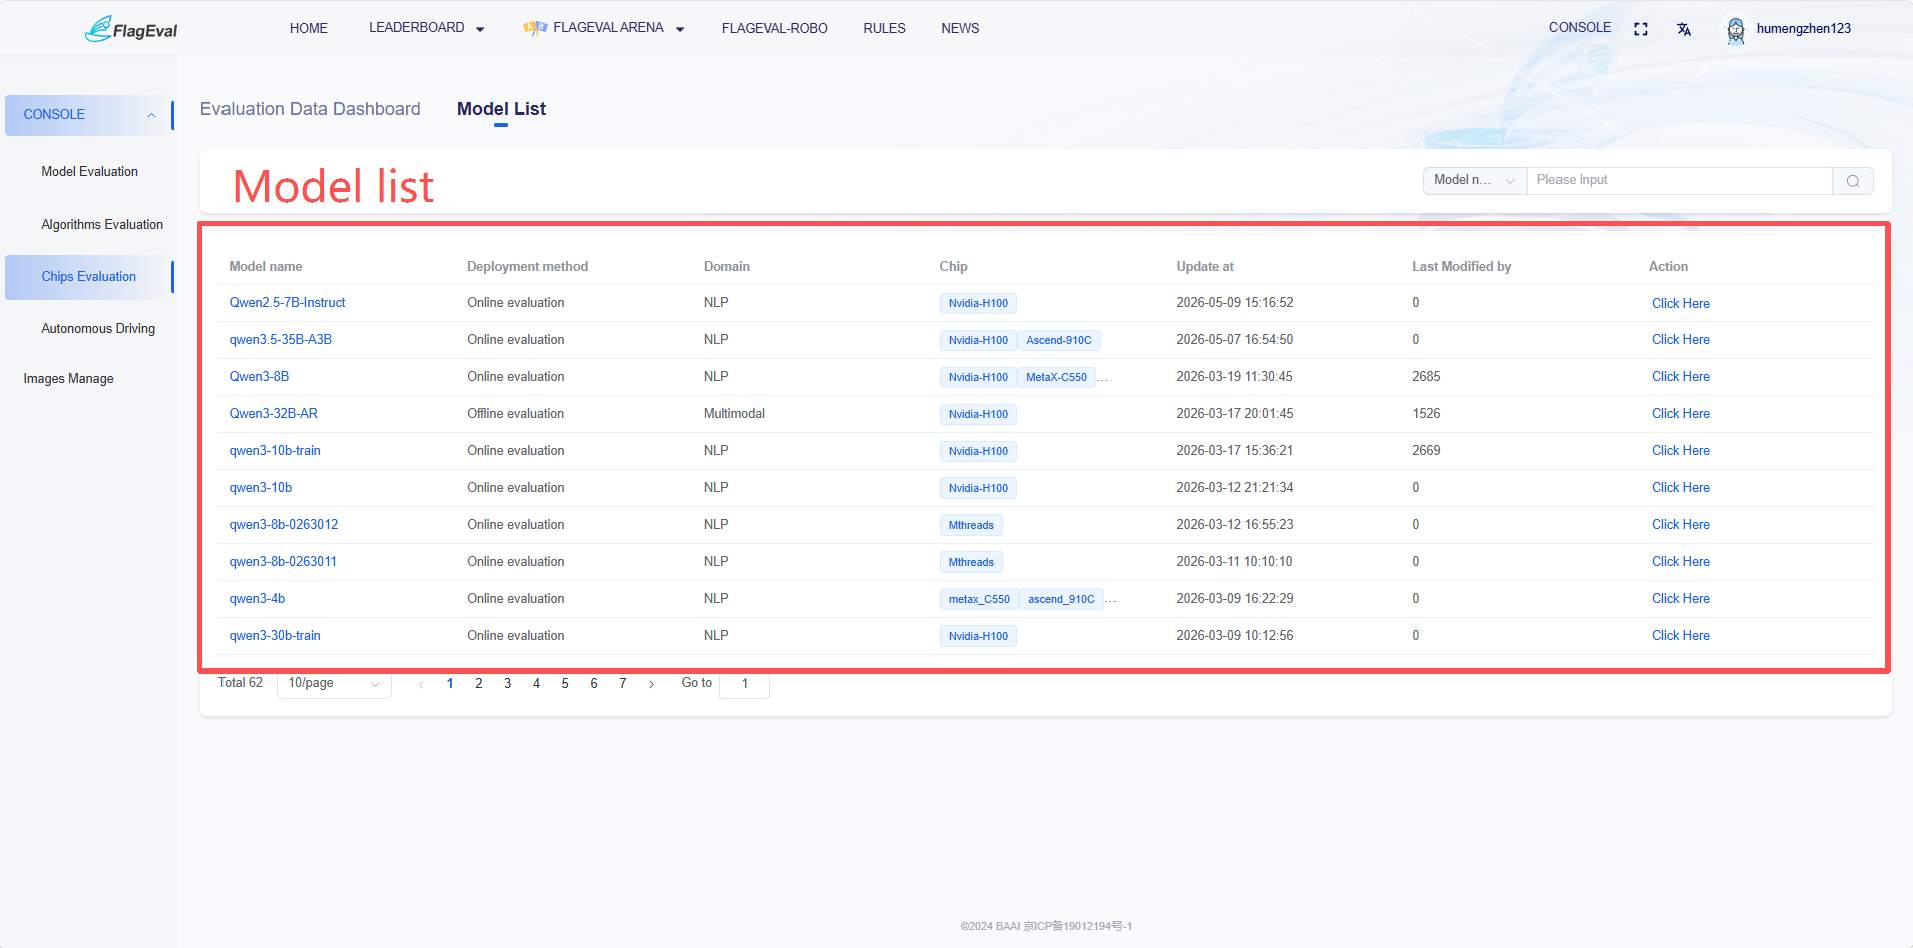
Model List
- The main content area displays information about adapted models in a list format. The specific fields are:
| Field Name | Description |
|---|---|
| Model Name | The unique identifier of the participating model (e.g., Qwen2.5-7B-Instruct, Qwen3-8B). |
| Deployment Method | The deployment type of the model in the evaluation environment (e.g., API Evaluation). |
| Evaluation Domain | The technical track to which the model belongs (e.g., NLP Natural Language Processing, Multimodal). |
| Evaluation Chip | The chip model on which this model has been adapted and evaluated (e.g., Nvidia-H100). |
| Modification Time | The timestamp when this evaluation record was last updated. |
| Last Modified By | The administrator or system ID that operated this record. |
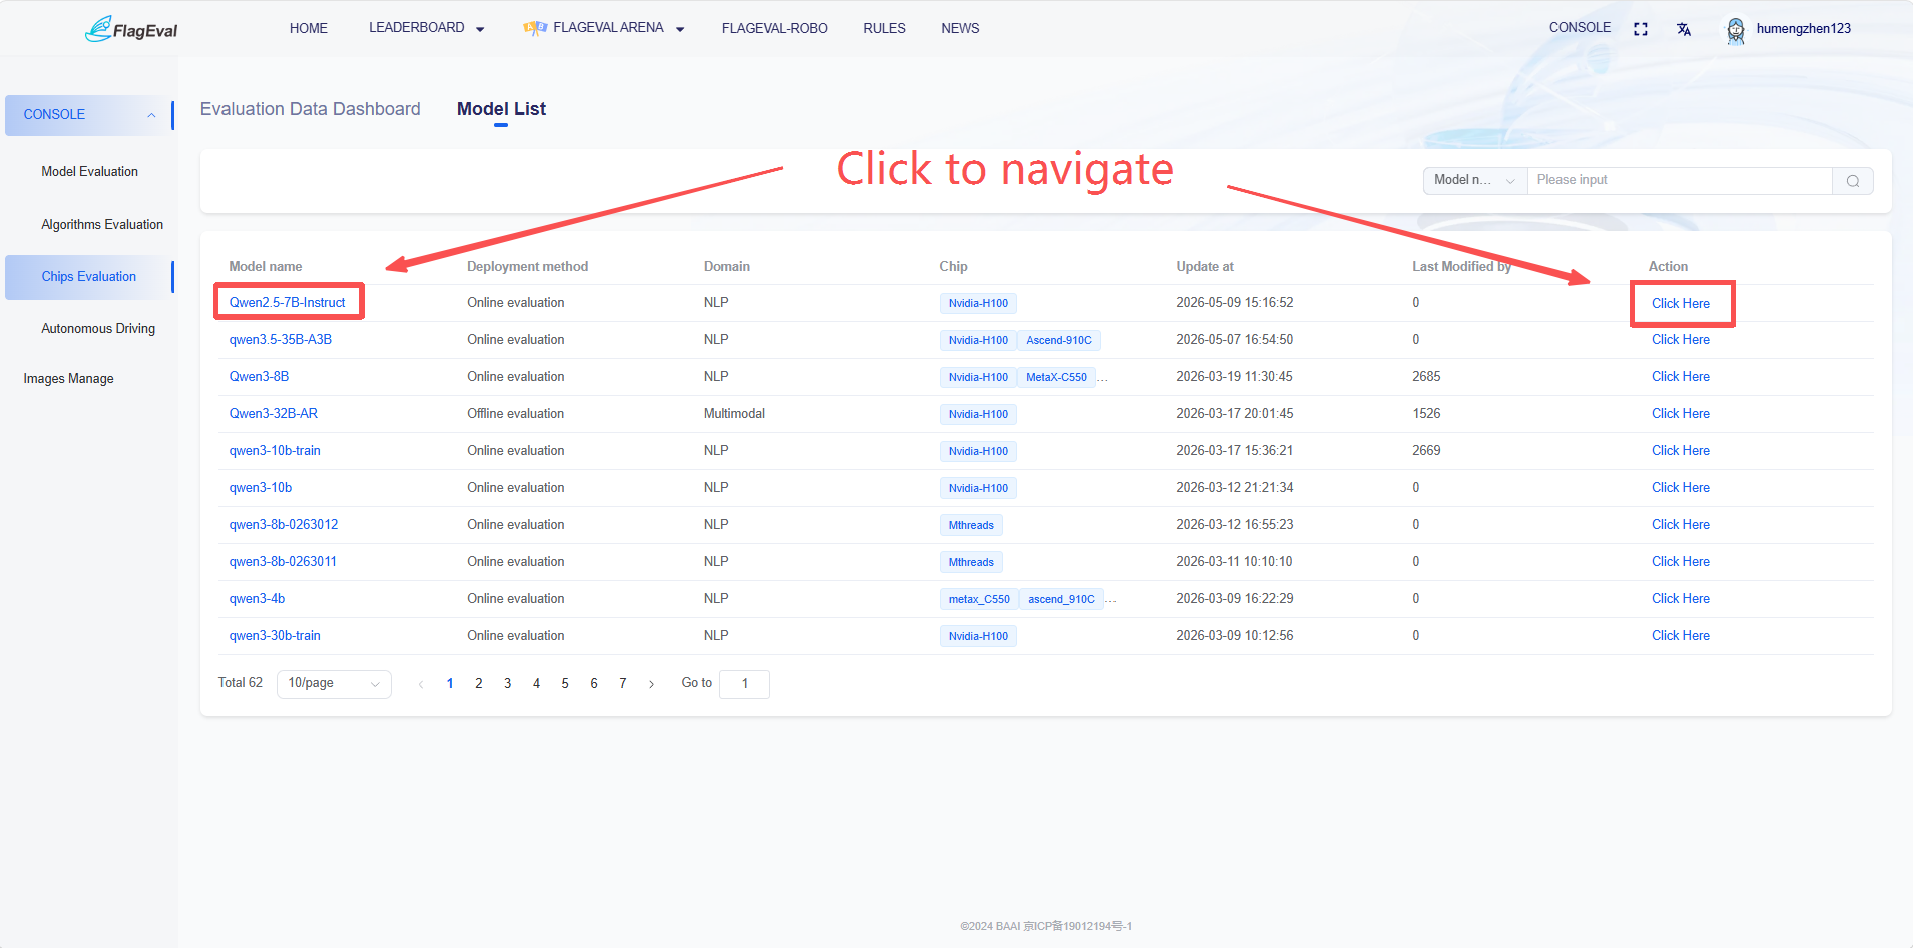
| Operation | Click [Click to View] to redirect to the detailed evaluation records of this model. |
Clicking on a model name in blue text from the "Model List" or clicking "Click to View" in the operation column will redirect to the corresponding details page of that model.
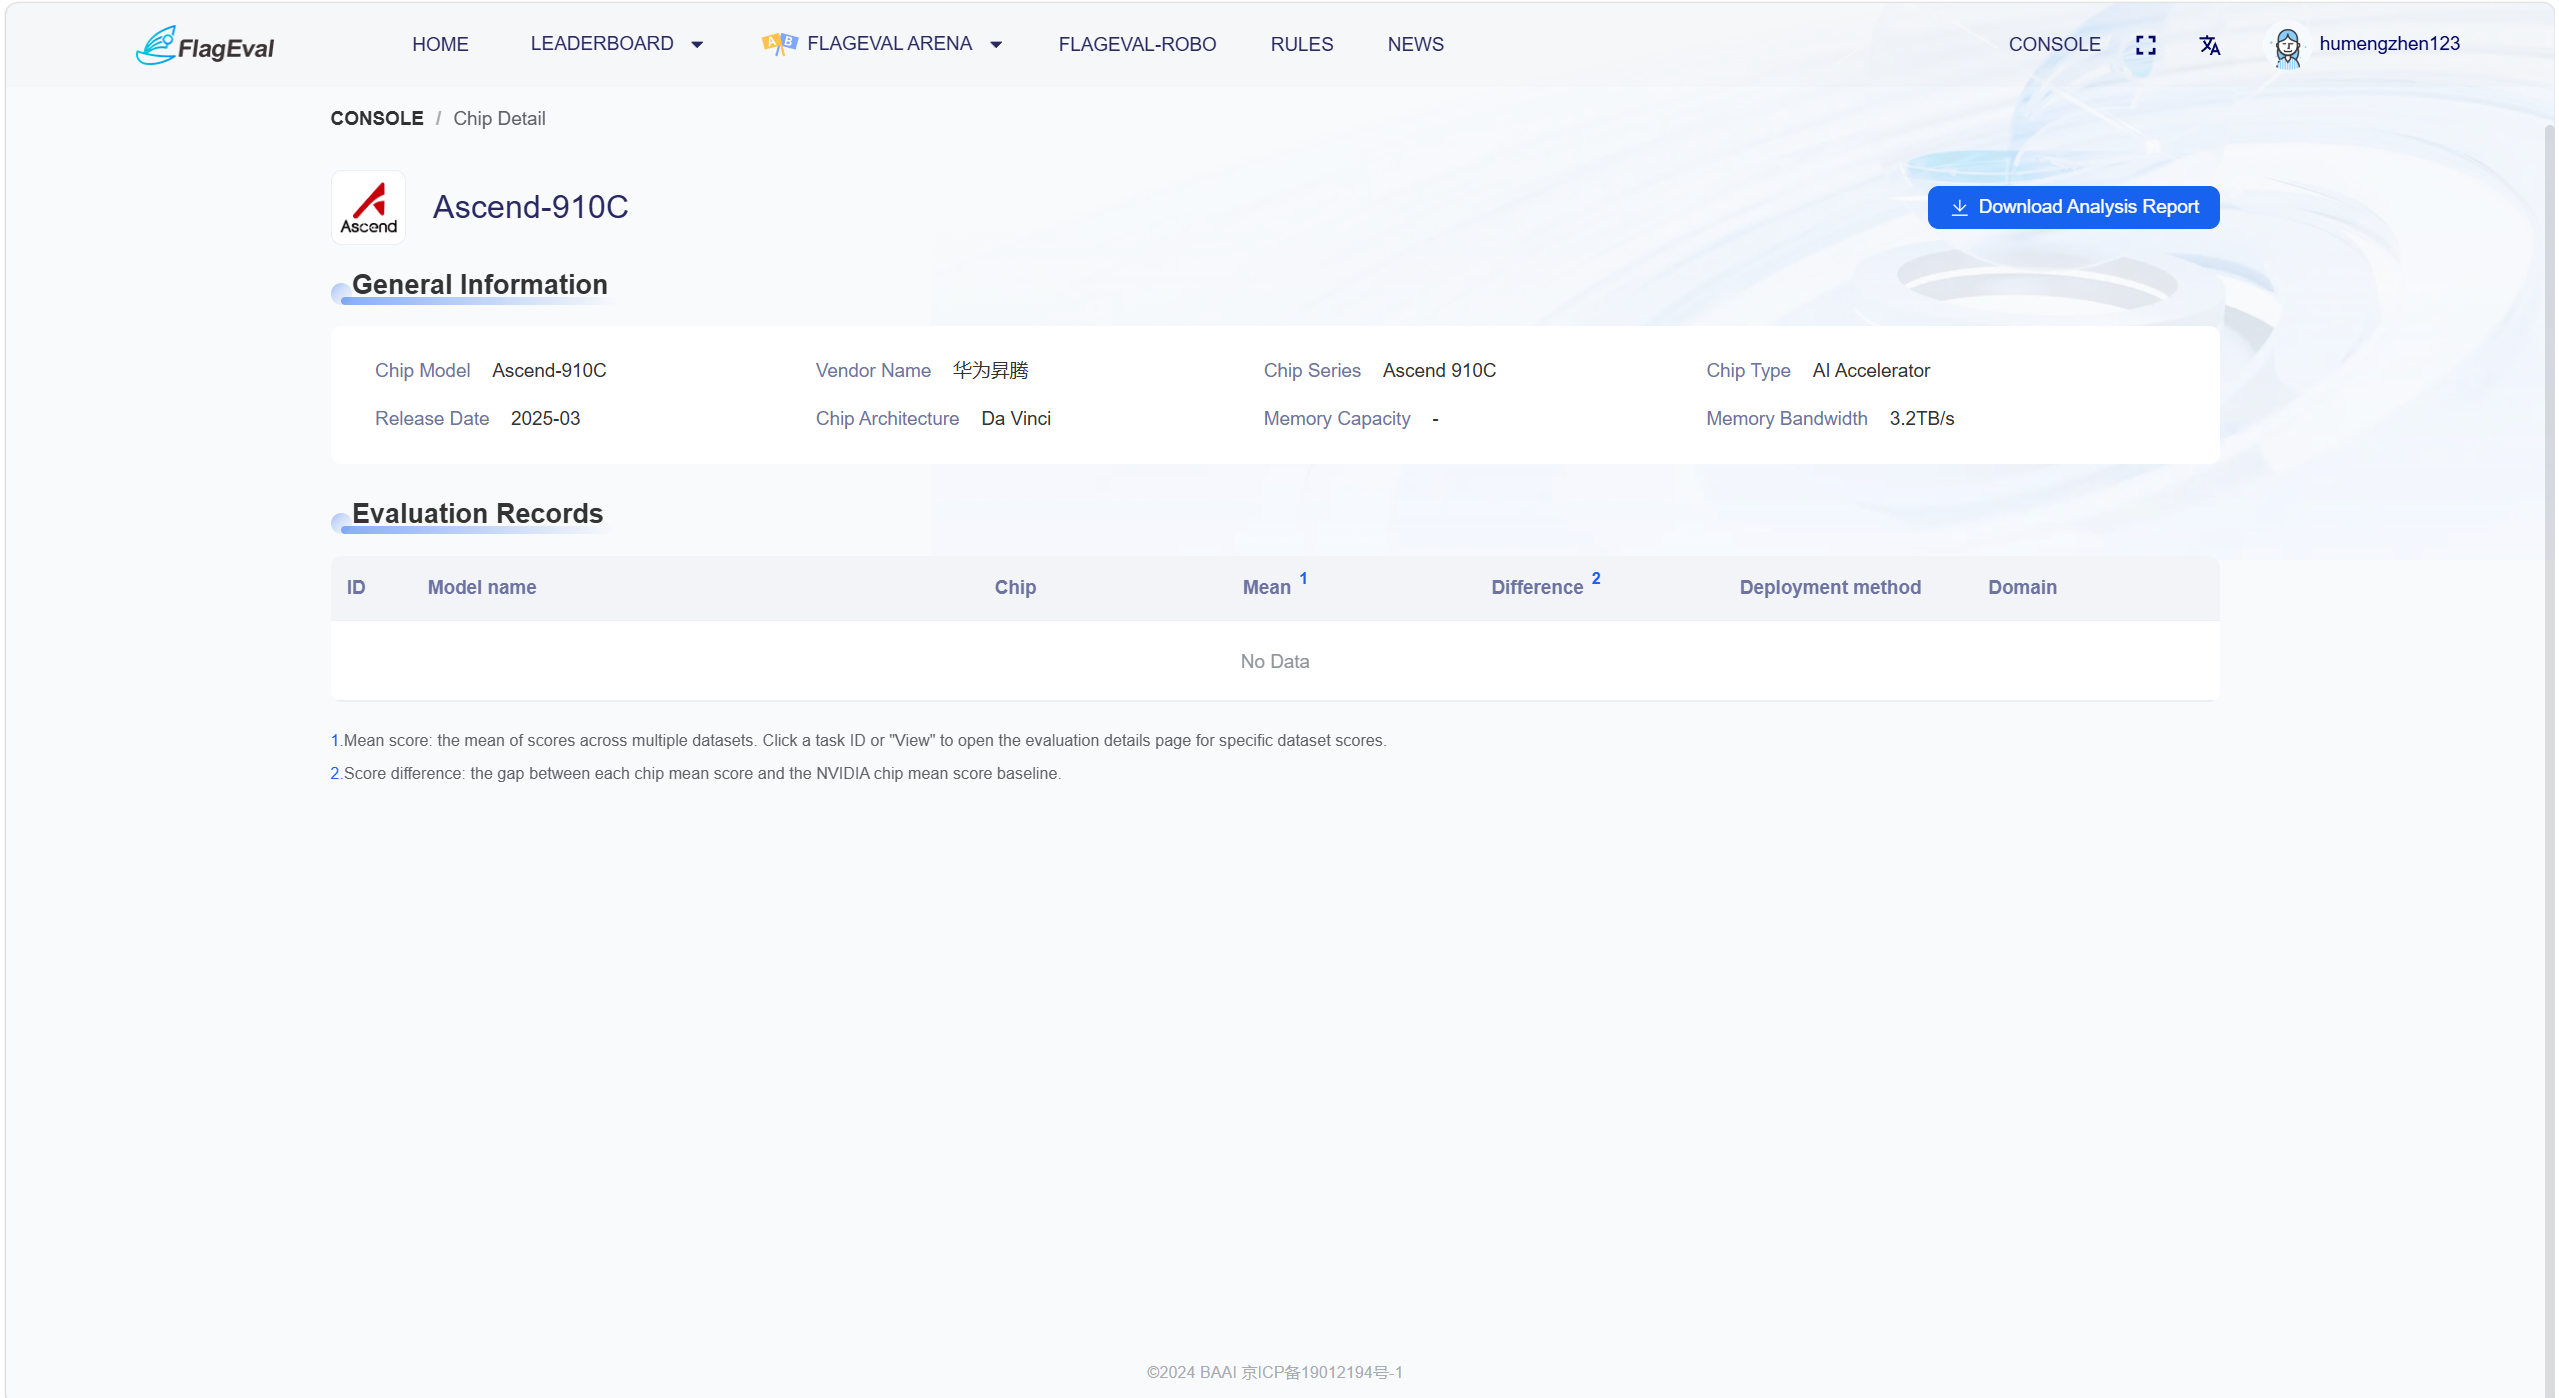
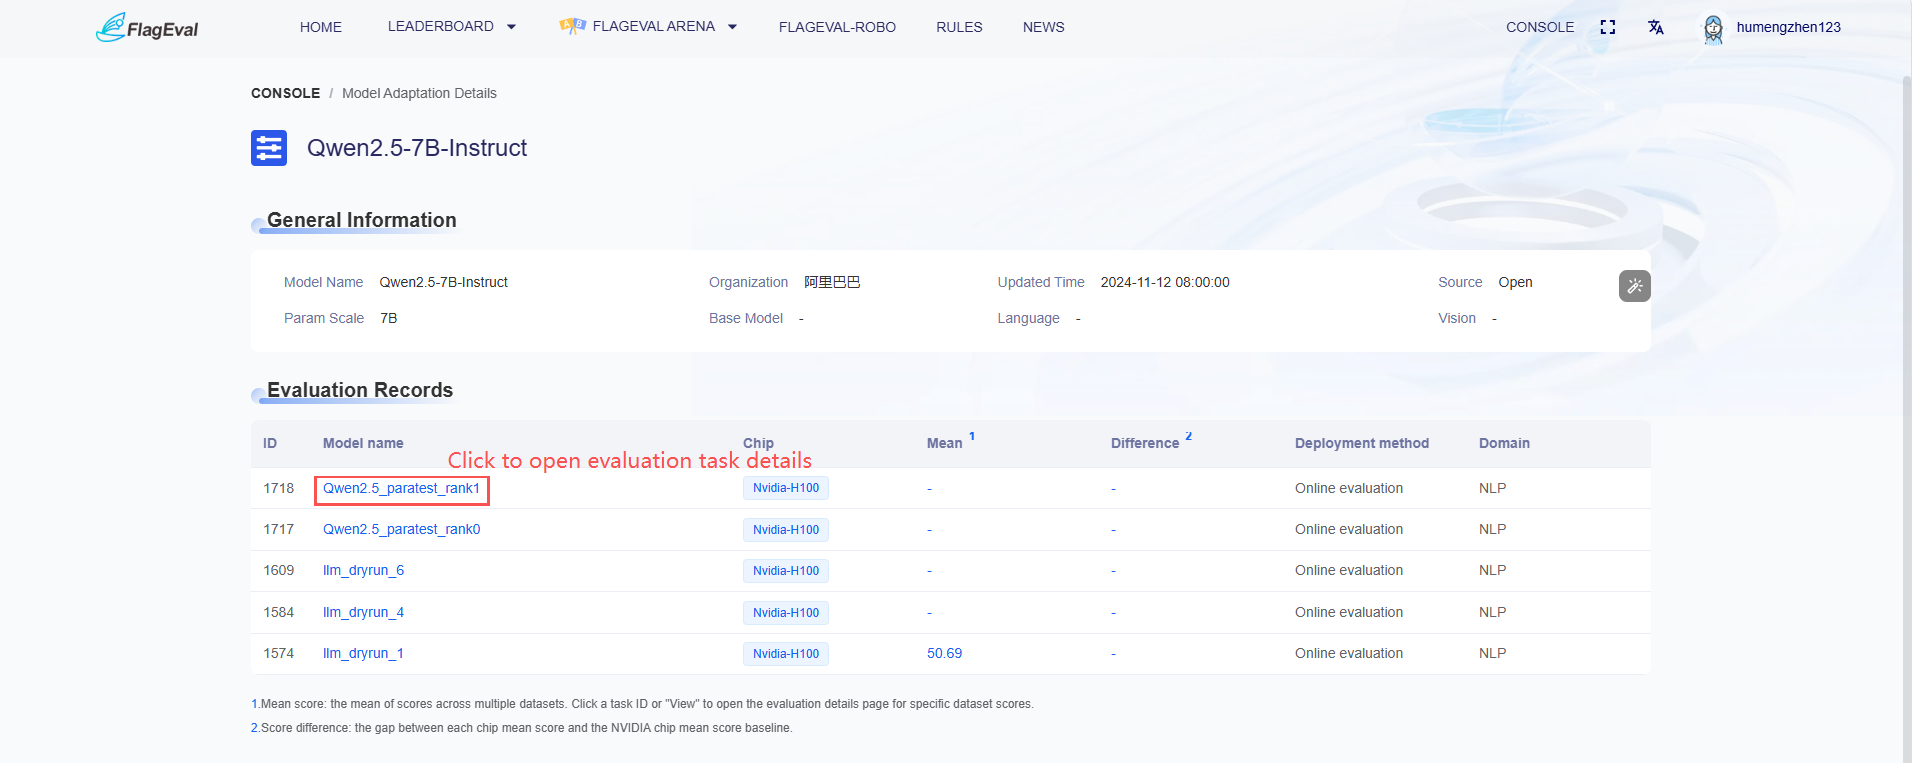
Evaluation Model Details Page
- After entering the model details page, the name of the model is displayed in the upper left corner, followed by the model's basic information and evaluation records below.
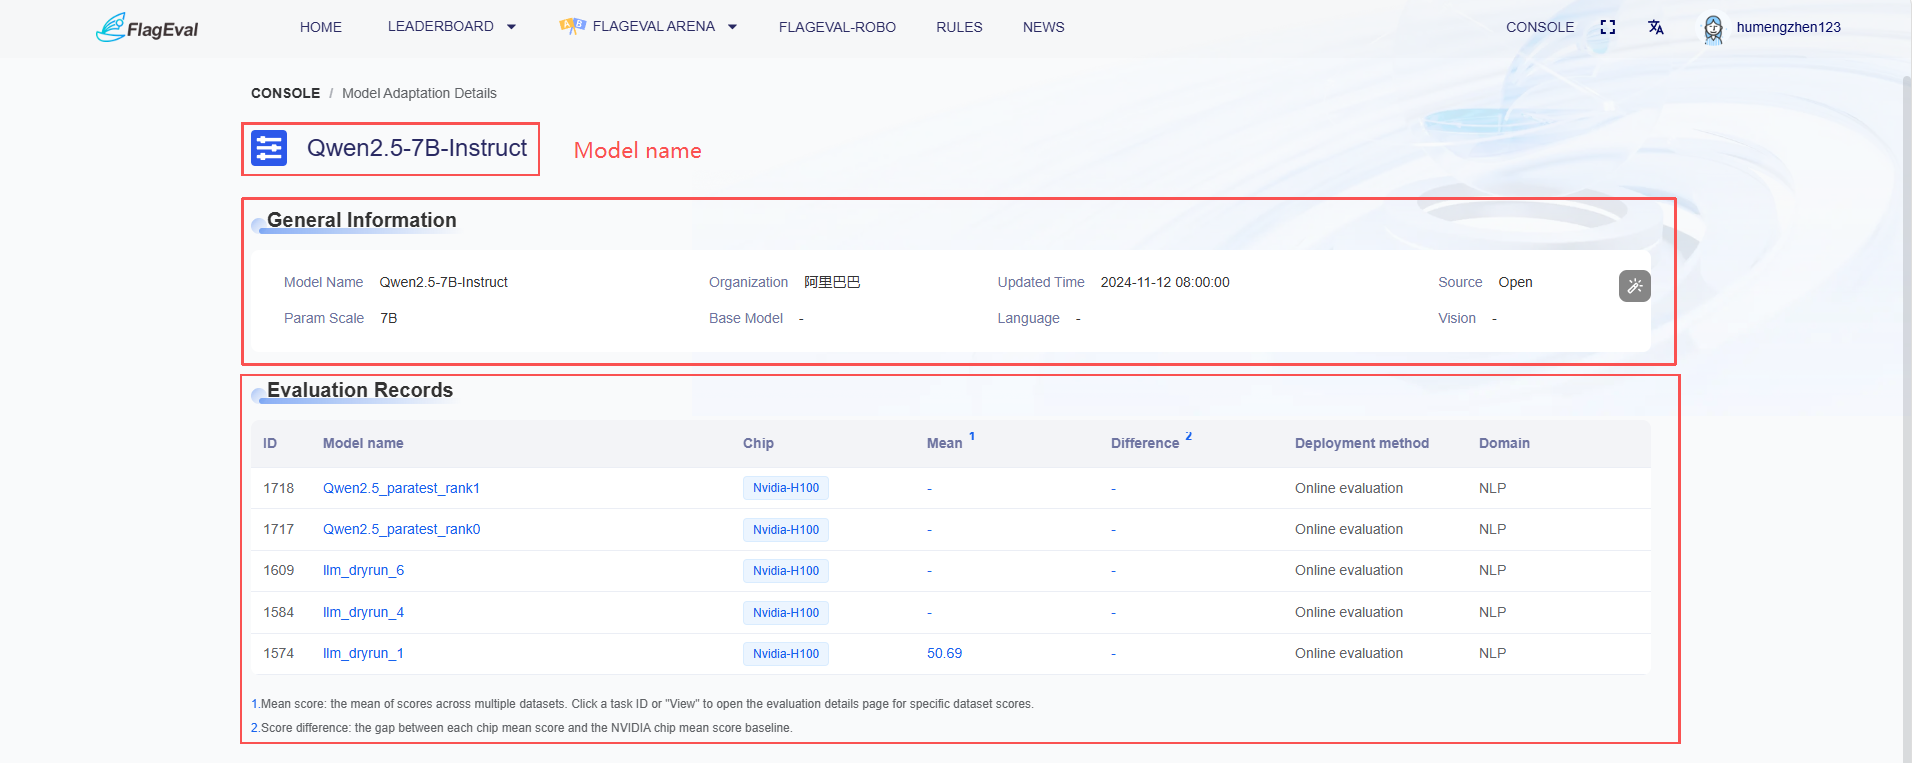
- Basic Model Information: This section lists the basic metadata of the model, making it easy for users to verify the version of the evaluation object. The specific fields are:
| Field Name | Description |
|---|---|
| Model Name | The name of the currently viewed model. |
| Update Time | The time when the model data was last synchronized or updated. |
| Open/Closed Source Type | Clearly indicates whether the model is open-source or closed-source. |
| Other Parameters | Includes configuration information such as parameter scale, base model, language tower, and vision tower. |
- Evaluation Records: Records the evaluation history of the model across different chips. The specific fields are:
| Field Name | Function Description |
|---|---|
| ID | The unique identification number of the evaluation task. |
| Model Name | The specific model version for this evaluation task. |
| Evaluation Chip | The specific chip onto which the model was adapted. |
| Average Score | The average score of the model across multiple test sets on this chip. |
| Score Difference | The difference between the average score of this chip and the average score of the baseline chip. |
| Deployment Method | The deployment type used during the evaluation. |
| Evaluation Domain | The professional domain to which the task belongs. |
- Clicking on a model name in blue text from the "Evaluation Records" list will redirect to the details page of that evaluation task, where specific evaluation results can be viewed.
Viewing Evaluation Results in the NLP Domain
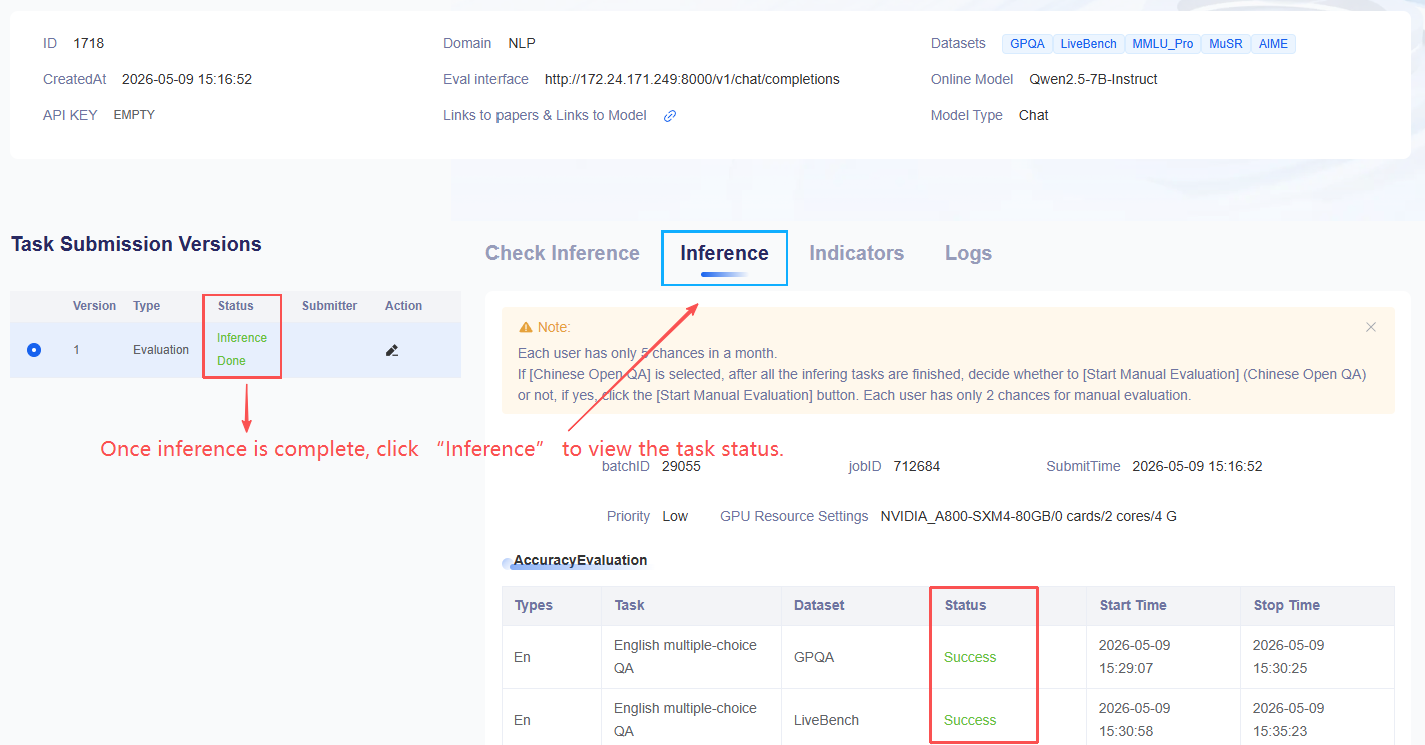
- Once the status of the relevant task shows success, specific results can be viewed under the indicator details.
Viewing Evaluation Results in the Multimodal Domain
- After the evaluation task status displays that inference is completed, click on the inference evaluation details to view the specific results.